How to Train Your Keyboard


If you’re reading this, odds are you work on a computer. You likely use a combination of your mouse and keyboard to interact with your computer throughout the day. But you're probably also aware that most of the apps you use on a daily basis provide keyboard shortcuts to increase the efficiency of routine tasks. You've likely memorized many of the shortcuts of your most used apps and, somewhere during this process, repetition has given way to muscle memory, making these shortcuts feel like second nature.
So, what happens when you try out a new app, and its keyboard shortcuts don’t align with your muscle memory? You could work on memorizing a whole new set of shortcuts, but then you face a cost of switching every time you change apps.
What if you could eliminate that switching cost? What if switching apps, rather than forcing you to learn new shortcuts, instead reinforced your muscle memory for the shortcuts you already know? In short, what if all of your apps felt the same?
We are going to walk through creating a system to bring uniformity to our apps with a single set of keyboard shortcuts. We'll start by learning how to install and configure the required apps, then, later on, I'll introduce the system of keyboard shortcut organization I use every day.
Note for Windows and Linux users: While the principles outlined here are universal, the tools are Mac only. Tools do exist to accomplish the same results on other operating systems. It may require extra research to apply these principles to non-Mac computers.
Customizing Shortcuts
The apps that are easiest to customize explicitly allow users to declare keyboard shortcuts in the settings. Many other apps expose shortcuts through menus that can be overridden at the system level, but this gets tedious if you you have more than a few shortcuts you want to override. And some apps provide keyboard shortcuts without offering any way to override them, or worse, don't even offer keyboard shortcuts at all.
We are going to learn how to train our keyboards to map the key combos you want to use to the key combos the apps on your computer expects.
Command+P Everywhere
As a long time Sublime Text user, I couldn't imagine life without ST's Quick Open Palette, which is triggered with Cmd+P. With this palette, I can trigger this shortcut and just type the name (or partial name) of something I want to open without needing to navigate the interface.
Over time, I've noticed other apps also offer similar quick open palettes. One of these is Slack. However, until a recent update, Slack’s quick open palette, triggered with Cmd+K, had no way to override it in a setting or menu.

As described above, the ideal scenario would be one where I could always use the same keyboard shortcuts to do the same things in all of my apps. So I just need a way of converting the Cmd+P combo I have already memorized into the Cmd+K combo Slack expects. Let's take a look at how we can accomplish this.
Configuring the Required Apps
There are two primary tools, plus a third companion tool, that we will install in order to map our Cmd+P combo to Cmd+K within Slack–and while we're at it, we'll be providing a foundation to build an entire system of custom keyboard shortcut mappings for any app.
The first tool we'll install is Karabiner-Elements. Karabiner is a fast, customizable tool that allows us us to remap the keys on a Mac at the kernel level.
Once Karabiner is installed, we’re going to install Goku, the "companion tool" I mentioned previously. Goku is an abstraction layer that allows you to define your Karabiner configuration in a much more human-friendly format.
Note: Karabiner supports multiple profiles, but as mentioned in the docs, Goku requires a
Defaultprofile in order to generate a Karabiner config so we will need to make sure this profile is present.
The second "primary tool" we need is Hammerspoon, a Mac automation tool we'll use alongside Karabiner-Elements.
Once you have these tools installed and running, the first thing we want to do is add some file watchers for both Karabiner and Hammerspoon. These watchers make their parent applications automatically recompile and reload config files after we make any changes.
First, we'll need to download Hammerspoon's ReloadConfiguration Spoon here and then move it to ~/.hammerspoon/Spoons.
Next, add the following to ~/.hammerspoon/init.lua:
gokuWatcher = hs.pathwatcher.new(os.getenv('HOME') .. '/.config/karabiner.edn/', function ()
    output = hs.execute('/usr/local/bin/goku')
    hs.notify.new({title = 'Karabiner Config', informativeText = output}):send()
end):start()

hs.loadSpoon('ReloadConfiguration')
spoon.ReloadConfiguration:start()
hs.notify.new({title = 'Hammerspoon', informativeText = 'Config loaded'}):send()
This script installs two watchers: one for Goku (to update Karabiner) and one for Hammerspoon. If the files change, they'll be reloaded and the system will display a notification. After we click the Reload Config menu item from the Hammerspoon menu in our Mac’s menu bar to manually recompile Hammerspoon, we can sit back and let these file watchers do their job.
Additional Helpers
Hammerspoon's URL structure can be difficult to write at first, so I've created a utility for building Hammerspoon Hyper key mappings that's inspired by Laravel's route definition structure. You can find the utility, which I'm calling "Hyperspoon", here: Hyperspoon.
To install Hyperspoon, copy the file Hyper.spoon/init.lua to your local machine at ~/.hammerspoon/Spoons/Hyper.spoon/init.lua.
Hyperspoon also includes some helper functions that abstract away some of the more verbose Hammerspoon API syntax. You can install these helpers by downloading the file Helpers.spoon/init.lua from the repo to your local machine at ~/.hammerspoon/Spoons/Helpers.spoon/init.lua.
Mapping CMD-P to Slack
Now let’s get back to our Cmd+P mapping. Let’s add the following to our Karabiner config located at ~/.config/karabiner.edn:
{
  :templates {
   :hyper "open -g hammerspoon://hyper?action=%s\\&target=%s"
  }
  :layers {
    :command {:key :left_command}
  }
  :main [
    {
      :des "Command layer"
      :rules [:command
        [:p [:hyper "open" "default"]]
      ]
    }
  ]
}
This snippet adds three helpful configuration settings:
- The contents of the
:templatessection defines ahypertemplate. This will make it easier for key mappings defined in Karabiner to forward their operatation to Hammerspoon, where the application specific mappings will be handled. "Hyper" is a concept we'll talk about later, but for now just know that this entire system is built around the concept of "hyper" keys. - The contents of the
:layerssection defines that, any time the left command key is held down, Karabiner should enter acommandlayer. In keyboard customization parlance, "layers" are modes that define that all of your keys will now potentially have different behaviors than they normally would. - Finally, the contents of the
mainblock defines an array of layers to respond to. In this case, we're defining the rules for thecommandlayer we defined earlier. We have one rule: when we are in the command layer and press thePkey, Karabiner should trigger thehypertemplate with theactionandtargetquery parameters, which will be handled by Hammerspoon below.
At this point, we've defined in Karabiner that pressing Cmd+P will trigger a Hammerspoon URL. Our next step is to set Hammerspoon up to respond to this URL. Open ~/.hammerspoon/init.lua and add the following:
hs.loadSpoon('Hyper')
hs.loadSpoon('Helpers')

slack = 'com.tinyspeck.slackmacgap'

hyper:app(slack)
    :action('open', {
        default = combo({'cmd'}, 'k'),
    })

hyper:app('fallback')
    :action('open', {
        default = combo({'cmd'}, 'p'),
    })
The above snippet starts by loading Hyperspoon and its helpers, then defines a slack variable and sets it to Slack’s app bundle identifier, which can be found for any app by executing the following shell command: osascript -e 'id of app "Slack"'.
Finally, we define our key combo mappings. We tell Hammerspoon that the app we're sending this to is Slack; the action is "open", the target is "default", and the key combination we're sending to Slack is Cmd+K. Since Cmd+P is a common shortcut for other apps, we also define a fallback app, which will tell Hyperspoon to output a Cmd+P for any apps that have not been configured to override it.
Note: "action" and "target" are simply terms used by convention to define a key combo mapping in the system I'm sharing. We can think of "action" as the verb, or the action we are going to take (e.g. "open", or "copy"), and "target" is the object of that action. If there's no specific target (e.g. "copy this file"), we'll set the target to "default", as in this example.
Once we save this file, we can open Slack's quick open palette by pressing Cmd+P! And, more importantly, we have a foundation on which to build upon for future customizations. Now we can add additional apps and mappings in Hammerspoon for the same key combo already defined in Karabiner.
For example, we can use Cmd+P to open Discord's quick open palette by adding the following to Hammerspoon:
discord = 'com.hnc.Discord'

hyper:app(discord)
    :action('open', {
        default = combo({'cmd'}, 'k'),
    })
Providing Missing Quick Open Palettes
Ideally all apps would have a quick open palette, but we can bridge the gap for those that don’t by making pseudo quick open palettes with Alfred. Alfred is a Mac automation tool that provides a globally accessible palette that can be used to launch apps, open files, and run automations. I like to think of Alfred as a quick open palette for my whole computer. For apps missing quick open palettes, rather than outputting a key combo, we can trigger an Alfred workflow to get the behavior we want!
I use Bear App extensively. Unfortunately, it doesn't have a quick open palette, so I currently use an Alfred workflow named Alfred-Bear to act as a proxy quick open palette. I'd love to be able to press Cmd+P in Bear and have it trigger this workflow, and with a quick modification to the workflow to add an external trigger that can be called from Hammerspoon, I can! Now it feels like Bear has a native quick open palette built right in! To make this sort of process easier for us, Hyperspoon provides an alfredWorkflow helper method that accepts an Alfred workflow bundle ID and an external script trigger identifier.
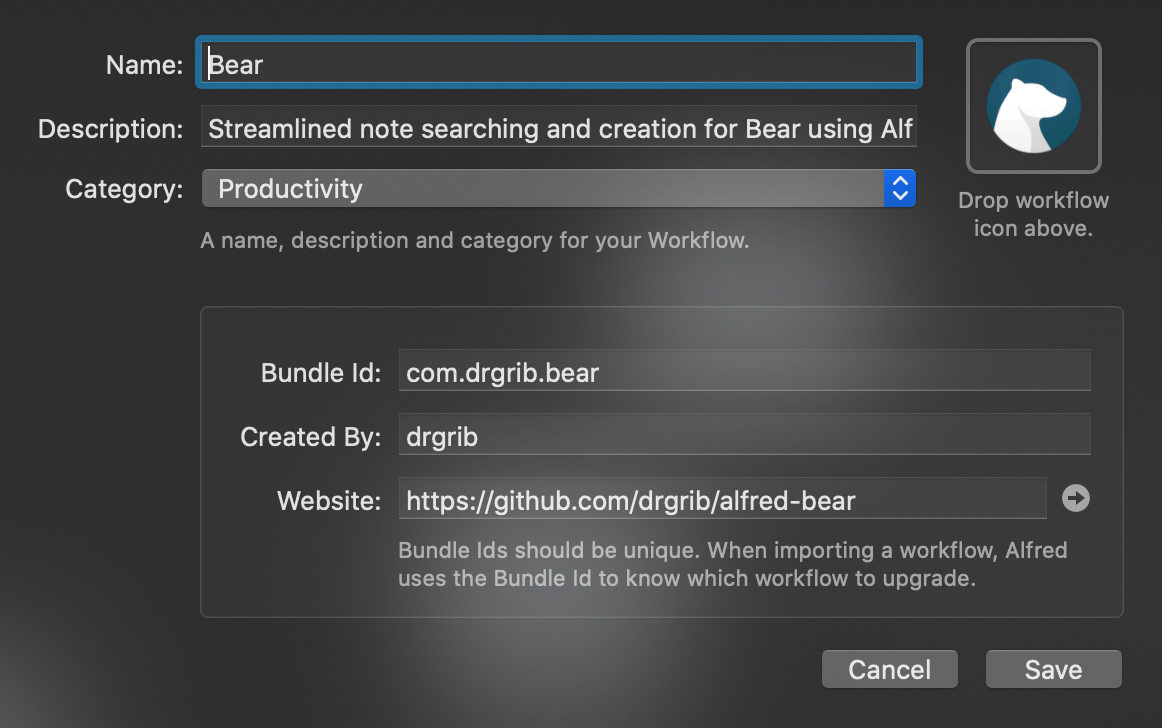
Once the Alfred-Bear workflow is installed, the bundle ID (com.drgrib.bear) can be found by opening Alfred preferences, navigating to the Workflows tab and double clicking on the Bear workflow.
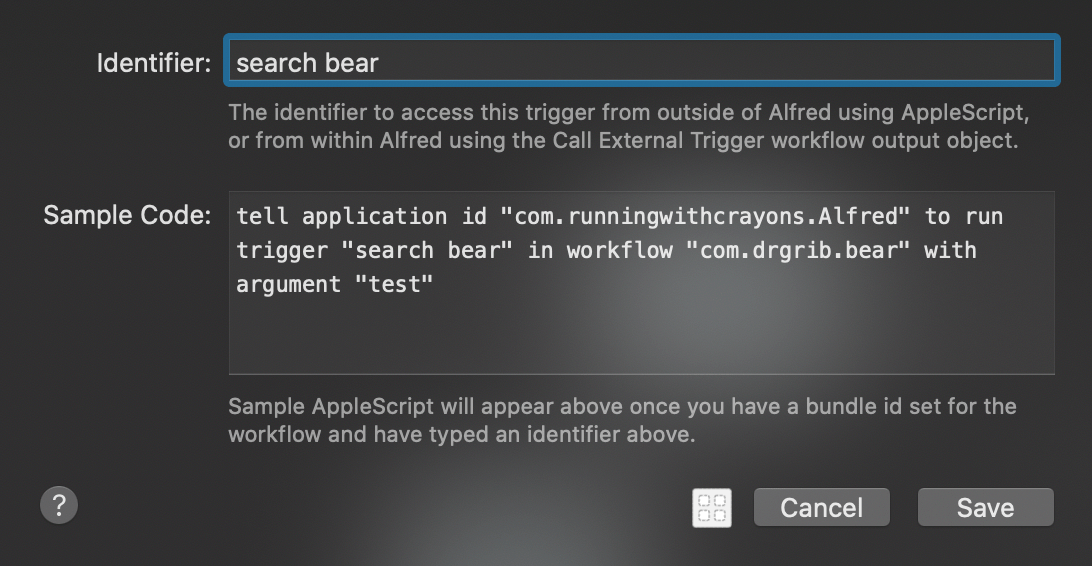
An external trigger can be added to the workflow by right clicking in the contents of the workflow and selecting Triggers > External. The text entered in the Identifer field (search bear in the screenshot below) will be passed to the alfredWorkflow function as the second parameter. The Sample Code field may be ignored since the alfredWorkflow function will take care of triggering the workflow.
Note: While Alfred is a free app, the Workflows feature is part of a paid addon called "Powerpack".
Adding the following to our Hammerspoon mappings will allow us to use Cmd+P from within Bear to perform a quick open with Alfred.
bear = 'net.shinyfrog.bear'

hyper:app(bear)
    :action('open', {
        default = alfredWorkflow('com.drgrib.bear', 'search bear'),
    })

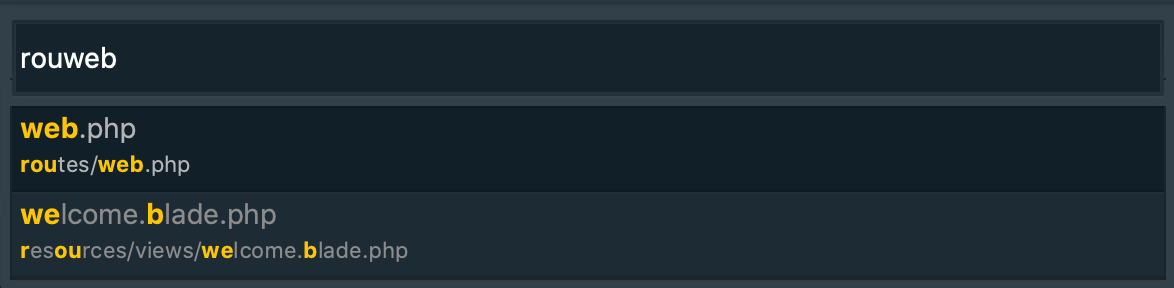
We can also make use of built in Alfred features to create these pseudo quick open palettes in other apps. We can map Cmd+P to a file search when in Finder and a bookmark search when in the browser by using Hyperspoon’s alfredSearch helper. I never used browser bookmarks much before, but now because they're so easy to use with Alfred, I use them every day.
chrome = 'com.google.Chrome'
finder = 'com.apple.finder'

hyper:app(chrome)
    :action('open', {
        default = alfredSearch('bm'),
    })

hyper:app(finder)
    :action('open', {
        default = alfredSearch('open'),
    })
There are also apps that might not have a quick open palette but have some type of an open menu that would provide a similar feeling function. For example, if you don’t use browser bookmarks, you could always map Cmd+P to Cmd+L in order to open a specific url or perform a search. In GitHub Desktop, Cmd+P can be mapped to Cmd+T to quickly switch to a different repository.
These are just a few examples of how to create uniformity with a single key combo (Cmd+P) by defining application specific mappings. For many, not having to switch back and forth between Cmd+P and Cmd+K is already a game changer.
The remainder of this post will present an opinionated system for mapping a limited set of keyboard shortcuts to application commands. However, this system is intentionally customizable. Uniformity is helpful, but it's also vital to map our shortcuts to how we naturally think.
Hyper Key
You've already seen the term "hyper" mentioned above. Now it's time to dig into what it means.
A good keyboard shortcut system should be both intuitive and ergonomic. Let's make a modification to our Cmd+P shortcut to something that achieves both.
On most keyboards the command key, pressed with the left thumb, requires lifting and tilting the left hand just enough to pull our fingers slightly off the home row keys. Any shortcuts which require the control or option keys pull our hand even farther out of typing position. For this reason, we’re going to explore abandoning these conventional modifier keys and define a hyper key.
Traditionally, a hyper key is a single key that is remapped to trigger a complex set of key modifiers like Cmd+Opt+Ctrl+Shift. The reason for this is it is unlikely that a keyboard shortcut using these modifiers is in use anywhere else on our computer so we avoid conflicts when creating custom keyboard shortcuts.
A common hyper key is the caps lock key. Conveniently located just to the left of the A key, the caps lock key is positioned for a shorter reach than any other conventional modifier—even the command key. The benefits of using caps lock as a hyper key also tend to outweigh the cost of losing caps lock functionality (more on that later).
In our case, rather than mapping this hyper key to trigger a suite of modifier keys, we will simply define it in our Karabiner config when calling our Hammerspoon quick open mapping. As we’re aiming for both ergonomic and intuitive, let’s redefine our quick open functionality to use the O key instead of the P key in order to aid our muscle memory by associating the O key with opening things.
While we’re redefining the caps lock key in order to minimize reach, we can also define it to trigger an escape when hit alone instead of as a modifier. This eliminates both the far reach to the escape key as well as a common frustration with the Touch Bar.
We’ll start by updating our Karabiner layer to use caps lock instead of command and rename the layer to default since the caps lock key will be the cornerstone of our key mapping system.
:layers {
   :default {:key :caps_lock :alone {:key :escape}}
 }
Next we just need to rename our layer's reference in the main block.
:main [
    {
      :des "Default layer"
      :rules [:default
        [:o [:hyper "open" "default"]]
      ]
    }
 ]
Since we aren’t making any changes to the Hammerspoon URL, we can just hit save and once Karabiner is re-compiled, we can trigger the shortcuts we defined above with Caps+O!
Now we have a starting point for using the caps lock key as our primary modifier while the O key takes on an abstract meaning of open. The specifics of what it means to open something is defined on a per app basis in Hammerspoon.
Additional Actions
Up until this point, we've only defined a single action: "open". However, there are plenty of other actions we may want to unify across our apps. Let's take a look at a few other actions we can define.
Navigation
One of the more common daily computer interactions is navigating forward and backward in our browsers and other apps. We can take a cue from Vim’s HJKL directional keys here. If we think of moving left as navigating backward and moving right as navigating forward we can map Caps+H to navigate back and Caps+L to navigate forward.
// Add this to Karabiner's default layer rules
[:h [:hyper "navigate" "back"]]
[:j [:hyper "navigate" "down"]]
[:k [:hyper "navigate" "up"]]
[:l [:hyper "navigate" "forward"]]
-- Add this to hammerspoon's Chrome mappings
hyper:app(chrome)
    :action('navigate', {
        back = combo({'cmd'}, '['),
        forward = combo({'cmd'}, ']'),
    })
But browsers aren’t the only apps that support navigating forward and backwards. We can map these same shortcuts in Bear, Finder, and Slack.
hyper:app(bear)
    :action('navigate', {
        back = combo({'cmd', 'option'}, 'left'),
        forward = combo({'cmd', 'option'}, 'right'),
    })

hyper:app(finder)
    :action('navigate', {
        back = combo({'cmd'}, '['),
        forward = combo({'cmd'}, ']'),
    })

hyper:app(slack)
    :action('navigate', {
        back = combo({'cmd'}, '['),
        forward = combo({'cmd'}, ']'),
    })
Now when we’re catching up on a Slack channel and get a DM, we can trigger Caps+O, read and reply to the DM, hit Caps+H and continue reading where we left off.
Now let’s reach for a bit more of an abstract navigational definition. What does it mean to navigate forward and backward in a text editor? I have Caps+L mapped to go forward to a function definition and Caps+H mapped to go back to the previous location. With this usage, Caps+L differs from our other uses of jumping forward through our navigation history but on an abstract level, it feels the same. Whether I am navigating through channels in Slack or jumping to and from function definitions in my editor, I feel as though I am performing the same interaction. We will explore this idea of abstract definitions further shortly.
Another piece of UI that I navigate frequently is a set of tabs in an app. Tabs are typically aligned side by side so we might consider that this would have been a good use of Caps+H and Caps+L to navigate left and right through our tabs. We have already defined these key combos above, so if we imagine our tabs not as left and right but more of a stack, it might feel natural to use Caps+J to move down through tabs and Caps+K to move up. We can accomplish this by adding the following to our Hammerspoon mappings for any apps that support navigating through tabs:
:action('navigate', {
    up = combo({'cmd', 'shift'}, ']'),
    down = combo({'cmd', 'shift'}, '['),
})
Copy / Paste
The Cmd+C and Cmd+V shortcuts for copy and paste aren't well loved based on their ergonomic inconvenience. We can take another cue from Vim here and think of the Y key as copy (yank in Vim) and the P key as paste. With these two keys positioned on the right side of the keyboard, they are convenient targets to use along with our caps lock hyper key. We can update the default layer definition inside our Karabiner config with the following in order to copy with Caps+Y and paste with Caps+P:
[:p [:hyper "paste" "default"]]
[:y [:hyper "copy" "default"]]
Next we'll need to the following config to our fallback app:
hyper:app('fallback')
    :action('copy', {
        default = combo({'cmd'}, 'c'),
    })
    :action('past', {
        default = combo({'cmd'}, 'v'),
    })
Now let’s push this copy abstraction forward a bit more. Copying something requires selecting the thing you wish to copy. Triggering a copy command has no effect if there is nothing selected in the first place, which feels like a missed opportunity for such a convenient key combo. Let’s work on supercharging this Caps+Y shortcut to be more context aware.
As we set up our copy mappings we want to ensure if something is selected, the selection will still land in our clipboard. In order to maintain this default behavior, the Helpers spoon provides a simple copy function that checks to see if there is a selection before running a custom mapping. We can wrap our app-specific mappings in this helper to continue copying anything that is selected.
If nothing is selected and we trigger this shortcut, what should happen? What would we expect to be copied?
If we are in a browser, we might expect the current URL to enter our clipboard. This can be accomplished by installing the Vimium plugin and adding the following Hammerspoon mapping:
hyper:app(chrome)
    :action('copy', {
        default = copy(keys('yy')),
    })
If we are in an editor, we might wish to copy the path to the current file.
hyper:app(vscode)
    :action('copy', {
        default = copy(combo({'cmd', 'option', 'control'}, 'y')),
    })
If we are in Bear, we might expect to copy a link to the current note.
hyper:app(bear)
    :action('copy', {
        default = copy(combo({'cmd', 'option', 'shift'}, 'l')),
    })
Insert
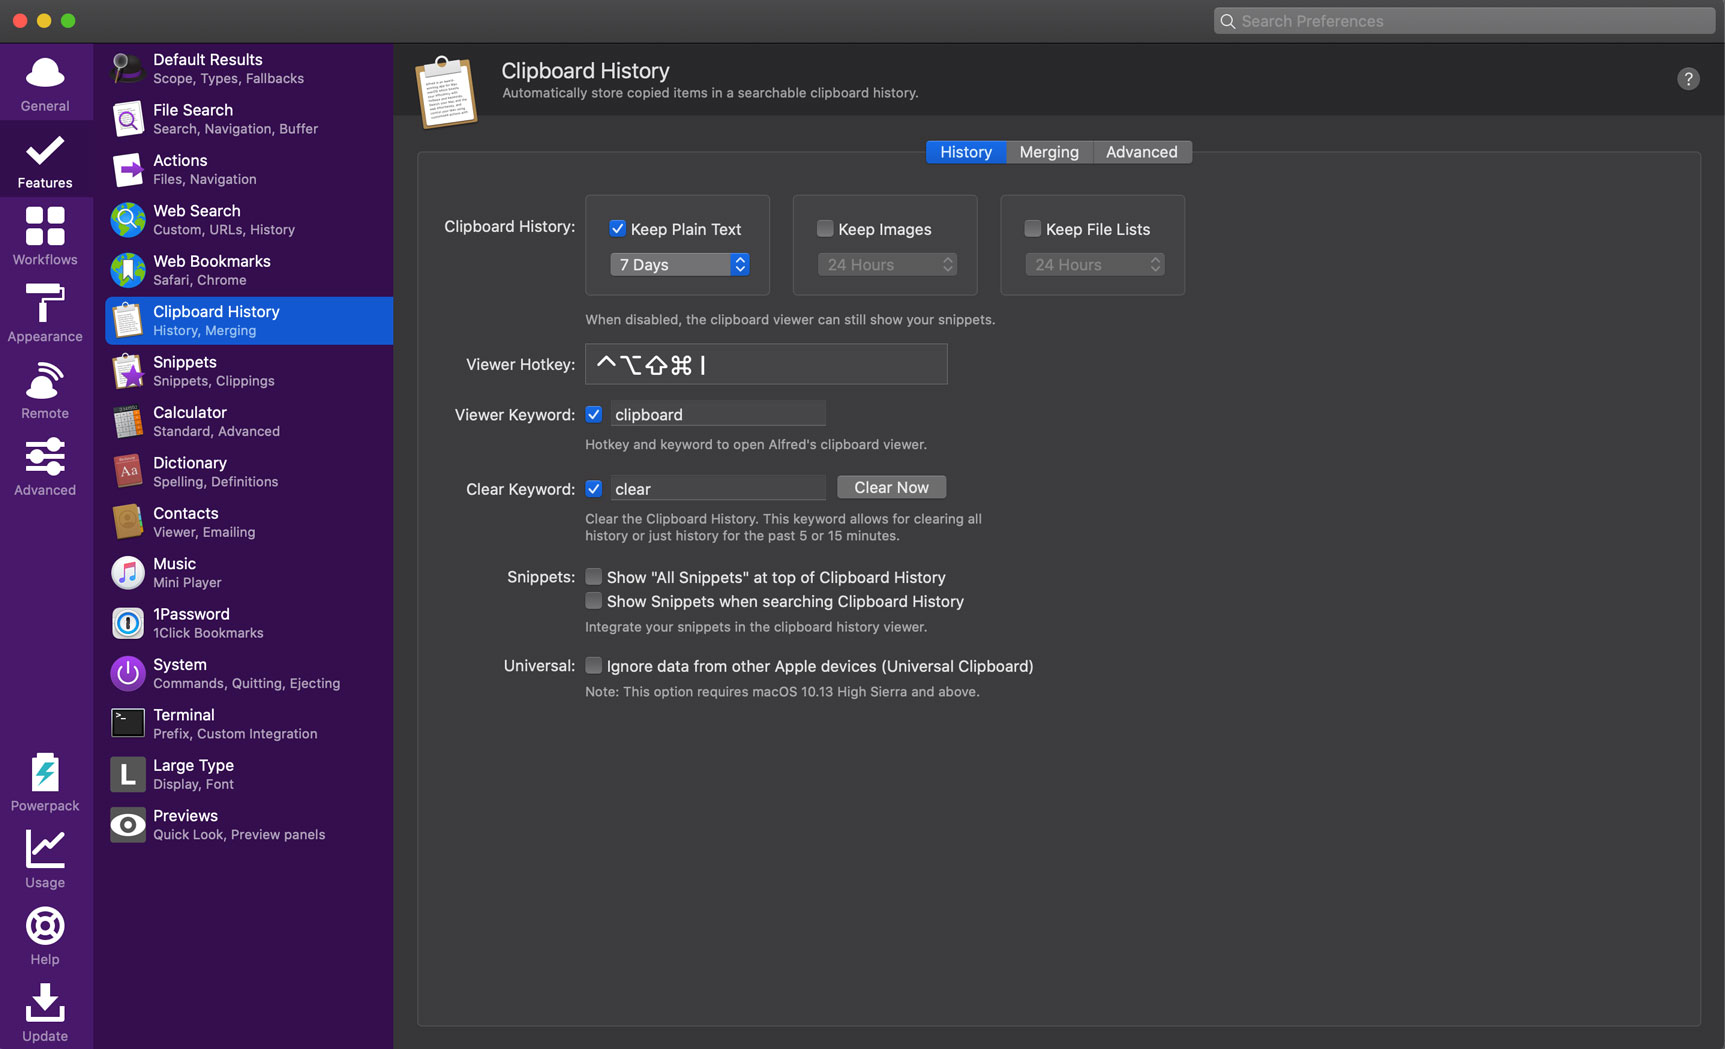
While we’re creating clipboard-related shortcuts, let’s add another action so we can open up our favorite clipboard manager. Clipboard managers keep a history of anything we've copied so we can paste them later. I use Alfred's clipboard manager, which can be triggered globally, so this falls outside of our app-specific mappings but is still useful enough to merit a shortcut. We'll set a global trigger of Caps+I by adding this line to the default layer in our Karabiner config:
[:i [:hyper "insert" "default"]]
Then we'll have Hammerspoon respond to the shortcut by adding the following to our fallback app definition:
:action('insert', {
    default = combo({'cmd', 'shift', 'option', 'control'}, 'i'), -- Alfred clipboard
})
Once the above has been added, we'll open Alfred’s clipboard history settings and register this key combination as its binding.
Execute
Some apps, like Sublime Text, not only provide a quick open palette for opening things, but also a command palette for executing commands. In Vim, the period key executes the most recent command so I naturally gravitate toward treating period as an execute hyper key. The following instructions will map Caps+. to Sublime’s command palette.
First we’ll add the following to our Karabiner config default layer definition:
[:period [:hyper "execute" "default"]]
Now we can add the following to our Hammerspoon config:
hyper:app(sublime)
    :action('execute', {
        default = combo({'cmd', 'shift'}, 'p'),
    })
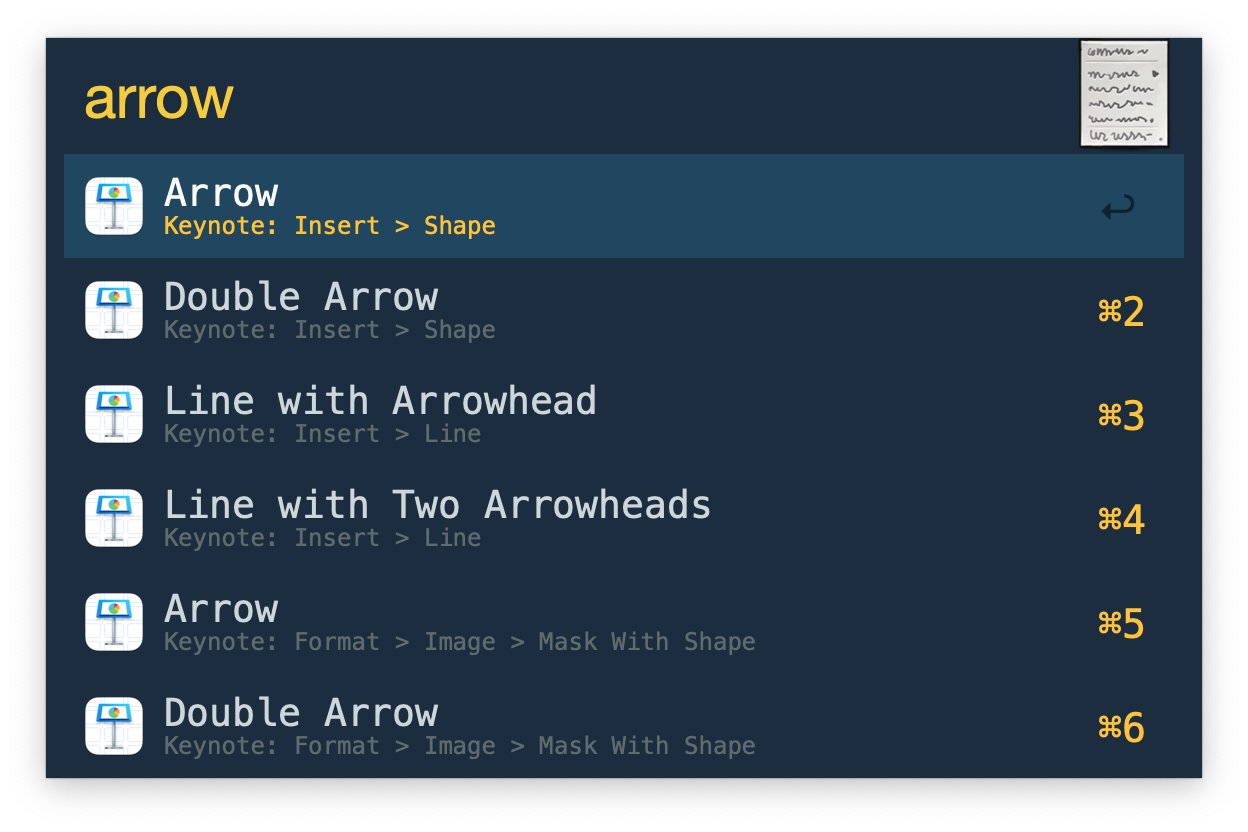
But what about apps that don’t provide a command palette? Remember, we want all of our apps to feel the same, so ideally we want to be able to trigger Caps+. in any app, type in the command we want to execute, and hit enter to run it. Thankfully there is a wonderful Alfred workflow called Menu Bar Search that supports filtering through all of the menu bar options of the front most app and then executing the selected option.
For example, let's say you're working in Keynote and want to add an arrow to a slide. You haven't set up a keyboard shortcut for this but you know it's somewhere in the Insert menu. Instead of clicking the menu to find it, you can just trigger this workflow, type arrow and select the option you want to insert.
We can add an external trigger to this workflow and trigger it as a fallback for Caps+. for any apps that don’t have a mapping defined.
hyper:app('fallback')
    :action('execute', {
        default = alfredWorkflow('com.tedwise.menubarsearch', 'menubarsearch'),
    })
Open Alfred
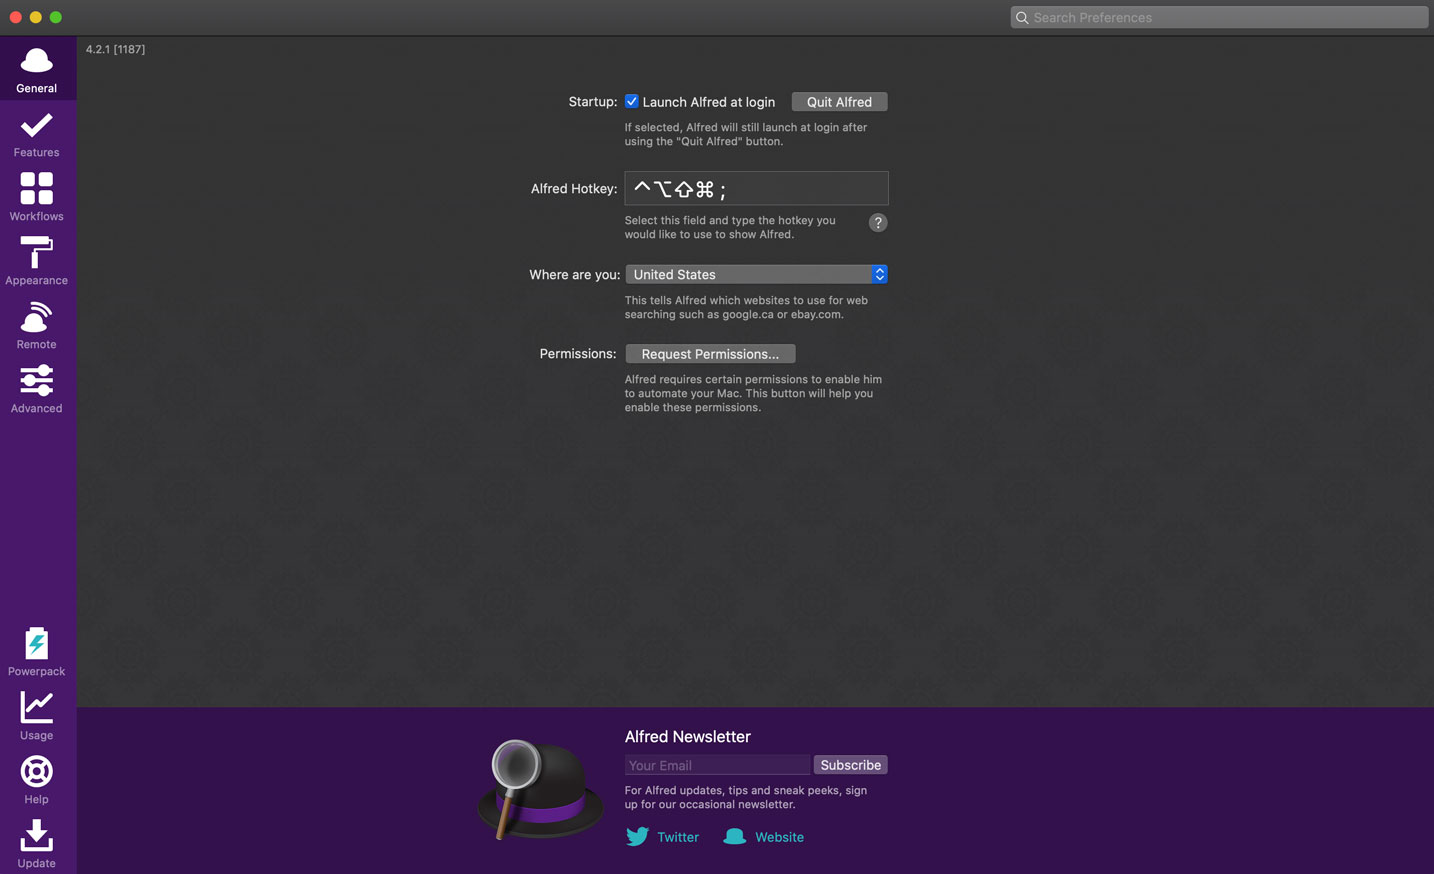
While we’re working with Alfred, let’s wire up our global Alfred trigger with our caps lock hyper key. As mentioned before, I think of Alfred as a command palette for my whole computer, so I want very easy access for triggering it. Since we’ve been setting things up to build muscle memory in our left pinky finger when reaching for the caps lock key, let’s use our right pinky finger for Alfred. I like to use the semicolon. The following default layer Karabiner config will map Caps+; to trigger Alfred globally:
[:semicolon [:hyper "open" "alfred"]]
Then in our fallback app in Hammerspoon:
:action('open', {
    alfred = combo({'cmd', 'shift', 'option', 'control'}, ';'),
})
Open Alfred's general settings and set the Alfred Hotkey to this key combo:
Hyper all the things
By now, hopefully you are growing accustomed to the idea of using the caps lock key as a key modifier in place of the conventional modifier keys. But why stop here? We have plenty of other keys within easy reach that we can also use as hyper keys for more intuitive key combos. The difference, of course, is that, unlike caps lock, most of the other keys actually output a character when pressed. So if we want to use the semicolon, for example, as a hyper key, we need to prevent it from actually outputting a semicolon while we’re using it as a modifier. We can accomplish this by defining these hyper keys in Karabiner as simlayers.
:simlayers {
    :general {:key :semicolon}
}
Now that we are using the semicolon key both as a modifier as well as outputting a semicolon, we need to configure our simlayer to account for our natural typing speed. By default, Goku will set a simlayer-threshold value to 500, which means simlayer keys will be used as a modifier when the second key is pressed within 500 milliseconds of the modifier. If the pressed simlayer key is either released prior to a second key press or held down for more than 500 milliseconds, a normal keypress will result. The number of milliseconds can be overridden by adding the following to the top level of the Karabiner config:
:simlayer-threshold 150
The simlayer-threshold value you choose will require some trial and error to get it just right, based on your own typing speed as well as your typical key combo speed. If the threshold is too high and you trigger your key combos quickly, you’re likely to output ;s rather than the intended ;+S combo. I personally find that a threshold of 150 tends to be a sweet spot between the two but you should find what works best for you.
One caveat here is that using simlayer keys does result in a slight delay of outputting the key value when typing. For lower thresholds, this is unlikely to be noticeable but it may help to primarily use keys that are both within easy reach and not used in the middle of words to avoid noticeable delays in typing. My favorite simlayer keys are: ; " , . /.
General Actions
With that out of the way, let’s finish setting up semicolon as our first simlayer hyper key. I like to group related functionality under a single hyper key, so since we’re using Caps+; as a global Alfred trigger, it feels ergonomically natural to me to use semicolon as a hyper key for general functions like save or close window. As a result, we'll call the semicolon-triggered simlayer "general".
The following will map ;+S to Cmd+S in all apps. This may feel jarring at first but I think for many, saving a document without reaching for keys outside of the home row will quickly replace any muscle memory associated with the movement required to reach for Cmd+S.
Karabiner:
{
  :des "General layer"
  :rules [:general
    [:s [:hyper "general" "save"]]
  ]
}
Hammerspoon:
hyper:app('fallback')
    :action('general', {
        save = combo({'cmd'}, 's'),
    })
Below are a few other general mappings I use with the semicolon hyper key:
;+W->Cmd+W(close window);+T->Cmd+T(open tab);+Q->Cmd+Q(quit current app);+R->Cmd+R(refresh window)
Creating a System
Over time as we build up a collection of hyper key mappings things can get very chaotic very fast, unless there's a system organizing them.
My personal system, as you've already seen, is centered around "actions", each of which are enabled by a hyper key. For example, earlier we reviewed the Caps+. combo; caps lock triggers the "default" action and then . provides us with a palette where we can type to search for a command we want execute.
We can extend the "execute" action mentioned above by defining an execute layer, which is enabled by pressing and holding . as a simlayer hyper key. I use it to make shortcuts for actions that could be triggered from a command palette, but which I run so often I'd like to just give them their own shortcut.
Below are examples of mappings I use in Sublime Text related to running tests:
.+A-> run all tests.+F-> run tests in the current file.+R-> rerun the previous test.+T-> run the nearest test
Remember, since these mappings are defined as a part of our system, we can still take advantage of the same combos in other apps by thinking through what executing a command means in any given app. Below are some examples where I reuse a few of these same execute action combos.
.+F-> fetch the current branch in Sublime Merge.+R-> send a request in Postman.+T-> react with the:tada:emoji in Slack
The following is a list of the additional keys I use as hyper keys along with the actions they represent:
| Key | Action |
|---|---|
| a | append |
| c | change |
| i | insert |
| m | make |
| o | open |
| r | relocate |
| x | debug |
| y | copy |
| caps lock | default |
| comma | launch |
| period | execute |
| semicolon | general |
| spacebar | toggle |
If you are willing to look through an abstract lens and use a bit of creativity, you can map these actions to any shortcut in any app.
Just as we pondered earlier what copying means in various apps, we can repeat this same thought process in other apps. The make action may have obvious uses in a text editor but in other apps it can be used to make folders, projects, or calendar events. The toggle action can toggle application states like commented code or sidebar visibility, while the relocate action can move things around the screen. The insert action can be used to expand snippets in our text editor as well as providing easy access to commonly used emojis while conversing in Slack. All along, we are reinforcing our muscle memory while avoiding the cost of switching app contexts.
Launching Apps
Speaking of switching app contexts, we of course want launching apps to be just as painless as triggering keyboard shortcuts within them.
I use the comma key as a hyper key to launch apps, which can be configured completely in Karabiner with the following example:
:templates {
  :launch "open -a %s"
}

:simlayers {
  :launch {:key :comma}
}

{
  :des "Launch layer"
  :rules [:launch
    [:a [:launch "Slack.app"]]
  ]
}
There are several different approaches to choosing which key to bind an app launcher to:
- Consider the name of the app - Ex:
,+Sto launch Sublime Text - Consider the function of the app - Ex:
,+Eto launch your editor - Consider the frequency of use of the app - Ex:
,+Ato launch your editor
Of the above, I prefer the second option of binding based on the function of the app as this gives me the flexibility to remap the combo to a different app while maintaining the abstraction, and I still get the benefit of the mnemonic hint. That said, each approach is valid and will be preferred by some over the others. The important thing is to experiment with what feels most natural and build muscle memory after landing on a good solution.
Lesser-used shortcuts
Up to this point, we have focused on standardizing keyboard shortcuts across apps with two strategies in mind:
- Give frequently-used shortcuts dedicated mappings for instant access
- Launch command palettes with dedicated key combos to access all other functionality
However, there is a third category of shortcuts: those used infrequently enough where a single key combo may not be necessary, but often enough where searching with a command palette can grow tedious. These shortcuts are well suited for access via a Hammerspoon Modal, which can be entered with a key combo. Once entered, a modal can be configured to respond to any keystroke and output the desired behavior.
For example, let’s say we have a key mapping set up to call php artisan make:test. Since we want to make test files frequently, we can map this command to a M+T combo for instant access. Perhaps we don’t make Laravel Job classes often enough for php artisan make:job to justify its own shortcut, but when we want to make a job it would be nice to not need to type out the whole command.
To solve this problem, we can set up a make modal. Once we trigger the modal, we can program it to respond to the j key and run the command to make the job. This requires an additional keystroke over what we have with M+T, but adds an additional benefit that you don't have to worry about the timing of your keystroke. Due to key positioning, M+J is not an ideal key combo anyway, but entering the modal and then hitting the j key is simple.
Because my primary shortcuts use the caps lock key as a modifier, I like to reverse the combo for these modals and use the combo's target key (in this case m for make) as the modifier followed by the caps lock key. So examples for each of the three shortcut strategies are below:
- Primary:
Caps+Mto make any file - Secondary:
M+Tto make a test file - Modal:
M+Capsto launch a modal to select a type of file to make
As I use combos like these, I imagine I am pivoting between caps lock and the target key, m in this case, to trigger my desired actions. My entire system relies on the caps lock key as a primary hyper key with other secondary hyper keys. Combining these keys promotes muscle memory by reducing reach while minimizing the number of keys associated with our actions and targets.
The helpers we installed earlier provide a modal function that can be used to map a M+Caps key combo to a modal that will respond to a set of follow-up keys. Below we will add a make layer in Karabiner that, when triggered, will launch a make modal in Hammerspoon, which will listen for the and j key and output a key combo to generate a job class.
Note: the key combo output will depend on editor configuration and will require an editor plugin to achieve the desired result.
Karabiner:
:simlayers {
    :make {:key :m}
}

{
 :des "Make layer"
 :rules [:make
   [:caps_lock [:hyper "modal" "make"]]
 ]
}
hyper:app(sublime)
  :action('modal', {
      make = modal('make', {
          j = combo({'cmd', 'shift', 'option'}, 'j'), -- make job
      })
  })
In Closing
It is my strong belief that anyone using a computer at an intermediate or higher level can benefit from custom key combo mappings, and it is my hope that you are inspired to make improvements in your daily workflow by training your keyboard.
The system I have presented is opinionated, but it's not exclusive. I encourage you to experiment with different key combos and search for what feels most intuitive to you. As you try out different combos, give each enough time to see if any muscle memory is sticking, but also be willing to try other combos if not.
Whether you override a few shortcuts or build an entire system, you can train your keyboard to learn the shortcuts you want to use.
Sharing
If you find these ideas interesting and would like to contribute or learn more about keyboard training, we are developing a web app at Tighten where fellow keyboard trainers can share their own systems and get inspiration from one another. If you would like to be notified of the app’s progress you can sign up at trainyourkeyboard.com. You can also follow @trainyourkb on Twitter to keep up with the latest updates about TrainYourKeyboard.
Acknowledgements
I had an opportunity last year to present these ideas to Tighten in an internal talk, which was well received and encouraged me to continue teaching others to train their keyboards. I want to thank everyone at Tighten for giving me the space to formulate these ideas during my twenty percent time.
The first person I initially presented my system to was my brother, Nathan Morgan. He and I frequently talk about all things coding and he quickly latched onto the keyboard training lifestyle and helped me improve the system. He figured out how to set up Hammerspoon to respond to Karabiner as well as setting up watchers for easy config reloading. He has also made many other advancements with Hammerspoon not covered here. I recommend checking out Nathan's dotfiles repo here.
Jose Soto has also been an encouragement to me along the way, both with his enthusiasm for keyboard training as well as his additional contributions. He first recognized the need for a third category of shortcuts beyond primary and secondary and proposed using Hammerspoon modals. As a Vim enthusiast, Jose also kept me accountable in keeping my hands off the mouse while working on a project with him a few years ago. You can see Jose's dotfiles repo here.
If you would like to view my dotfiles repo, you can access it here.
in your inbox:
let’s talk.
Thank you!
We appreciate your interest.
We will get right back to you.