React 101, Part 4: Firebase

Articles in the React 101 Series:
- Part 1: React 101, Part 1: Building a GIF search engine
- Part 2: React 101, Part 2: Refactoring with Redux
- Part 3: React 101, Part 3: Routing and Auth
- Part 4: React 101, Part 4: Firebase
Last updated 06/01/17 to use Create React App, Redux Form v6, React-Router v4, and Firebase v3. Looking for the old version of the code? Find it here
Table of Contents:
Introduction
Congratulations, you've made it to our final article in this series! We've got an application with some forms and a scaffolded auth system; all that's left to do now is to hook it up to a data source so that we can build true authentication and work on favoriting some gifs.
If you haven't used Firebase before, it's a NoSQL cloud database that allows you to sync data with your application in real time. It also handles authentication, which is going to come in handy since we don't have a server to authenticate against!
Aside from a few lines of code in our actions, most of what we're going to build is similar to what we'd do when using a REST API built in Node/Express, Laravel, or another back-end framework. As such, most of the principles we'll be learning here will still apply (while allowing us to avoid the overhead of building an API as part of this tutorial series. However, if that's something you'd be interested in, let us know on Twitter.)
As always, we're going to continue from where we left off in the last section. If you don't have the code, you can find it here. Part 3 ended with the code found in the Step 16 commit.
Authentication with Firebase
If you don't already have a Firebase account, you'll want to sign up first. It's free!

We'll install the Firebase NPM package in our app by running $ npm install --save firebase from the terminal.
If you've done any Googling on how to integrate Firebase and React, you've undoubtedly come across the ReactFire package. That is not what we're going to be using in this tutorial! ReactFire populates the state of individual React components, and this works great for vanilla React. If you'll recall, however, the second principle of Redux is that state is read-only; the only way you should ever change the application store is to fire an action! As such, we're going to be hooking Firebase into our Redux actions directly, similar to what we did with
superagentin parts 1 and 2 of this series.
Before we start writing any code, let's take a look at the auth flow we need to accomplish in order to sign up users or log them in:
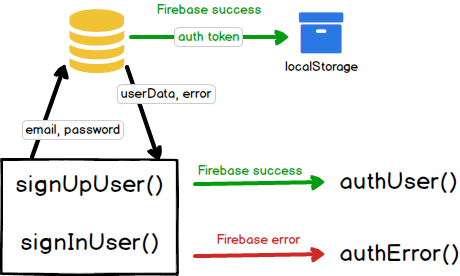
Step-by-step, here is how it's broken down:
Sign up/Login:
- User fills out sign up or login form
- Firebase creates a new user (
signUpUser) or signs them in (signInUser) with the email and password credentials sent by the form - Firebase sends back either an error object or a userData object
Success:
- Firebase saves its authentication token to our brower's localStorage (so that it persists when the page is refreshed)
- The
authUseraction creator is dispatched, and the Redux store is updated to setauthenticatedtotrue
Error:
- We send the error message returned from Firebase to the
authErroraction so that it can be displayed to the user
This is the first time that we've attempted to dispatch one action from another (in this case, signUpUser or signInUser calling authUser). We also need to do this after a promise returned by Firebase has resolved, upping the complexity even further.
While the ReduxPromise middleware was plenty powerful enough for our simple API call to fetch gifs, we need something with a bit more oomph to tackle firing actions in a conditional way. To do this, we're going to install a package called redux-thunk.
In your terminal, run $ npm install --save redux-thunk.
redux-thunk gives us control over Redux's dispatch() method, which is responsible for sending every fired action to all of our reducers. This allows us to call actions from within action creators in an asynchronous way.
For a simple example of how this works, let's rewrite our requestGifs() action creator to use redux-thunk.
First, we'll need to replace the ReactPromise middleware in configureStore with reduxThunk:
src/store/configureStore.js
Next, we need to update our requestGifs() action creator to use reduxThunk:
src/actions/index.js
If you don't remember why we installed ReduxPromise in part 2, actions in Redux are normally completely synchronous: they dispatch as soon as the action creator is fired. This can be problematic when we need to wait on the result of an external call, since we don't want the reducer to receive a promise!
With ReduxPromise, we returned a promise as our payload when the action was dispatched, and then the ReduxPromise middleware works to resolve that promise and pass the result of the API call to the reducer.
What reduxThunk does, on the other hand, is force the action creator to hold off on actually dispatching the action object to the reducers until dispatch is called.
superagent is still returning a promise, but the .then(response => {}) resolves that promise, giving us the actual result of the call. It is within that method that we dispatch our action with the resolved data.
Ultimately, we're passing the exact same data to our GifsReducer, but reduxThunk gives us far more flexibility in the way we actually handle our actions. In essence, it gives us a trigger for our gun.
Instead of calling dispatch() with an action object to send to a reducer, we can call dispatch() with another action creator function.
When we create or login a user via Firebase, we need to wait on the result of that call to figure out how to proceed. If the promise resolves as a success, we need to make sure our application knows that a user is logged in; if not, we need to pass along the error so the user knows what went wrong.
src/actions/index.js
We've got some new actions and a bit of configuration code, so let's walk through this:
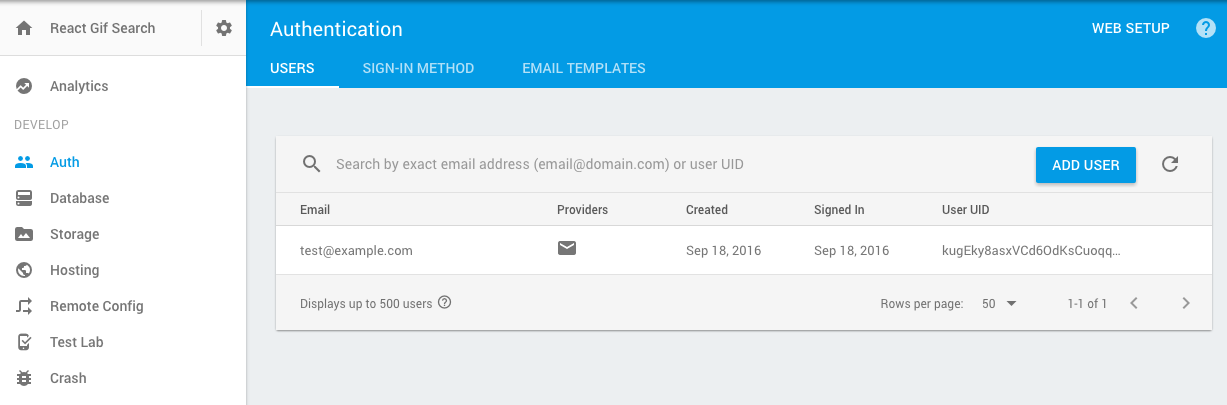
Here, we're importing the Firebase package we installed. To get your config information, you will need to head into the Firebase console; while you're there, you'll also need to enable email/password authentication:
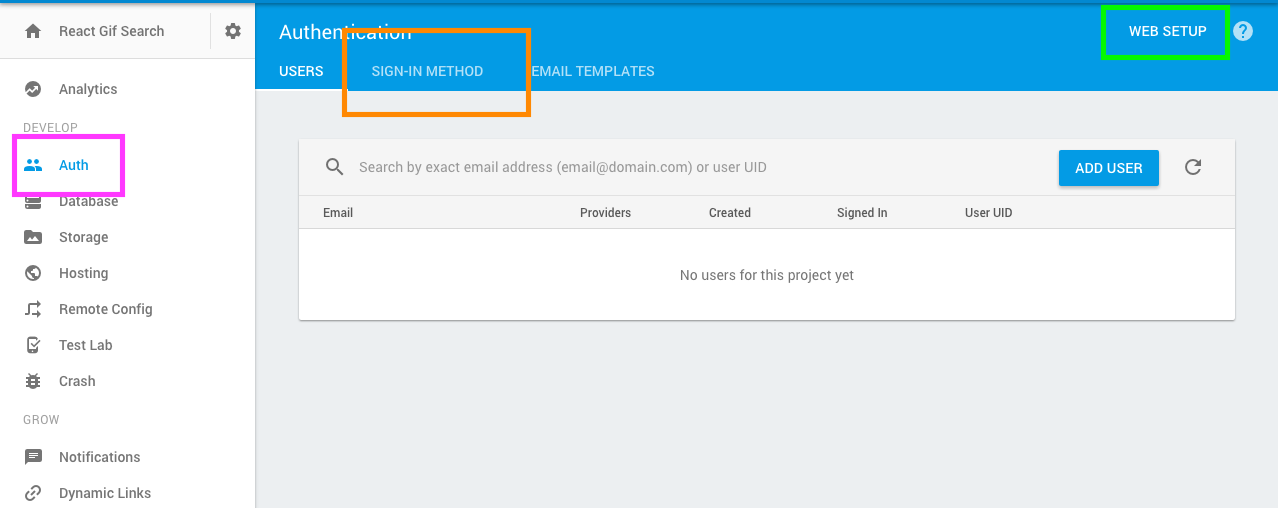
- Go into the Firebase console and click the "Auth" tab
- Click the "Web Setup" button and grab the data within the
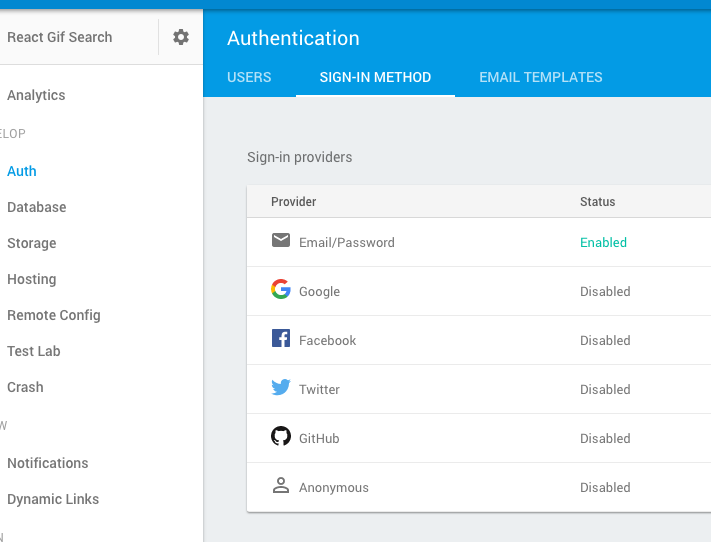
var configobject. Paste it in theconst config = {}object starting on line 15. - Click the Sign-In Method horizontal tab
- Enable the
Email/Passwordsign-in provider
Next, let's take a look at our new signUpUser and signInUser action creators:
Functionally, these two are almost exactly the same. The only difference is the name of the Firebase method used: to create a user, we're using createUserWithEmailAndPassword, and to log an existing user in, we are using signInWithEmailAndPassword. Like we did in requestGifs, we're using reduxThunk again. We are passing both of these our email and passwords from our forms, which are being sent to Firebase.
Notice that we removed our SIGN_IN_USER action object in favor of one called AUTH_USER:
Whether the user is successfully created or signed in, the result is the same -- we want our application to know that a user is now authenticated. Because we're setting authenticated to true on both signing up and logging in, it makes more sense to have a dual-purpose action that we can use for both.
If either method returns an error, we're catching it and, in the callback, passing our error message to our new authError action creator. Let's take a closer look at that now:
We are adding a simple action creator and action object here to handle any errors returned from Firebase.
We'll also need to make a few changes to our AuthReducer to handle these new actions:
src/reducers/auth.js
Here, we're adding error as a key on state. In our AUTH_ERROR action, we're setting the message that comes back from Firebase as our error; in AUTH_USER and SIGN_OUT_USER, on the other hand, we're setting it to null. Otherwise, even if our user successfully signs in and out, we still might see an error message about an incorrect password or duplicate email address!
We've got a few more little updates to make to finish the auth flow. In our Signup container, let's add some handling for displaying that error message we just set up in our AuthReducer. We also need to update our handleFormSubmit method to use signUpUser instead of signInUser:
src/containers/Signup.js
We're setting the error key to a value of this.props.authenticationError to make it easily discernible from our field-specific validation errors. If Firebase returns an error when the user is trying to sign up, it should render in a <div> above the form with some Bootstrap styling.
Since our Signup form now cares about global application state instead of just form state, we are adding a mapStateToProps function and passing it to our react-redux connect()() method.
While we're at it, let's do the same thing on our Login form:
src/containers/Login.js
Now, if you fill out the signup form, you should be able to log into Firebase and see your new user under the "Auth" tab, and if you fill out the login form, you should be logged in successfully.
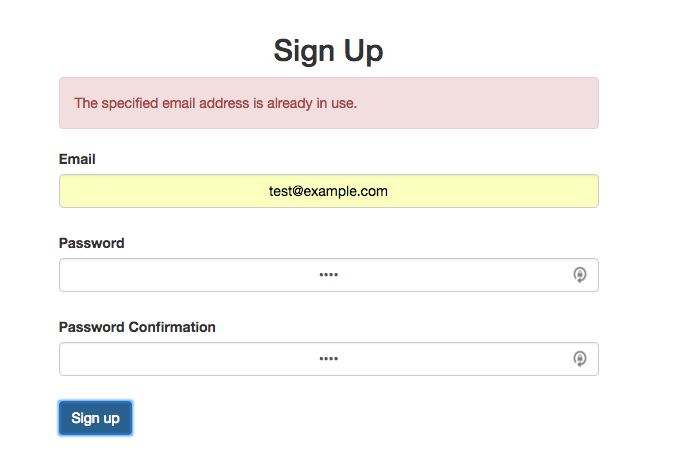
And if you enter that same email address in the Signup form again, you should see an error message:
But there's a problem here -- if you refresh the page, it appears that our user is logged out, even though the Firebase package is automatically saving our authentication info to localStorage when the user signs up or logs in (and you can easily check localStorage in your browser to verify this is true):

If you're familiar with OAuth or JWT, you probably have a pretty good idea of what you're looking at, but if not, let's take a moment to explain.
With normal, full-stack apps, where our front-end and back-end are running as part of the same application, we can log a user in and simply store session data in a cookie.
However, since our front-end isn't connected to any sort of server or database, it relies on APIs for data. This is why we're using Firebase to log us in and out.
Here is how the auth flow breaks down:
React Client: Hey, Firebase, I want to log this user in. Here are his email and password.
Firebase: Cool, that's a real user, and the credentials are correct. Here is a token to represent this user's session.
React Client: Sweet! I'll hang on to this in my localStorage for later.
Some time later, one of two things will happen:
React Client: Hey, Firebase! This user's trying to access a protected resource. I've got this token — who does it belong to, and is it still valid?
Firebase: Yup, the token's still valid, and it belongs to the user with a UID of '1234';
OR
React Client: Hey, Firebase! This user's trying to access a protected resource. I've got this token — who does it belong to, and is it still valid?
Firebase: Nope, the token's expired or invalid. You need to make the user log in again so I can give him a new token.
While the Firebase package handles storing our token for us, this generally won't be the case. If you're authenticating against a REST API using something like POSTman, you'll have to store the token yourself. You can do this in the action creator using the
localStorageobject. You'll need to set the token on login and delete it on logout.
We're already setting authenticated to true in our AuthReducer, but when we refresh the page, authenticated will be reset to the default of "false" if we don't have a way to verify with Firebase that our user should be logged in.
Let's add another action to check the authentication state with the data Firebase is storing for us:
src/actions/index.js
Once again, we're using reduxThunk to conditionally dispatch some actions. If the user is signed in, Firebase.auth.onAuthStateChanged() will return a valid user object, and we can dispatch our authUser() action creator to update authenticated to true on the state.
If Firebase.auth.onAuthStateChanged() returns null, it means that the Firebase auth info is no longer valid, so we call signOutUser() to lock the user out of the application until they sign in again.
But if we refresh the page, it still looks like our user is logging out! We need to call verifyAuth() almost as soon as our app boots so we can update the state accordingly. We can do that as early as when we're creating our store:
src/store/configureStore.js
Since we're working with the store object directly, we don't need anything fancy like thunks or bindActionCreators to dispatch an object: we can just import it and dispatch it right there.
There's one bug, though: if you log out, then refresh the page, it'll appear that you are signed back in
But now, if you refresh the page when you're logged in, you'll see the top bar update to show "My Favorites" and "Sign Out" but still get redirected to /login. Why is this?
Firebase is storing the logged-in user in localStorage, so if you refresh while you're signed in, you'll stay signed in. To fix this bug, we will want to be sure to call Firebase's signOut() method when we log our user out so that localStorage is properly cleared, then dispatch our SIGN_OUT_USER action:
src/actions/index.js
We're close to being done: We can sign a user up, log them in, and sign them out. All that's left to do is let them favorite some gifs.
Favoriting gifs
Let's take a look at some mockups of what we're going to be building:
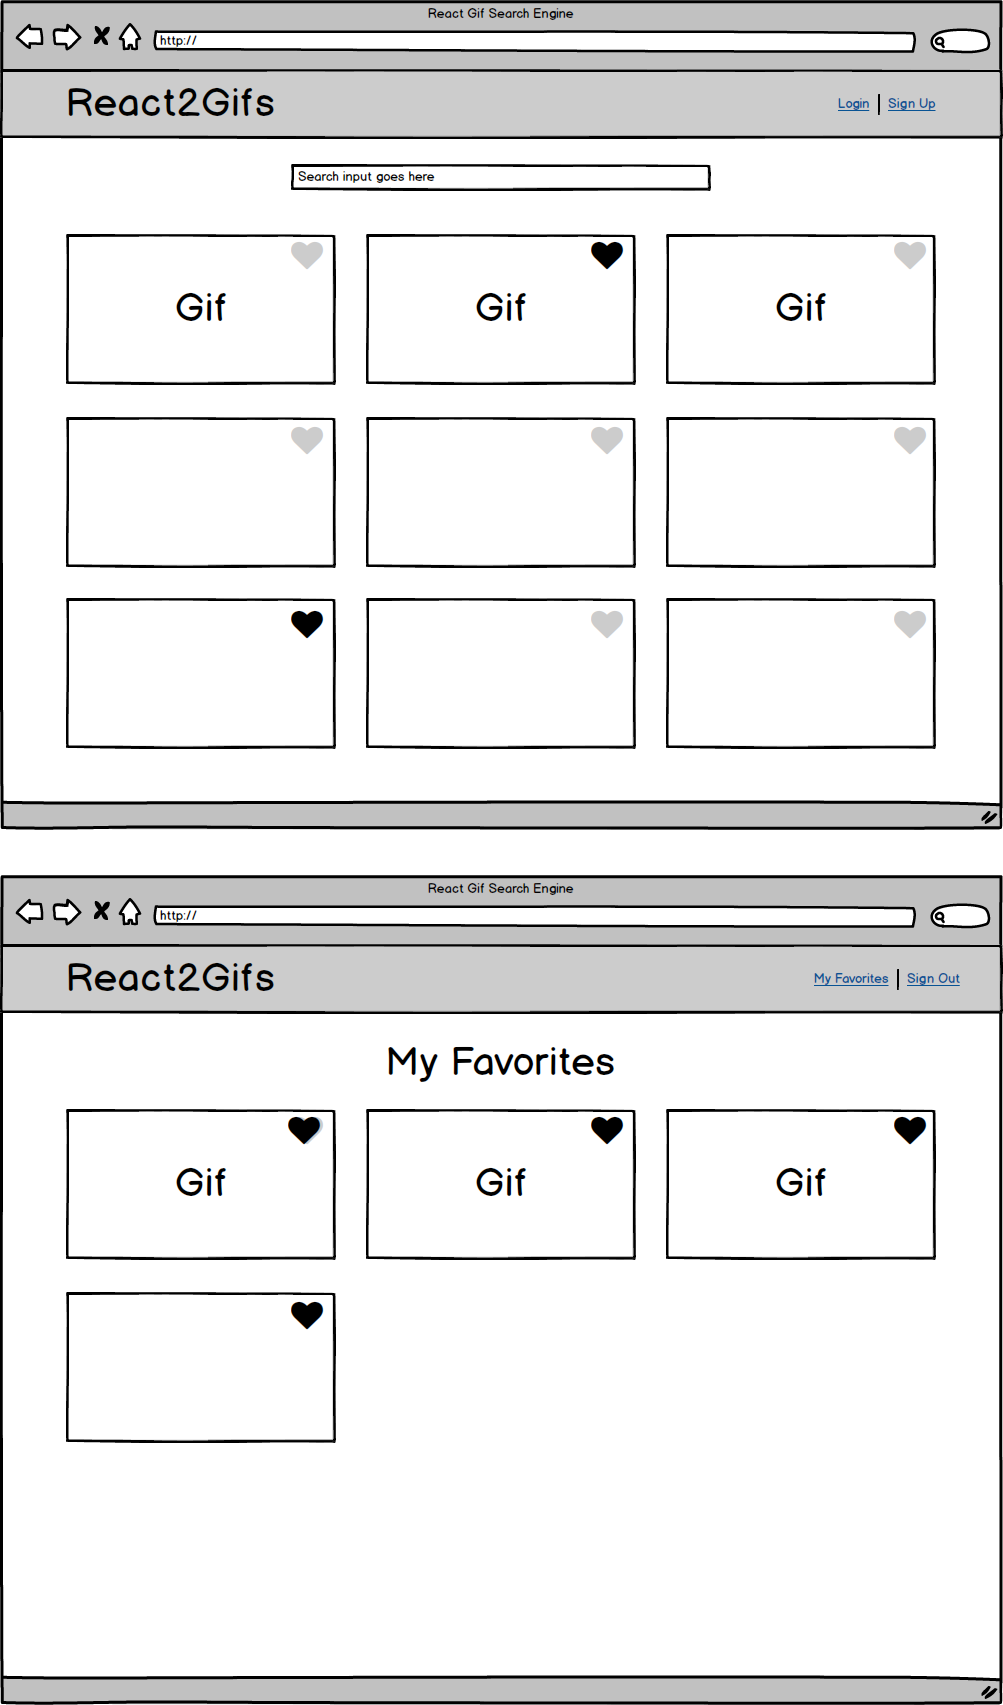
We are going to need heart icons, and we're going to need some different styling based on whether a gif is favorited or not. Let's tackle that before we start worrying about Firebase integration.
We're going to add FontAwesome alongside our Bootstrap CSS file in our index.html. This will allow us to add classes to <i> tags to give us an empty and filled heart:
index.html
And we're also going to add a bit of styling to our app.css file:
src/styles/app.css
Next up is a pretty massive overhaul of our GifItem component. There's a lot going on here, but it's all vanilla React code that we've more-or-less seen before:
src/components/GifItem.js
The first thing you might have noticed is that we're again using a constructor() method to set our state for this component. "Wait a minute," you're probably saying. "I thought you told me that we are only supposed to fire actions to update the application's state!"
And yes, this is true to an extent. Anything that affects the application's store should absolutely be sent through an action and reducer. However, we're only managing a small piece of UI here, and trying to keep track in the Redux store whether all of these individual GifItems are favorited would require some rather complex code.
There's nothing wrong with using React's state for minor UI changes on individual components, but if it's going to affect other parts of the application or involves an external API call, you should probably dispatch an action instead.
Notice that we're passing through props as an argument in the constructor() and super() methods. This allows us to access this.props within our constructor, but you don't need it unless you're trying to pass props through to local state.
Here, we're setting the favorited key on state so we know whether to render a filled-in or empty heart to show whether a gif has been favorited or not. We're also going to use the props onFavoriteSelect and onFavoriteDeselect to fire our actions, so we'll have to add those to our GifList, Favorites, and Home components next.
In this method, we're doing one of three things. If the user isn't logged in, we shouldn't show the hearts at all when they search for gifs; we don't want them favoriting gifs if they're not authenticated. If they are logged in, we are rendering FontAwesome heart icons based on whether or not the gif is currently favorited, and then we're calling our favoriteGif() and unfavoriteGif() methods from our click handlers to toggle the state.
The rest of the code is fairly similar to what we had before. Don't forget to move the this.props.onGifSelect handler from the <div> to the <img> element; we don't want to open a modal whenever our favorite heart is clicked!
Let's update our GifList next to pass down these new props. Since it's really not doing any sort of business logic, we can leave it as a functional component:
src/components/GifList.js
We've added a handful of properties to pass our handlers down from our parent components, but our GifList still isn't doing anything with them aside from giving them to GifItem.
Next, let's update our parent components to pass these props down. We'll tackle Home first, since it needs the least amount of work:
src/containers/Home.js
Here, we're passing through the actions favoriteGif and unfavoriteGif (which we haven't created yet) and adding authenticated from our store to props so we can pass them all down to GifItem.
Let's add those actions now:
src/actions/index.js
Before we break down what the code does, let's take a look at what we can see in our Firebase database when we favorite a gif:
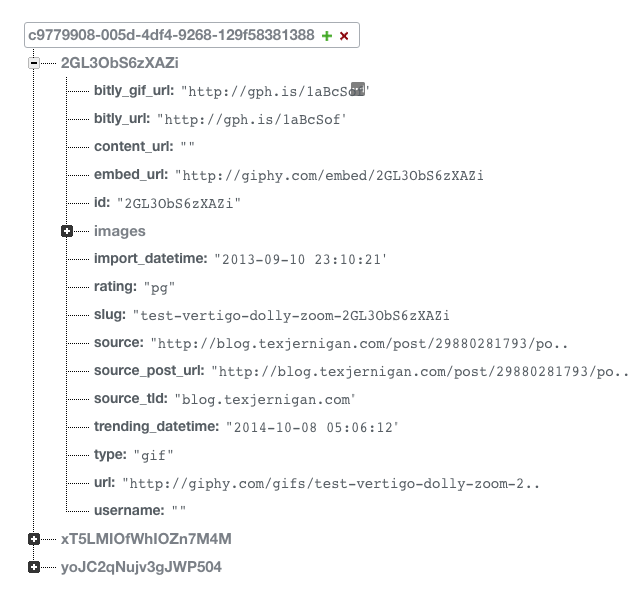
As we mentioned before, Firebase is a NoSQL database. You have a great deal of flexibility on how you store your JSON.
Here, we're creating a database reference for a user with a UID of "c9779908-005d-4df4-9268-129f58381388": in this example, this was the logged-in user on my application, and the UID was pulled from localStorage by our Firebase.auth().currentUser property. Within this object are all of our saved gifs; the Giphy ID is the key, and the object itself is the value.
If you look at the Firebase docs, there are multiple ways to write data to the database. We are using update, however, to avoid duplicate data: if an object already exists with that gif ID, Firebase will simply overwrite it instead of favoriting it twice.
The code to remove the gif from Firebase is very similar. We are referencing the first child path (the user ID), then the second child path (the gif ID), and the simply removing the data at the second child path.
If you leave your Firebase window open and favorite/unfavorite gifs, you should see the data being added and removed in real time.
Only one thing left! We have to fetch all of the favorited gifs for the user and put them into our store so that we can render them on our "My Favorites" page.
Let's add our action type and action creator first:
src/actions/index.js
Here, we're using Firebase's on method to pass our favorited gifs into our Redux store. on is a listener that fires when the initial data is stored at the specified location (in this case, our child path with our user ID) and again every time the data changes. It passes a snapshot of this data through the callback, and we are then dispatching the value of this snapshot to our reducer.
In our reducer, we need to do a bit of data finessing to get our Firebase data to look the same as our Giphy data:
src/reducers/gifs.js
Our gifs from Giphy are being returned as an array, but they're being returned as a single JSON object from Firebase. We can, however, iterate through our Firebase response object and add it to an empty array, and then return that array from our reducer.
Why do we want to do this? We're already saving Giphy objects directly to Firebase. If our data schemas are the same, we can use our GifList and GifItem without any further modification!
Let's take a look at how we could update our Favorites container to see this in action:
src/containers/Favorites.js
You probably noticed that this new container looks very similar to our Home container. (In fact, if you were feeling ambitious, you could probably refactor much of this code into a shared component in order to DRY things up a little bit.) There are two main differences here:
Once again, we see the useful componentWillMount() method! This time, we're using it to fetch our favorite gifs as soon as the container loads.
There's one other minor difference:
Here, we're setting an isFavorite prop to "true" so that our GifItems know that the initial state on all of these components should be "favorited".
That should be all we need to get everything working! If you click on the "My Favorites" link, you should see any favorites from the home page loaded. Furthermore, if you try to unfavorite a gif, it should automatically disappear!
Conclusion
We hope you've found this series helpful. If you've followed along with the tutorial, you should be armed with most of the knowledge you need for your first React + Redux project.
If you'd like to take your learning a step further, try adding some functionality on your own: add infinite scrolling to load more gifs, check against Firebase whether gifs are favorited, add social authentication, or spend some time looking for areas that can be consolidated and refactored.
If you enjoyed this series, we'd love it if you let us know on Twitter. We've got more exciting stuff in the works, so stay tuned!
in your inbox:
let’s talk.
Thank you!
We appreciate your interest.
We will get right back to you.