React 101, Part 3: Routing and Auth

Articles in the React 101 Series:
- Part 1: React 101, Part 1: Building a GIF search engine
- Part 2: React 101, Part 2: Refactoring with Redux
- Part 3: React 101, Part 3: Routing and Auth
- Part 4: React 101, Part 4: Firebase
Last updated 06/01/17 to use Create React App, Redux Form v6, React-Router v4, and Firebase v3. Looking for the old version of the code? Find it here
Table of Contents:
- Introduction
- Bootstrapping some views
- Routing
- Forms and validation
- Actions, reducers, and higher-order components
- Conclusion
Introduction
We're back for the next part of our series on React! We're going to add a ton of new functionality to the React app that we built in Part 1 and hooked up to the state-management library Redux in Part 2.
In Part 3, we're going to accomplish the following things:
- Add routing, allowing us to build additional pages in our application
- Introduce forms and validation
- Create components/actions/reducers to handle signing up, signing in, and signing out
After you finish this section, our app will almost be complete. All that's left is hooking up Firebase, which we will tackle in Part 4.
We're going to be picking up right where we left off in Part 2. If you don't have the code, you can find it here. Part 2 ended with the code found in the Step 12 commit.
You can find a link to a demo of the completed project here.
Bootstrapping some views
Our first step will be to add some new views to our single-page application! We need pages for signing up, signing out, and viewing our favorites.
If you're familiar at all with JavaScript single-page application frameworks, you might know that these aren't really "pages" — our only actual page is our index.html, which is serving our bundle.js from Webpack. What we need to do instead is swap out components to create new views and make it look like we're navigating around multiple pages.
Here are the three views we are going to build:
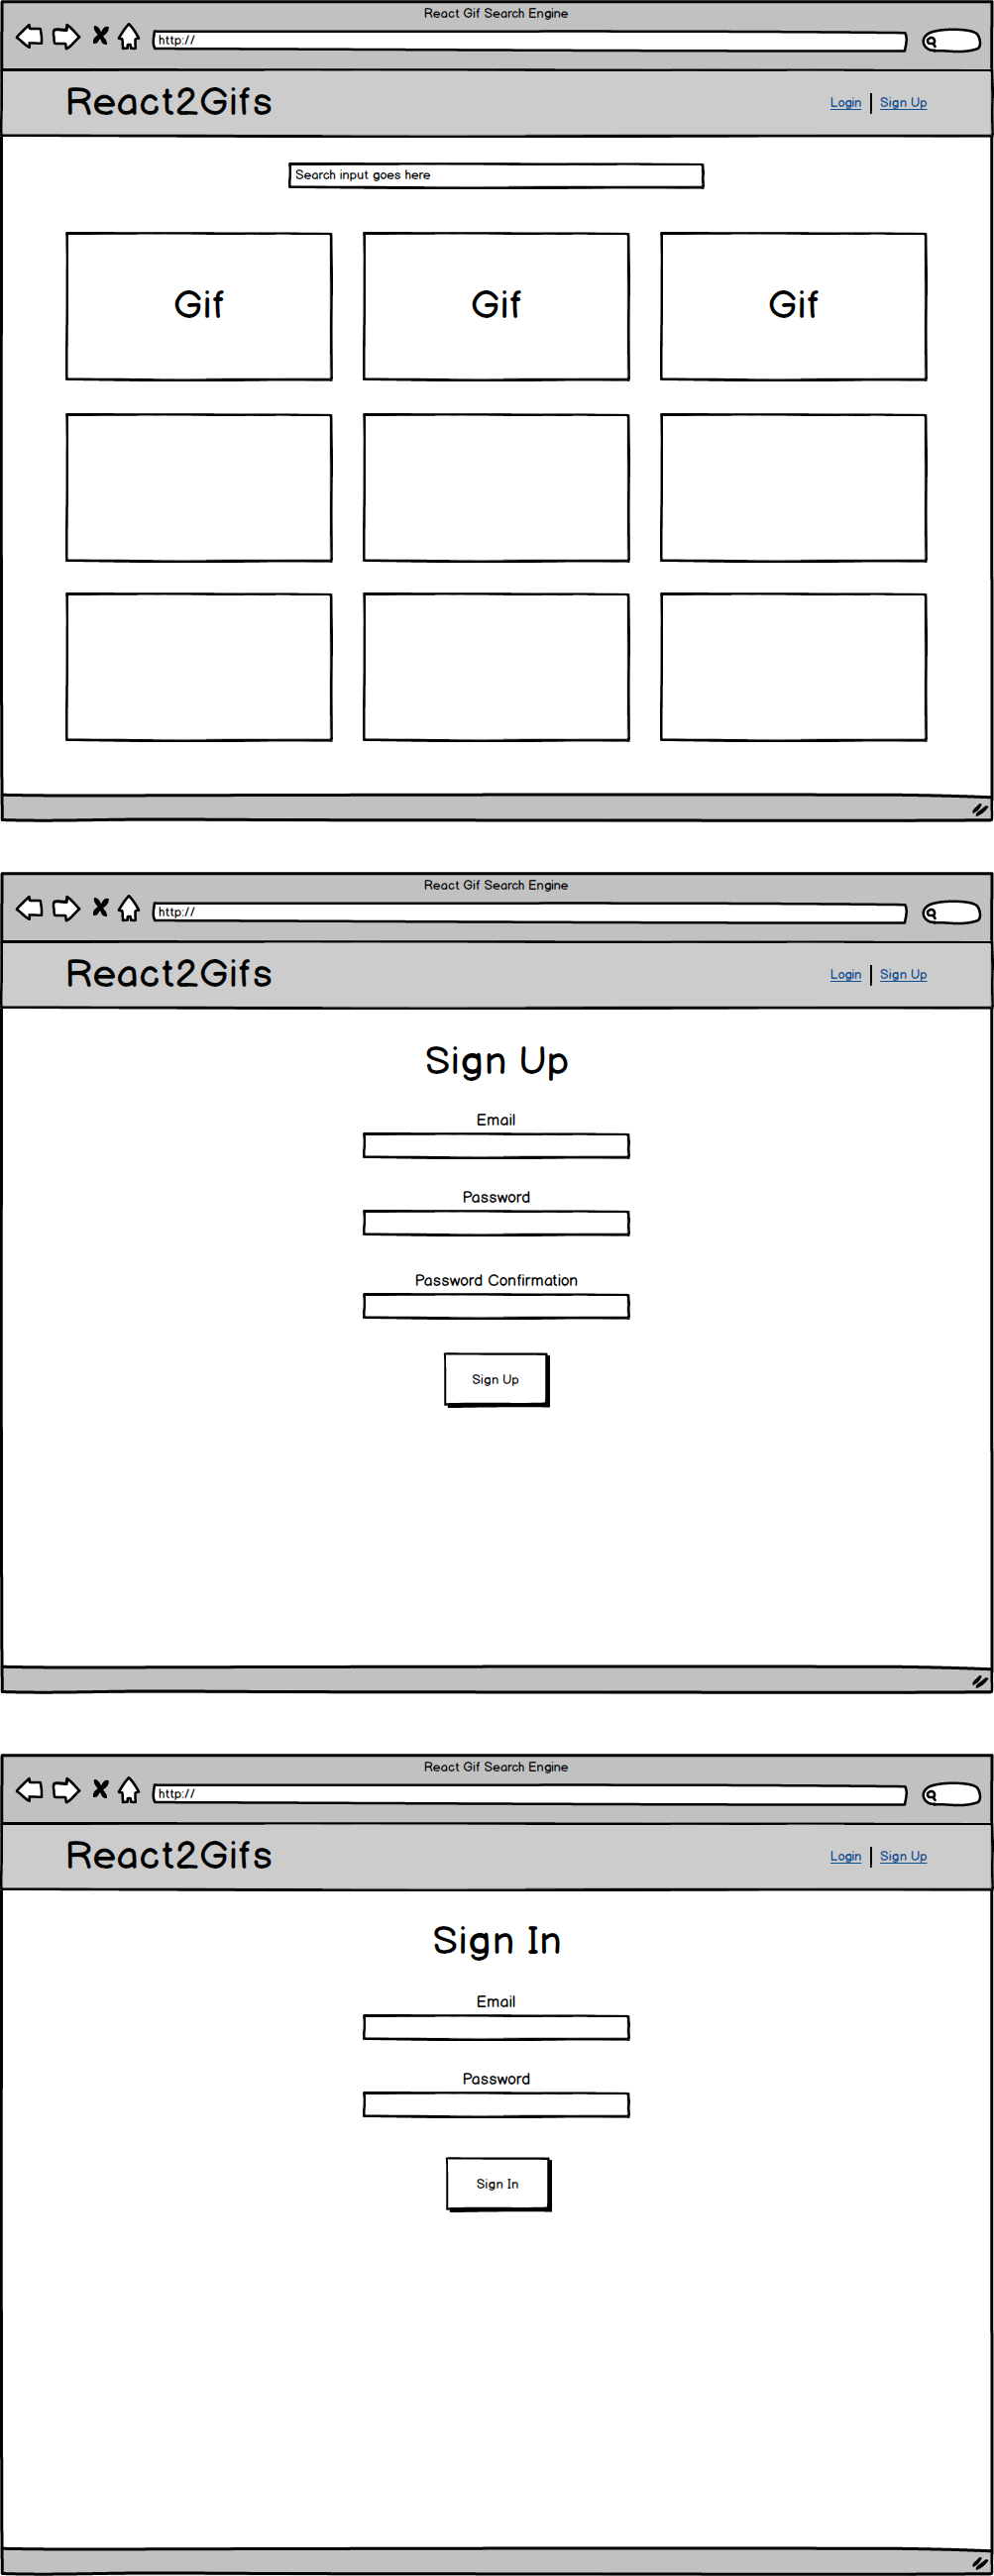
We're also going to build a placeholder view for the "My Favorites" section we'll be building out in part 4.
To accomplish this, we'll need the help of a few tools. While we could go in and manually add a bunch of CSS to make our forms and navbar pretty, we're going to take the easy route and pull in Bootstrap to provide some CSS for us.
There is a really nice package called react-boostrap that turns Bootstrap components into React components, but that's really more than we need right now, since we're just using a bit of styling on the header and forms. Instead, we're just going to load the Bootstrap 3 CSS file from a CDN the old-fashioned way into our index.html file:
index.html
Next, we're going to build our navbar as part of a Header component.
First, however, we must ask ourselves whether our header should be a container (which is connected to our Redux store) or a component (which receives state as props from a parent container).
Our header is going to need to be pretty aware of what's going on with our application's state:
- It will need to know whether the user is signed in to render
Login / Sign UpvsMy Favorites / Sign Out - It will need to fire an action when the user signs out, since there is not going to be a "sign out" page to handle this
So, we'll go ahead and make it a container so that we can hook it up to Redux with connect()().
Let's add some basic markup for now:
src/containers/Header.js
If you've ever worked with Bootstrap before, there shouldn't be any surprises in this code. We're using typical Bootstrap navbar classes (with className instead of class, since we are writing JSX instead of HTML and 'class' is a reserved JavaScript keyword) to build a navbar with a "Login" and "Sign Up" link. We'll hold off for now on the conditional logic that will render "My Favorites" and "Sign Out" when a user is authenticated, since we have no real way to check that at the moment.
We're also setting up an empty mapStateToProps function and passing it into react-redux's connect()() method. This will save us a bit of typing later when we come back to hook state into this container.
Next, we're going to add two containers to (eventually) hold Login and Signup forms. The reason we are making these containers instead of components will become clearer once we add the actual forms, but for now, let's just return a basic <div> with some text so we can check our navigation is working once we hook up our router.
src/containers/Signup.js
src/containers/Login.js
If you click on the "Login" and "Sign Up" links on the header, they don't actually navigate us to these containers yet - we need to set up routing first.
Before we do that, let's set up our final container for our favorited gifs. Once again, we're not going to return any real data here, but it will give us another page to route to:
src/containers/Favorites.js
Okay! Now that we have some views to route to, let's explore how to set up react-router in the next section.
Routing
Before we install React Router, let's talk a little bit about what it is and how it works.
Currently, in our application, we have one base App container that is rendering all of our child components - GifList, SearchBar, etc.
React Router watches for changes in the URL and updates the components on the screen accordingly. We'll still have a base App component, but instead of just rendering our GifsList, SearchBar, and other components, App will render whatever React Router tells it to.
This means, first of all, that our current App component is no longer really responsible for the entire application. Instead, it's only responsible for the view on our index page. Accordingly, let's rename it Home:
src/containers/Home.js
The only code that needs to change in this file (besides the file name itself) is where we declare the class name and pass it into the connect()() function at the bottom. Other than that, everything can stay exactly the same.
We also need to make a quick update to our index.js file to pull in App from its new location:
src/index.js
So how do we get these different pages to render? To answer that, let's install React Router DOM, along with the package to make it work with Redux, and configure our routes:
$ npm install --save react-router-dom react-router-redux@next
The first thing we need to do is update our configureStore.js file to make our store aware of our browser location. We are doing this through the history package, which is a dependency of react-router. This can determine our location from the URL in our browser. (There is also HashHistory, which doesn't require any sort of server setup, and MemoryHistory, which is common with React Native, but we don't need to worry about those right now.)
Since we will need this history object elsewhere in our app, we are exporting it and removing the default from the configureStore() method. We are passing the history object through to routing middleware that will intercept and dispatch navigation actions:
src/store/configureStore.js
Since the configureStore method is no longer being exported by default, we also have to make a minor update to our src/index.js file to specifically import that method:
src/index.js
Next, we need to add react-router-redux's routerReducer to our main reducers file so that it can intercept navigation actions and keep track of our current location in the store:
src/reducers/index.js
Finally, we're ready to connect our router to our main App component. Our new App component is much smaller than the one we just renamed to Home:
src/components/App.js
This new main App component, along with the Header container, will be rendered in every view. It serves as a main template of sorts, and if we wanted to add a footer or any other component that will render on every page, we would add it here as well.
Let's walk through what's going on here:
Here, we're importing our new components and containers, along with a couple of different modules from the react-router-dom packages and the history object we created back in configureStore.
Next up, we are wrapping all of our code in the ConnectedRouter component from react-router-redux and passing it the history object we created:
How does ConnectedRouter work? Remember that we said we were using the BrowserHistory-flavored version of the history package. If our app's URL is http://localhost:3000/favorites, for example, it takes everything after the first / - in this case, favorites - and uses it as a path to render the components we say it should.
Next, we must define the parent component tied to our exact "/":
We're passing in the component that should render whenever a path contains exactly /: the Home component that we just separated from App.
Next, we're defining our other three views — Signup, Login, and Favorites:
Whenever react-router-dom detects the path in the URL, it look at the routes defined within App to figure out which component to render.
Let's test this out! If you click the Login and Sign Up links in the navbar, or visit http://localhost:3000/favorites, you should see the basic components we created render.
You might have noticed that whenever you click on a link in the header, our app does a full-page refresh to load the new views. This causes us to lose out on one of the main benefits of a single-page application: speed! Let's update our header to use react-router-dom's Link components to fix this:
src/containers/Header.js
By replacing our <a> tags with <Link>, we let react-router-dom know it should just swap out the component passed into App instead of refreshing the page. Now, if you click on the "Login" and "Sign Up" links, switching between them should be almost instantaneous.
We still have a few more steps before we can tackle real authentication; let's build out our forms next.
Forms and Validation
In order to get authentication working, we're going to need two different forms: one to allow a new user to sign up and one to allow an existing user to login.
Luckily, there's a package called redux-form that handles most of the heavy lifting for us!
To install it, run $ npm install --save redux-form in your terminal.
Setting up redux-form is rather simple. The first thing we need to do is to add the package's built-in reducer to our rootReducer (including it alongside the two reducers we already have for gifs and modals):
src/reducers/index.js
Now that our FormReducer can access our store, we're ready to build the forms themselves! Let's tackle our login form first, since it's the easier of the two:
src/containers/Login.js
Now that we've seen the entire class, let's take a closer look at a few pieces of the code. This time, however, we're going to take our exploration a bit out of order:
Because our component doesn't currently care about any state outside of the form itself (such as whether a user is actually logged in), we are going to hold off for a bit on adding our react-redux connect()() decorator.
For now, we have a new decorator, reduxForm()(), that connects our form to Redux. In its first set of parentheses, it takes a config object that has only one required argument: a unique name for the form. This will be set as a key on the store object returned from the FormReducer.
It's possible to pass in additional arguments to handle validation, failure, sub-forms, etc., but we don't need to worry about that right now.
Next, let's take a look at the form object itself:
handleSubmit() is a redux-form method, made available via this.props by reduxForm()(), that we can attach to the form's onSubmit event handler. This lets redux-form know that the user is trying to submit the form so it can intercept it and run validation first (if defined, which we haven't done yet in this file).
Within redux-form's handleSubmit method, we're also calling our own handleFormSubmit method that we define earlier in the class:
When this.props.handleSubmit() is called, it passes the value of the form as an argument to whatever callback is supplied -- in this case, our class's handleFormSubmit() method. When handleFormSubmit() is fired, we're simply logging the value of the form to the console for now until we have the opportunity to set up actions and reducers to handle actual authentication.
Finally, we get to our form markup itself. redux-form provides us with a Field component that makes it easy to connect individual inputs to the Redux store. The values of these inputs are then made available via redux-form's this.props.handleSubmit. If we submit the form, we should see our email and password input logged in the console:

That does it for our login form! Let's work on our signup form next. It's going to be quite similar to our login form, but this time, we're going to add some validation as well:
src/containers/Signup.js
Let's take a look at our Field components within the form first:
The most obvious difference between this and our Login form is that we have added a passwordConfirmation field. In addition, instead of passing input to the component property, we are passing this.renderField.
Why is this? redux-form accepts three default DOM inputs: input, which we used in our Login form, along with textarea, and select. However, if we need more custom and/or reusable logic, Field will also accept a custom component or stateless function. If we start breaking down our renderField() method, it might become a bit more clear why we didn't want to use one of the default DOM inputs:
We've seen a simplified version of this ES2015 syntax a few times before. Here, we are pulling off field.input, field.label, field.type, field.meta.touched, and field.meta.error and automatically assigning them their own variables input, label, touched, etc. Some of these are things we will need if validation fails, but we also get the added benefit of only needing to write our fieldset and label markup once.
Here, we're setting up the actual input element, but what's going on with that {...} syntax? When you wrap a component or stateless function, Field automatically passes it a number of props. Some of these input props include name and value, along with event handlers such as onBlur, onFocus, etc. By adding these to our HTML input element with {...input}, we are destructuring the value of the input prop and merging in the values provided by the Field component.
To see where the error prop might come from, let's take a look at our validation logic:
There isn't anything too crazy going on in this validation code. We're checking that the email, password, and passwordConfirmation fields have a value, checking our email value against a regex to make sure it's actually an email, and comparing password and passwordConfirmation to make sure they match.
This validate function has been added as an argument to our reduxForm configuration object at the bottom of the file so that this information, along with the form name, will be passed to our FormReducer:
There's one other major difference between our current Login form and our Signup form: we've added some code to display the errors below our inputs:
This simple conditional checks if the user has "touched" — or clicked into — the field, since we don't want to jump the gun and display errors before the user has had a chance to interact with the field. Then, if the field has an error attached to it, it displays the error.
If our sign up form has errors, we should now see something like this:
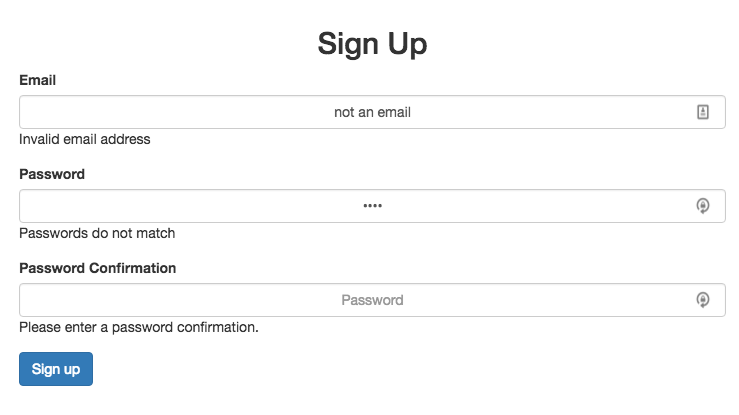
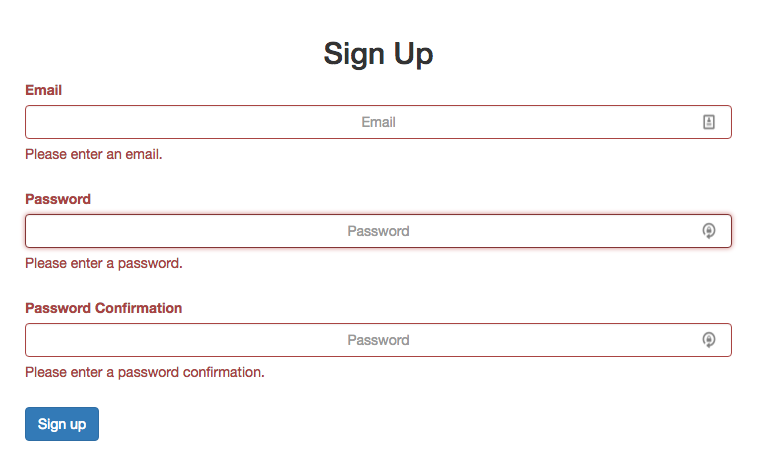
Let's take this one step further. Since we've already pulled in Bootstrap styles, let's utilize a few extra classes to make these messages more visually interesting.
src/containers/Signup.js
Here, we're adding a ternary conditional to check whether our fields have errors, and if the field has been touched and has an error, we're adding the Bootstrap class of has-error on our fieldset. We're also adding the Bootstrap class control-label to our labels and help-block to our actual error text. Now, if we have errors on our form, our messages, along with the invalid inputs and their labels, should be a nice red color:
Now that we have a better understanding how validation works, let's add some to our login form as well:
src/containers/Login.js
This is basically a stripped-down version of what we did in our Signup form. Don't forget to add validate to our reduxForm method at the bottom of the file!
Our forms are working, so we're ready to take the next step to hook them up to our application. We're still not ready to connect to Firebase yet, but we can start stubbing out some of the code in our application to handle authentication state.
Actions, reducers, and higher-order components
Before we connect to Firebase, we'll want to lay the foundation for authenticating users in our codebase. We'll need to handle things like showing the My Favorites and Logout links instead of Sign Up and Login, and we'll also want to redirect any unauthenticated user who tries to access /favorites back to the index route.
So before we worry about passing credentials around the application or actually signing up users, let's create two basic actions to fake signing the user in and signing the user out as well as a reducer to handle them. We won't pass through any sort of payload but instead will set an authenticated property on state to true or false based on which action hit the reducer.
Let's tackle our actions first:
src/actions/index.js
If you'll recall from part 2, an action can be fired by a container to tell our store that it needs to update.
Here, we have our action types as constants SIGN_IN_USER and SIGN_OUT_USER, and we are passing them into our action creators signInUser() and signOutUser() via the required type property.
We don't need to pass along any other data at the moment; our new AuthReducer reducer will simply set the state based on the action type:
src/reducers/auth.js
There aren't any new concepts going on here: we're setting our initialState for the user to be signed out, but if the SIGN_IN_USER is fired, a new copy of the state is created with authenticated set to true (remember how our reducer should act as "Save-As" functionality instead of mutating the state directly!) If SIGN_OUT_USER is fired, a new copy is created and authenticated is set to false. Simple enough.
Don't forget to add the AuthReducer to our rootReducer so that it has access to our store:
src/reducers/index.js
Next, let's head back to the forms we just created. Instead of just calling console.log() in the handleFormSubmit() methods, we need to fire the signInUser() action creator:
src/containers/Signup.js
src/containers/Login.js
Like in our other containers, we're importing all of our exported modules from the actions/index.js file as a single object. We're also finally pulling in the react-redux connect()() decorator again, since our components now need to be connected to Redux in order to have access to our signInUser() action creator.
However, you may be wondering why we're not using mapDispatchToProps and bindActionCreators to add our actions to props; instead, we're just passing in Actions directly.
bindActionCreators actually only needs to be used when you're passing action creators down as props from a container to a component that's not aware of Redux. Since Login and Signup don't have any child components, we can just pass our action creators into reduxForm()() directly!
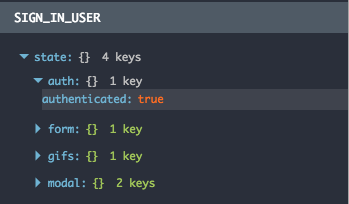
Now, if you fill out and submit either form, you can check Redux DevTools and see that authenticated is set to true:
Now that we have a way to check via state whether a user is signed in, it's time to update our header! We want to show the "My Favorites" and "Sign out" links when authenticated is set to true, and also want to fire the signOutUser() action creator whenever the "Sign out" link is clicked:
src/containers/Header.js
Let's break some pieces down:
Like we saw with Login and Signup, we don't actually need to explicitly call mapDispatchToProps and bindActionCreators to hook our action creators into our container. Our Header doesn't have any child components, so we can just pass in Actions directly in order to make signOutUser() available on this.props.
Here, we're extracting away the conditional logic needed to render our links into its own method. authenticated is being made available from our AuthReducer via mapStateToProps, and if it's set to true, we return our links to "My Favorites" and "Sign Out", since that's what signed-in users should see.
But why are we returning an array of <li>s? On any sort of React render() method, we have to return a single element, which is why we're always wrapping things in <div> tags. However, wrapping a group of <li>s within a <div> inside of a <ul> isn't very clean markup.
We can instead return an array of comma-separated <li>s, and React will just list them in order. The only thing we need in order to do this is to give them a key prop so that they are unique.
Notice that our "Sign Out" link isn't a <Link> tag but instead a normal <a> element. This is because we're not actually routing anywhere when this link is clicked; instead, we're calling the handleSignout() method to fire our signOutUser() action creator.
Now, when we "sign in" with any credentials that pass validation, our links should change! In addition, when Sign Out is clicked, authentication should be set to false.
There's one last piece we need here, though. When a user signs in, they shouldn't stay on the Login or Sign Up form; they should go to /favorites. Also, even though users can only see the My Favorites link in the header when they're signed in, there's nothing to stop them from navigating to it when they're not authenticated. We need a way to redirect them to the login page if they're trying to access a page only logged in user should be able to see.
To do this, we need to use a Higher-Order Component, sometimes known as a decorator.
While this term sounds intimidating, it's actually rather straightforward: a higher-order component is a function that takes an existing component and then wraps it in another component in order to add some new functionality.

Confused? We've actually been using higher-order components for awhile without giving them a name! A good example is react-redux's connect()() function: instead of just returning the component, we wrap it in connect in order to give it access to our store.
To get a better understanding, let's take a look at our App component:
src/containers/App.js
There should be a lot that looks familiar here, but we also have a few new concepts:
Here, we have two functions that return Route components. We are passing through a component and checking whether our user is authenticated, then either returning the component we are passing in as an argument or redirecting them to the /login or /favorites location. PrivateRoutes are restricted to authenticated users, and PublicRoutes are restricted to users who are not logged in.
Here, we are calling our <PublicRoute>s and <PrivateRoute> instead of just our vanilla <Route>s. We are also passing through whether our user is authenticated from the store.
Because this component is now connected to the store, we want to move it to the containers directory and update its location in index.js:
src/index.js
Now, when you sign in or up, you shold be redirected to /favorites, and when you log out or if you try to access http://localhost:3000/favorites without being signed in, you should be redirected to /login!
Conclusion
We're finally in the home stretch. We should now have everything we need to hook up real authentication, and Firebase makes it rather easy!
In the next article, we'll dive into Firebase and take a look at how to authenticate users for real. We'll also give logged-in users the ability to favorite gifs, which will let us finally populate our "My Favorites" page with some real content.
in your inbox:
let’s talk.
Thank you!
We appreciate your interest.
We will get right back to you.