Getting Started with Twill, an Open Source Laravel-Based CMS

How do companies like OpenAI, The New York Times, Pentagram, and the Art Institute of Chicago manage their brand identity when publishing content online? They all use the same powerful and flexible tool to create bespoke content management systems. Follow along as we explore how leading companies use Twill to differentiate themselves in a competitive online landscape.
Introducing Twill
Twill differentiates itself from other content management systems by allowing users to easily create unique and customized content layouts. With its simple drag-and-drop block editor, anyone can design and manage their own custom content without needing any technical skills. Built on the Laravel framework, Twill allows developers to extend and customize its functionality to meet the specific needs of each project. At the same time, users get a smooth experience that lets their creativity shine. This perfect mix of flexibility and user-friendliness makes Twill a standout choice for managing content. Check out the Twill demo site for a sneak peek at what is possible.
Note: Twill is frontend agnostic. You have complete control over how to render the content authored through Twill’s admin console. You could pass the content to Blade or Inertia, or expose it to a SPA or mobile app through API endpoints.
Getting Started
In this post, we’ll dig into the most important elements of Twill by building a basic page editor together. While Twill can be used for much more than this, it’s a great place to start.
The Twill docs have detailed installation instructions; please refer to them to get up and running.
Here are the basic steps you’ll take to install Twill in an existing Laravel app:
composer require area17/twill:"^3.0"
php artisan twill:install
php artisan storage:link
You should now be able to navigate to your Twill admin panel (/admin by default) and log in using the username and password you provided during installation.
As soon as you install Twill, it’ll add several new Artisan commands under the twill namespace; you can run php artisan twill to view a complete list. We’ll be relying on these to accelerate the development process.
Translations
Twill supports translations out of the box. To add a new locale, we’ll just need to add each in the config/translatable.php config file:
//...
'locales' => [
    'en',
    'es', // [tl! add]
],
//...
Now, when creating translatable content, we will have the option to add content in both English and Spanish.
Creating our first module
Twill is organized around “modules”, which is a way to organize business logic around an Eloquent model. For example, a CMS may have the following modules: pages, posts, projects, and team members.
We can use the twill:make:module artisan command to quickly create all the required files for a module:
php artisan twill:make:module [options] [--] <moduleName>
There are a lot of options you can pass along to this command, which may feel a bit overwhelming to a newcomer ... don’t worry, we’ll go through the most relevant options, and for this tutorial I recommend you pass the --all flag to enable all the options. Here’s the help page for twill:make:module:
Description:
  Create a new Twill Module

Usage:
  twill:make:module [options] [--] <moduleName>

Arguments:
  moduleName

Options:
  -B, --hasBlocks
  -T, --hasTranslation
  -S, --hasSlug
  -M, --hasMedias
  -F, --hasFiles
  -P, --hasPosition
  -R, --hasRevisions
  -N, --hasNesting
      --bladeForm
  -E, --generatePreview
      --all
      --force
      --factory
      --seeder
      --packageDirectory[=PACKAGEDIRECTORY]
      --packageNamespace[=PACKAGENAMESPACE]
      --parentModel[=PARENTMODEL]
-B, --hasBlocks- Whether the module should contain blocks.
- A block is a predefined component used to build custom layouts. You can create blocks to display text, images, video, and more.
- When a module includes blocks it will have access to the block editor, a drag-and-drop interface for changing and updating content.
-T, --hasTranslation- Whether the module’s fields should to be translatable.
- Adds a
*_translationstable to the generated migration.
-S, --hasSlug- Whether the module allows a slug.
- Adds a
*_slugstable to the generated migration.
-M, --hasMedias- Whether the module allows media such as a cover image, feature image, avatars, or product images.
-F, --hasFiles- Whether the module allows attached files.
-P, --hasPosition- Whether the module allows a defined position/order.
- This allows entries to be ordered in any way, such as a team page listing the founders at the top.
- Adds
positioncolumn to the generated migration.
-R, --hasRevisions- Whether the module should track edits to its content.
- Adds a
*_revisionstable to the generated migration.
-E, --generatePreview- Whether the module should define how to preview an entry in it.
- Preview files are used to preview edits made to the content. If you are using Blade to render the frontend you may be able to use the same file for both preview and the frontend.
We’ll generate a module to create and publish pages. Since I want most of these options, I’ll be using the --all flag:
php artisan twill:make:module --all pages
Note: Twill recommends using the plural form of the module name in the command to ensure the generated code is correct.
If you do not use the --all flag, you will be prompted to answer a few follow up questions before generating the module.
After running the command, there are a few instructions in the output to update the AppServiceProvider boot method and run migrations after modifying them.
-----
To add a navigation entry add the following to your AppServiceProvider BOOT method.
-----
use A17\Twill\Facades\TwillNavigation;
use A17\Twill\View\Components\Navigation\NavigationLink;

TwillNavigation::addLink(
    NavigationLink::make()->forModule('pages')
);
-----
Do not forget to migrate your database after modifying the migrations.
Here are the files Twill will generate after running the command above:
app/Http/Controllers/Twill/PageController.phpapp/Http/Requests/Twill/PageRequest.phpapp/Models/Page.phpapp/Models/Revisions/PageRevision.phpapp/Models/Slugs/PageSlug.phpapp/Models/Translations/PageTranslation.phpapp/Repositories/PageRepository.phpdatabase/factories/PageFactory.phpdatabase/migrations/2024_XX_XX_XXXXXX_create_pages_tables.phpdatabase/seeders/PageSeeder.phpresources/views/site/page.blade.php
Modified files:
routes/twill.php
These files will likely look familiar, as they’re mainly regular Laravel files. There’s one that stands out, though, that you’ll need to become familiar with: the repository file. Repositories allow you to customize the default functionality of your module by overriding or implementing methods provided by Twill.
Following the previous instructions, we’ll now need to modify the migration to define the fields we want our pages to have.
Let’s imagine that each page on our site will have a translatable title, translatable subtitle, cover image, and translatable content. The migration is generated with a title and description. We’ll modify the migration to remove the description and add the subtitle, as you can see below; the content and image will show up in a different step.
<?php

use Illuminate\Database\Migrations\Migration;
use Illuminate\Database\Schema\Blueprint;
use Illuminate\Support\Facades\Schema;

return new class extends Migration
{
    public function up()
    {
        Schema::create('pages', function (Blueprint $table) {
            createDefaultTableFields($table);
            $table->integer('position')->unsigned()->nullable();
            $table->nestedSet();
        });

        Schema::create('page_translations', function (Blueprint $table) {
            createDefaultTranslationsTableFields($table, 'page');
            $table->string('title', 200)->nullable();
            $table->text('subtitle')->nullable(); // [tl! add]
            $table->text('description')->nullable(); // [tl! remove]
        });

        Schema::create('page_slugs', function (Blueprint $table) {
            createDefaultSlugsTableFields($table, 'page');
        });

        Schema::create('page_revisions', function (Blueprint $table) {
            createDefaultRevisionsTableFields($table, 'page');
        });
    }
};
Since we passed the --all flag to the twill:make:module command, our migration comes with a few tables to store data for the extra options. The pages table will contain all the base data for the page. page_translations stores all the fields you would like to be translatable. page_slugs and page_revisions as you may have guessed, stores slugs and revisions.
There are a few things to note here. First, our title and subtitle fields were added to the page_translations schema. Any translatable fields will be defined in the page_translations table instead of the base pages table. Second, as I noted earlier, we didn’t define a column for our cover image or content. We’ll add these later through our controller, using Twill’s media and blocks features.
We can now run our migration:
php artisan migrate
If you log into your Twill admin console now, you should see a new navigation item at the top for Pages. If it’s missing, double-check that you’ve updated your AppServiceProvider, adding the requested TwillNavigation::addLink code.
Before we can add any pages to the app, we need to make some changes to our Page model and controller.
Note: As we update our app, keep in mind that Twill is just a Laravel package. It adds functionality to Laravel, but we are still using Laravel. Remembering this can also be helpful when troubleshooting something unexpected.
Looking at our Page model we should see:
<?php

namespace App\Models;

use A17\Twill\Models\Behaviors\HasBlocks;
use A17\Twill\Models\Behaviors\HasTranslation;
use A17\Twill\Models\Behaviors\HasSlug;
use A17\Twill\Models\Behaviors\HasMedias;
use A17\Twill\Models\Behaviors\HasFiles;
use A17\Twill\Models\Behaviors\HasRevisions;
use A17\Twill\Models\Behaviors\HasPosition;
use A17\Twill\Models\Behaviors\HasNesting;
use A17\Twill\Models\Behaviors\Sortable;
use A17\Twill\Models\Model;
use Illuminate\Database\Eloquent\Factories\HasFactory;

class Page extends Model implements Sortable
{
    use HasBlocks;
    use HasTranslation;
    use HasSlug;
    use HasMedias;
    use HasFiles;
    use HasRevisions;
    use HasPosition;
    use HasNesting;
    use HasFactory;

    protected $fillable = [
        'published',
        'title',
        'description',
        'position',
    ];

    public $translatedAttributes = [
        'title',
        'description',
    ];

    public $slugAttributes = [
        'title',
    ];

}
Using the twill:make:module command generated a model class configured to use the required Twill classes and traits. As you can see, it also gives each model translatable title and description fields by default. In our migration we defined title and subtitle so we’ll need to make a quick change.
So let’s add subtitle and drop description from the $fillable and $translatedAttributes arrays.
Note: You should use
$fillableover$guardedin your models, because Twill usesrequest()->all()under the hood.
app/Models/Page.php
protected $fillable = [
    'published',
    'title',
    'subtitle' // [tl! add]
    'description' // [tl! remove]
    'position',
];

public $translatedAttributes = [
    'title',
    'subtitle' // [tl! add]
    'description' // [tl! remove]
];
The other columns, published and position, were added to the migration directly or through the createDefaultTableFields helper.
Finally, we need to tell Twill how to collect the data. We do so in Twill by implementing the getForm method on our PageController.
The getForm method returns a A17\Twill\Services\Forms\Form object we can use to define which form fields to display on the create and edit pages for this module. By default, creating a new model is a two-step process. For example, adding a new page triggers a modal asking for the page’s title and slug. Submitting the modal will redirect to the edit page.
Since title and slug will already be supplied by that initial modal, our form definition is not required to have these fields. What should we add? Remember how our pages should have a title, subtitle, cover image, and content. We will add the remaining subtitle, cover image, and content fields to the form.
app/Http/Controllers/Twill/PageController.php
use A17\Twill\Models\Contracts\TwillModelContract;
use A17\Twill\Services\Forms\Fields\BlockEditor;
use A17\Twill\Services\Forms\Fields\Input;
use A17\Twill\Services\Forms\Fields\Medias;
use A17\Twill\Services\Forms\Form;

// ...

public function getForm(TwillModelContract $model): Form
{
    $form = parent::getForm($model);
    // [tl! add:1,11]
    $form->add(
        Input::make()->name('subtitle')->label('Subtitle')
    );

    $form->add(
        Medias::make()->name('cover')->label('Cover Image')
    );

    $form->add(
        BlockEditor::make()
    );
    $form->add(// [tl! remove:0,3]
        Input::make()->name('description')->label('Description')->translatable()
    );

    return $form;
}
We use the Medias and BlockEditor form fields to add the cover image and content.
Here is how our new page form will look in our Twill admin console:

Now is a good time to dig a bit deeper into how media and blocks work in Twill.
Media
You can configure your Twill app to store its media in S3, Azure, or on the local server. Once it’s uploaded, media can be attached to, and used by, multiple modules. The original will be stored and used when generating different cropped versions. Twill uses Glide (by Jonathan Reinink) as the default image rendering service to crop and cache generated images, but you can also use Imgix, Twicpics, or a local rendering service instead.
The same image can be reused in several places, each with a different size and aspect ratio requirement. Twill offers configuration options to define all the ways an image can be wrangled through “roles” and “crops”; an image’s role hints at where to use the image, and crops define the aspect ratio used to generate the crop.
Twill ships with default roles and crops, which you can configure in config/twill.php, but each module can define its own by setting a public variable called $mediasParams on the model.
Here is an example from the Twill documentation that illustrates the different options.
public $mediasParams = [
    // Role name
    'cover' => [
        // Crop name
        'default' => [
            [
                // Ratio name, same as crop name if single
                'name' => 'default',
                // Ratio as a fraction or number
                // 0 = free form
                // 1 = square
                'ratio' => 16 / 9,
            ],
        ],
        // Crop name
        'mobile' => [
            [
                // Ratio name, multiple allowed
                'name' => 'landscape',
                // Ratio > 1
                'ratio' => 16 / 9,
            ],
            [
                // Ratio name, multiple allowed
                'name' => 'portrait',
                // Ratio < 1
                'ratio' => 3 / 4,
            ],
        ],
    ],
    // Another role
];
Twill will serve your images to the frontend using the configured rendering service, which will resize, crop, and cache your images before serving.
# Example route with Glide as the configured rendering service
GET|HEAD img/{path} Front\GlideController

# Example generated URL
https://example.com/img/eea9e033-a216-423a-9717-0b01571d609f/dolorep9c.jpg?fm=jpg&q=80&fit=max&crop=740%2C480%2C0%2C0
After you change a model’s roles or crops, you’ll probably want to refresh the crops by passing the model and role to the twill:refresh-crops command:
php artisan twill:refresh-crops {modelName} {roleName}
Blocks
Blocks are predefined components you can use like Lego bricks to build custom layouts. You can think of blocks like a template for a specific type of content. An image block, for example, will have an input for selecting an image and could provide additional form fields for adding a caption or selecting positioning or width. A person card block may have an input for selecting a headshot, text inputs for name, title, and social media links. A technical blog or documentation site could have blocks for code highlighting, callouts, JSFiddle widgets, or videos.
Pentagram’s website, which is powered by Twill, is great example of how a block can be used to create unique layouts. The Twill demo is running an older version of the content management system powering pentagram.com. Log into the demo and check out the available blocks under ‘Work’, such as quote, full-width image, fixed image grid, and flexible image grid.
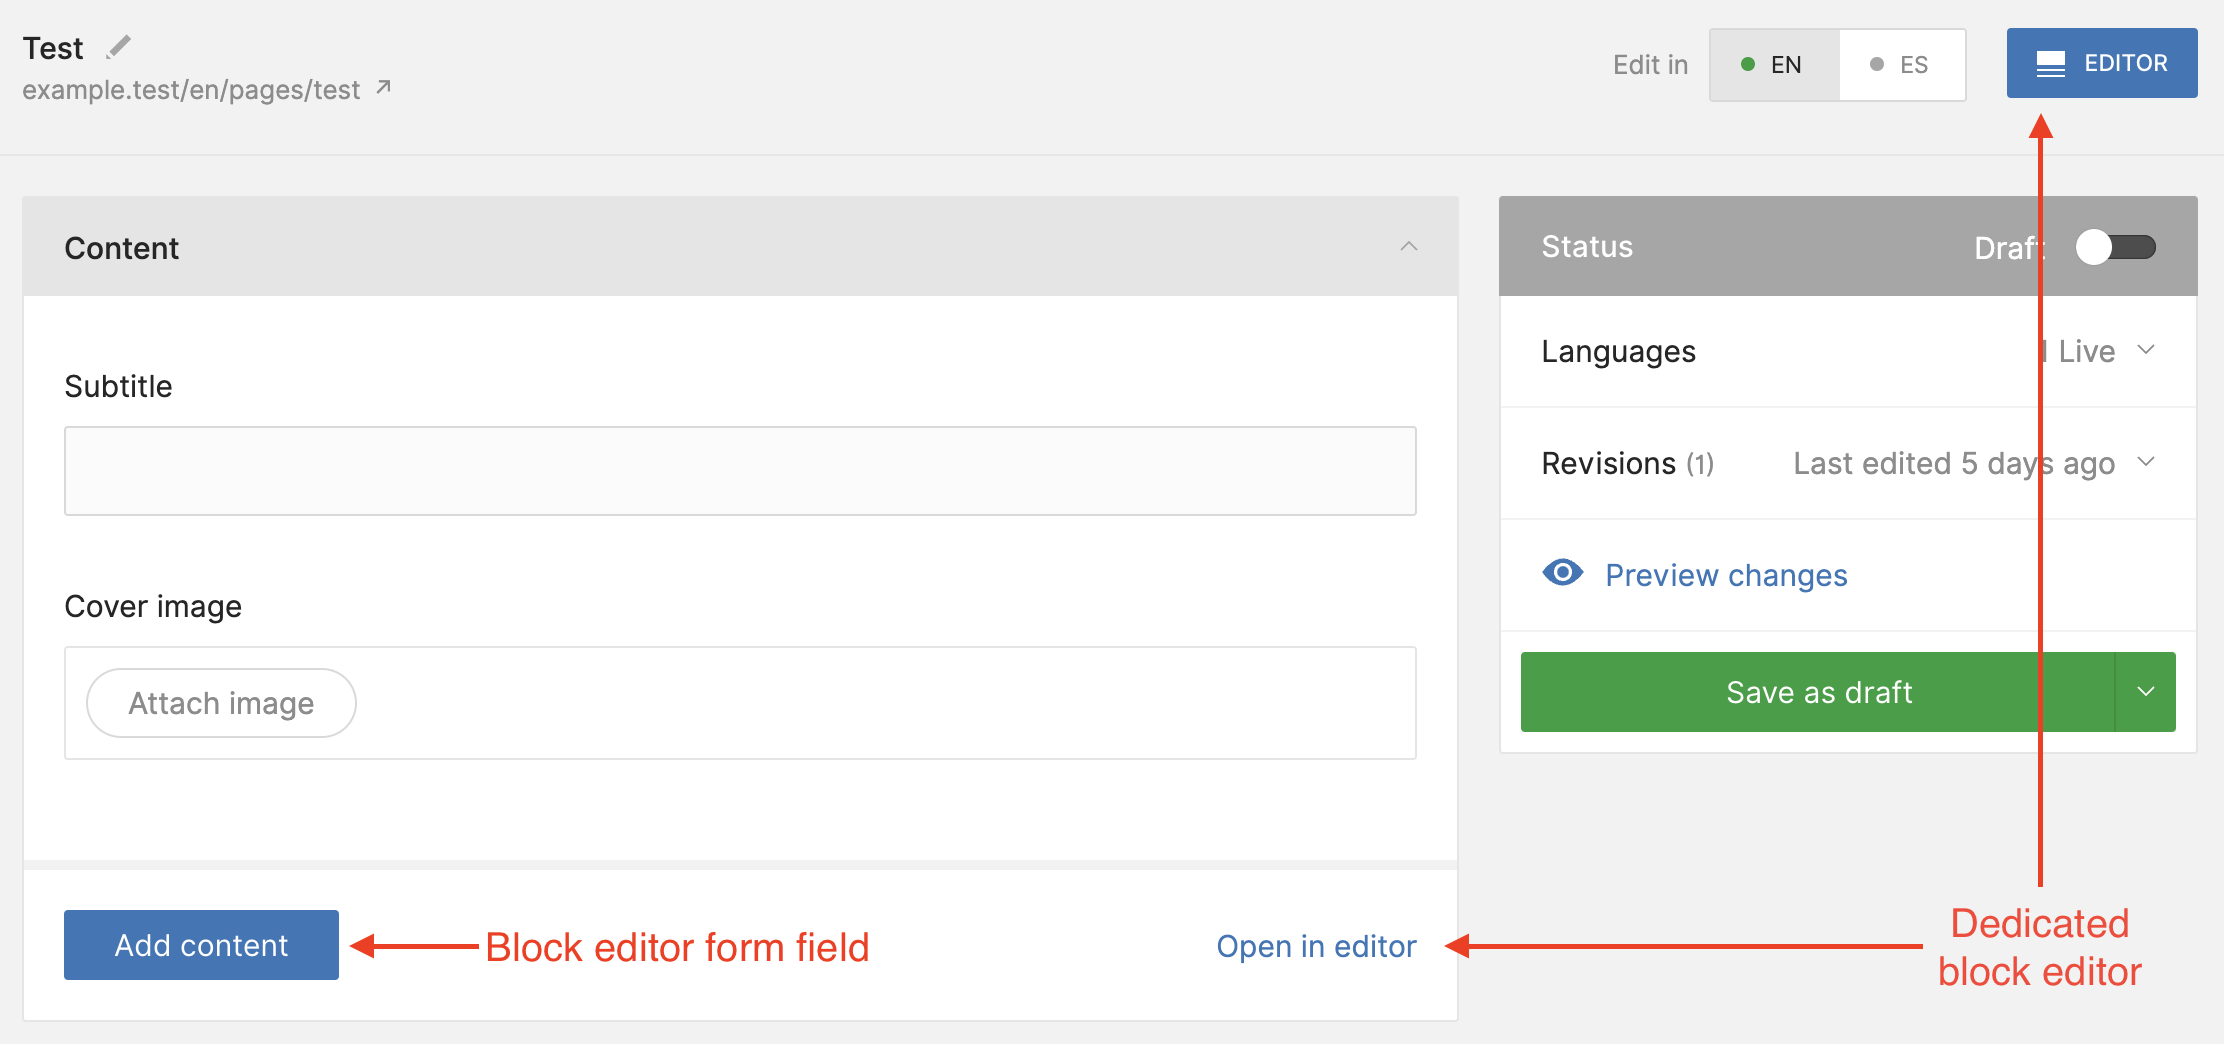
There are two ways to add and edit blocks: using the model’s block editor form field, or with the dedicated block editor.
The block editor form field was added to our page’s controller getForm() method:
app/Http/Controllers/Twill/PageController.php
use A17\Twill\Services\Forms\Fields\BlockEditor;

//...
$form->add(
    BlockEditor::make()
);
The dedicated block editor is a full-page editing experience you can use to pull in any number of blocks, update block contents, and arrange them through a drag-and-drop interface. The dedicated block editor can be accessed by clicking ‘Open in editor’ at the bottom of the panel or the ‘EDITOR’ button next to the language switcher.
So let’s make a block component of our own! We’ll use the twill:make:componentBlock command to generate a new quote component.
php artisan twill:make:componentBlock quote
The command generates two new files:
app/View/Components/Twill/Blocks/Quote.php(Where you define the file used to render the content, and the form used to create/edit it)resources/views/components/twill/blocks/quote.blade.php(The file used to render the component.)
We’ll modify these files, then, to make them work for our new “quote” component. We’re going to give each quote a source (who said it) and content (what they said).
We can capture this information by adding fields to the getForm method of the Quote class, just like we added fields to the PageController:
app/View/Components/Twill/Blocks/Quote.php
<?php

namespace App\View\Components\Twill\Blocks;

use A17\Twill\Services\Forms\Fields\Wysiwyg;
use A17\Twill\Services\Forms\Form;
use A17\Twill\Services\Forms\Fields\Input;
use A17\Twill\View\Components\Blocks\TwillBlockComponent;
use Illuminate\Contracts\View\View;

class Quote extends TwillBlockComponent
{
    // [tl! add:1,5]
    public static function getBlockIcon(): string
    {
        return 'quote';
    }

    public function render(): View
    {
        return view('components.twill.blocks.quote');
    }

    public function getForm(): Form
    {
        return Form::make([
            Input::make()->name('title'), // [tl! remove]
            Wysiwyg::make()->name('text') // [tl! remove]
            Input::make()->name('source') // [tl! add:0,6]
                ->label('Quote Source'),

            Wysiwyg::make()->name('content')
                ->label('Quote Content')
                ->toolbarOptions(['bold', 'italic', 'underline'])
        ]);
    }
}
Note: You can use
php artisan twill:list:iconsto view available icons or even specify your own custom icon.
And we can fill out what the quote will look like in the quote’s template file:
resources/views/components/twill/blocks/quote.blade.php
<div>
    <h2>{{ $input('title') }}</h2> <!-- [tl! remove] -->
    {!! $input('text') !!} <!-- [tl! remove] -->
    <blockquote>{!! $input('content') !!}</blockquote> <!-- [tl! add] -->
    <p>{!! $input('source') !!}</p> <!-- [tl! add] -->
</div>
Note: Be careful when echoing unescaped content supplied by your users.
The quote block now appears as an option in our block editor form field.

The Image and Body text blocks are default blocks installed with Twill. You’ll need to create two view files in resources/views/site/blocks/ for image.blade.php and text.blade.php before you can use them. It’s easy to create your own so I always remove them:
config/twill.php
return [
    'block_editor' => [
        'use_twill_blocks' => [],
    ],
];
Now we are left with our new quote block.
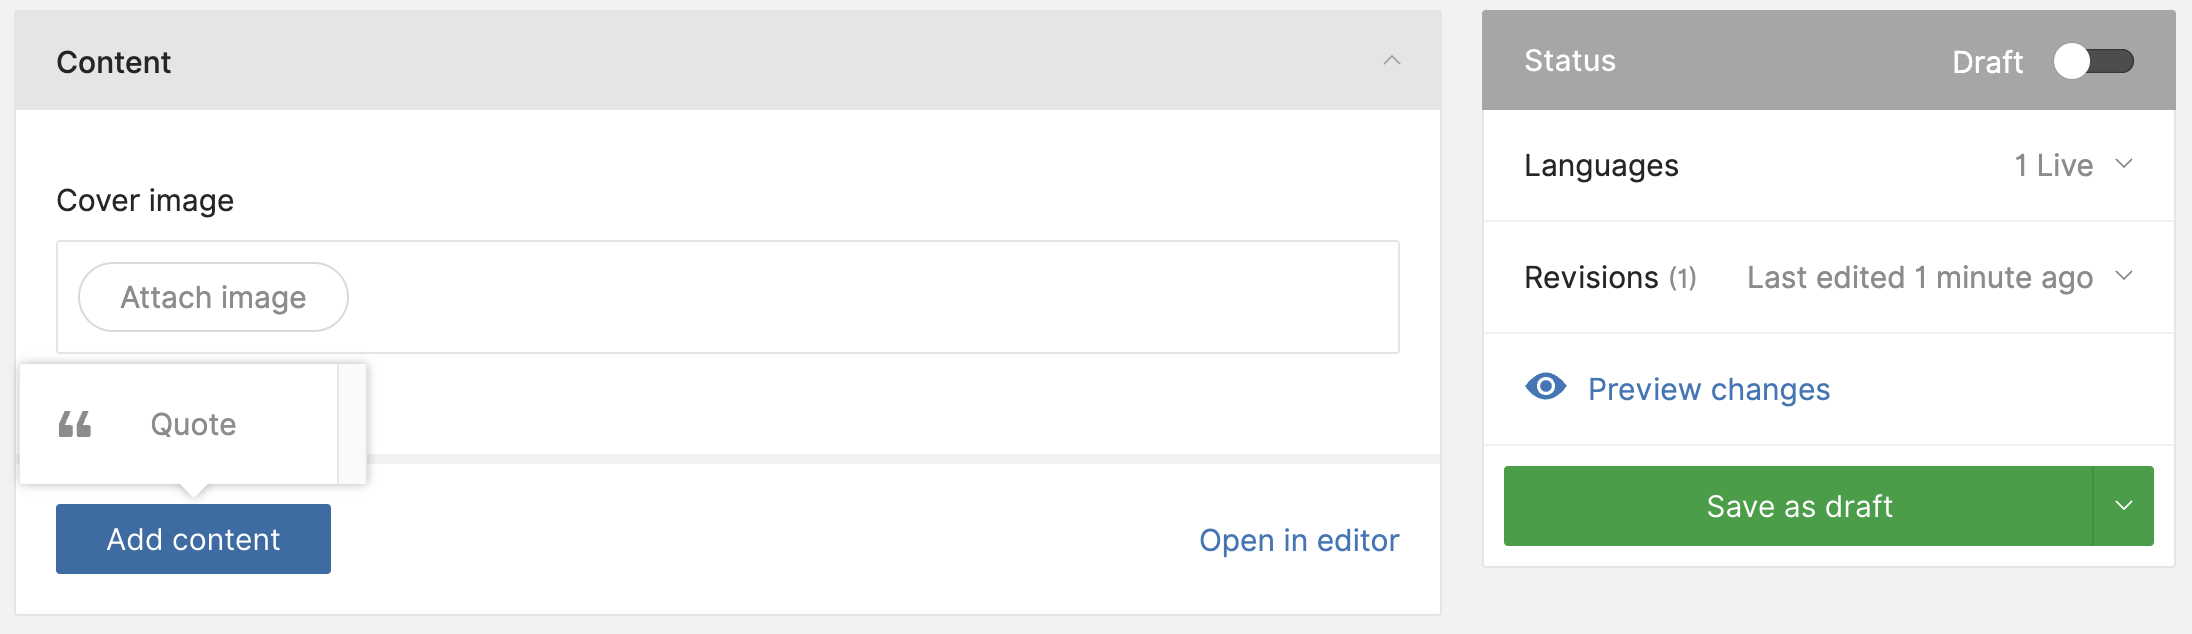
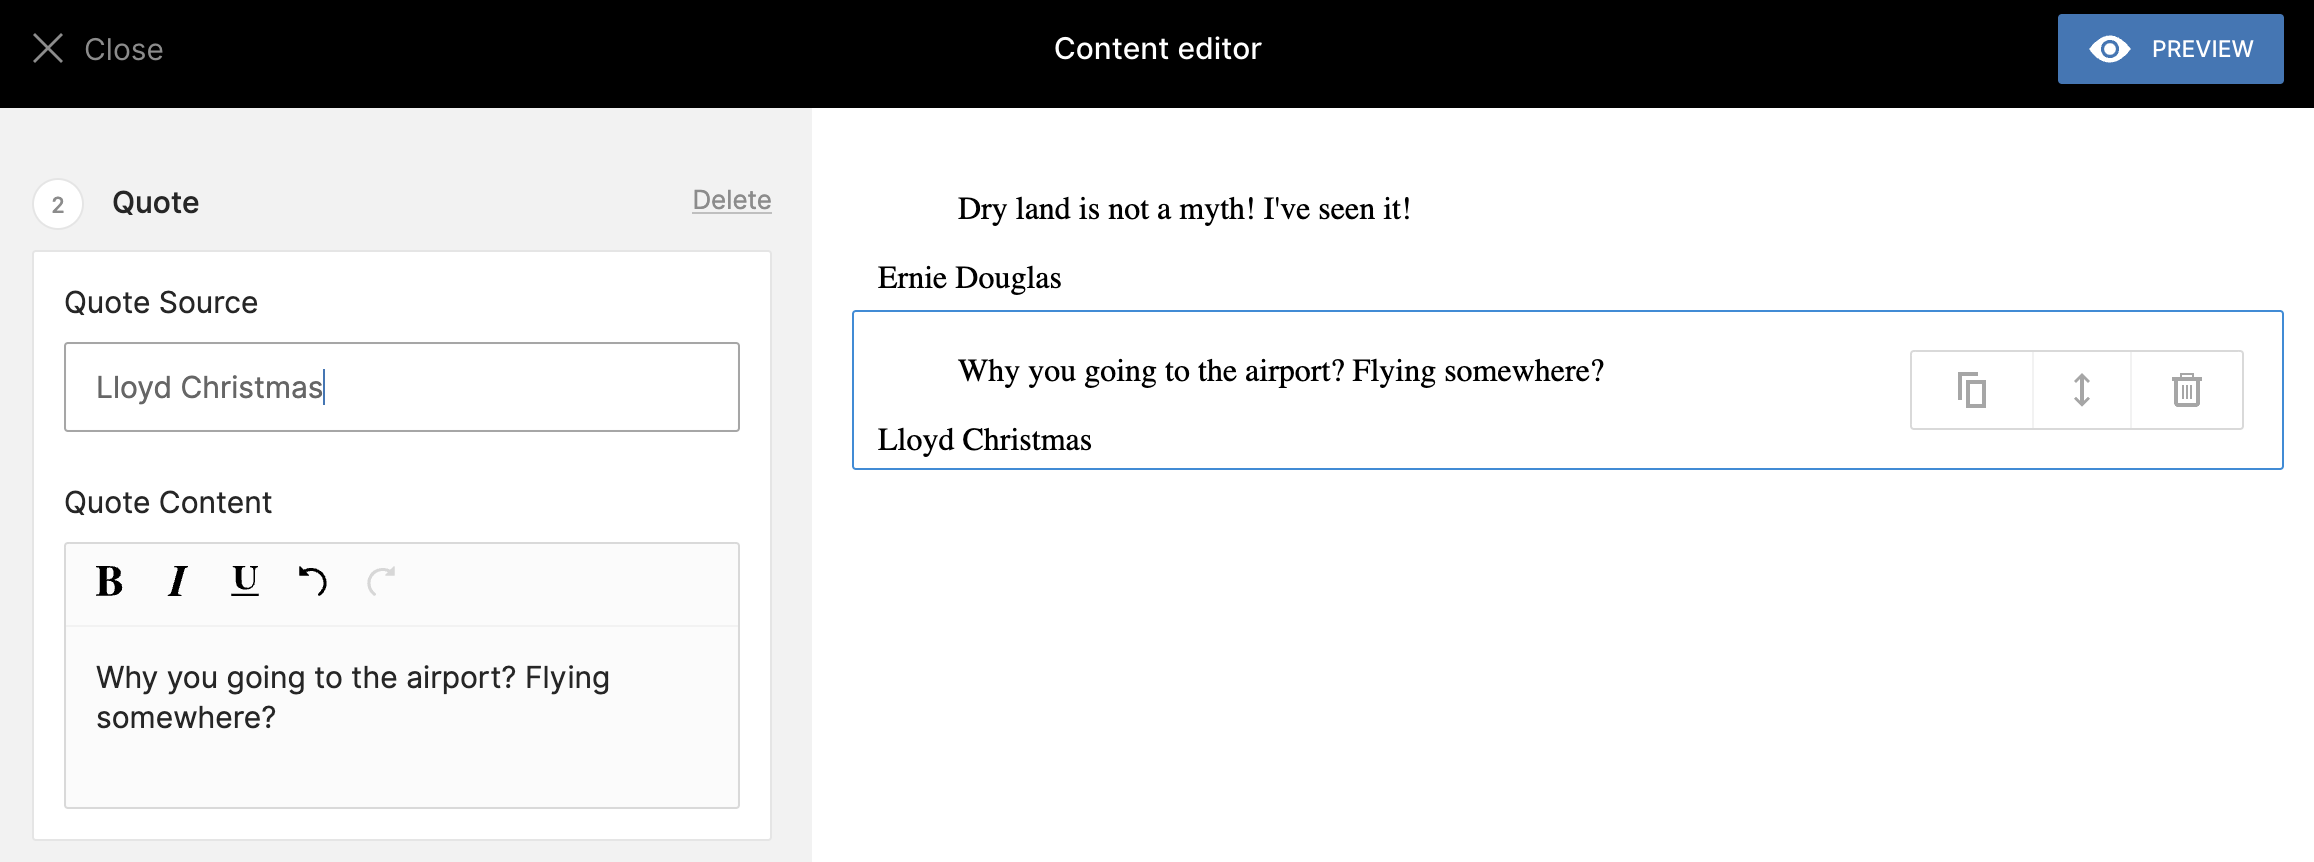
We can create our first block by clicking ‘Add content’ and selecting our quote block. Enter the quote source and content then save.

Let’s open the dedicated block editor to add another quote. Click ‘Open in editor’ at the bottom of the content panel or the ‘EDITOR’ button next to the language switcher to open the dedicated block editor.

Using the dedicated block editor you can drag-and-drop new blocks into the content area, edit the block’s content, and even drag-and-drop blocks to reorder them.
Now, what if we want to support translations within the block editor? We can update the form field definitions, chaining on a call to translatable() on any fields we want to translate.
app/View/Components/Twill/Blocks/Quote.php
public function getForm(): Form
{
    return Form::make([
        Input::make()->name('source')
            ->label('Quote Source'),// [tl! remove]
            ->label('Quote Source') // [tl! add]
            ->translatable(), // [tl! add]

        Wysiwyg::make()->name('content')
            ->label('Quote Content')
            ->toolbarOptions(['bold', 'italic', 'underline'])
            ->translatable() // [tl! add]
    ]);
}
We’ll also need to update the Blade template to access those translations.
resources/views/components/twill/blocks/quote.blade.php
<div>
    <blockquote>{!! $input('content') !!}</blockquote> <!-- [tl! remove] -->
    <p>{!! $input('source') !!}</p> <!-- [tl! remove] -->
    <blockquote>{!! $input('content')['en'] !!}</blockquote><!-- [tl! add] -->
    <p>{!! $input('source')['en'] !!}</p><!-- [tl! add] -->
</div>
Frontend
As I mentioned earlier, Twill is frontend agnostic; it allows you to build the backend, but doesn’t have any hand in how that content is delivered to the end user. For example, the last Twill project I worked on delivered user-generated content as JSON through a single localized endpoint.
For this tutorial, we’ll use Blade templates to show just one way to render content authored through Twill. Remember, you can choose what works best for your application.
First, create a controller to handle these requests:
php artisan make:controller PageController
Our demo app only needs the index and show methods.
app/Http/Controllers/PageController.php
<?php

namespace App\Http\Controllers;

use App\Repositories\PageRepository;
use Illuminate\Contracts\View\View;

class PageController extends Controller
{
    public function index(PageRepository $pageRepository): View
    {
        return view('page.index', [
            'pages' => $pageRepository->all()
        ]);
    }

    public function show($slug, PageRepository $pageRepository): View
    {
        // Use App::setLocale('es') to change the translation
        $page = $pageRepository->forSlug($slug);

        abort_unless($page, 404, 'Page not found');

        return view('page.show', [
            'page' => $page
        ]);
    }
}
Next, let’s add the Blade files.
The index view will list our pages using the page’s title and subtitle and link to the show view.
resources/views/page/index.blade.php
<!DOCTYPE html>
<html>
    <head>
        <link rel="stylesheet" href="https://cdn.jsdelivr.net/npm/@picocss/pico@2/css/pico.min.css" />
    </head>
    <body>
        <div class="container">
            <h1>Pages</h1>
            <ul>
                @foreach ($pages as $page)
                    <li>
                        <a href="{{ route('page.show', $page->slug) }}">
                            {{ $page->title }} - {{ $page->subtitle }}
                        </a>
                    </li>
                @endforeach
            </ul>
        </div>
    </body>
</html>
The show view will display the page’s title, subtitle, cover image and render out any blocks we defined.
resources/views/page/show.blade.php
<!DOCTYPE html>
<html>
    <head>
        <link rel="stylesheet" href="https://cdn.jsdelivr.net/npm/@picocss/pico@2/css/pico.min.css" />
    </head>
    <body>
        <div class="container">
            <h1>{{ $page->title }}</h1>
            <h2>{{ $page->subtitle }}</h2>
            <img src="{{ $page->image('cover') }}" alt="{{ $page->title }}" />
            {!! $page->renderBlocks() !!}
        </div>
    </body>
</html>
Finally, we’ll update routes/web.php with the new routes.
use App\Http\Controllers\PageController;
use Illuminate\Support\Facades\Route;

Route::get('/pages', [PageController::class, 'index'])->name('page.index');
Route::get('/pages/{slug}', [PageController::class, 'show'])->name('page.show');
Visiting these routes in the browser will display our basic index and show pages.
Localization
Our basic frontend does not handle serving the content in different languages. There are a few different ways you can add this to your app; I’d recommend Twill’s guide Building a multilingual site with Laravel Localization as a good place to start.
Conclusion
Twill is a fantastic choice for anyone looking to create a custom content management system with Laravel. The straightforward module creation, built-in translation support, and user-friendly media and block editor are just some of the features that make it a joy to work with. Whether building a simple blog or a complex multilingual platform, Twill provides the tools and flexibility to bring your vision to life ... try it out and see how it can transform your content management processes.
in your inbox:
let’s talk.
Thank you!
We appreciate your interest.
We will get right back to you.