Introducing Jigsaw, a Static Site Generator for Laravel Developers


That's right, Tighten has created a Laravel-based static site generator named Jigsaw, and we think it's pretty great.
Before I write another line of this post, I want to address the looming question: Why create another static site generator? In PHP alone there are two, and since we soft-launched Jigsaw there's already been another Blade-based static site generator launched.
Why Jigsaw?
There are three primary reasons we created Jigsaw.
First, we believe that Blade, Elixir, and Markdown are the perfect technologies for static site generation. Laravel's Blade templating engine is a perfect fit for any site, and it's especially well-suited for sites that are almost entirely template-driven, like static sites. Pair it with Markdown for the content and you have a perfect templating system. And Elixir is the best build system you can find.
Second, we want to help Laravel developers—who already have the skills and experience to quickly write dynamic apps with Blade and Elixir—use their pre-existing skills in new contexts. Now, the tools you're already comfortable with can enable you to build an entirely different class of site—no need to learn any new systems or syntaxes.
And third, we think there are a lot of sites that might start their life as a static site, but quickly need to grow. The path from Jigsaw site to Laravel site is short and getting shorter.
What is Jigsaw?
So, I just blabbed on about why Jigsaw—but what is it?
In the spirit of Jekyll and Octopress, Middleman and Sculpin, Jigsaw is a static site generator. This means it's a dynamic application that you can run at your command and which spits out static files—HTML, CSS, and JavaScript.
Static site generators most commonly run on your local machine, and then the output can be pushed up to a simple web host—any web host will do, since they're just going to be serving static files. You can use git to deploy, or scp, or even SFTP.
So, Jigsaw is a Laravel-based tool that makes it simple for you to generate static files using a simple command (jigsaw build) from Blade templates, Markdown files, and anything you'd like for your assets (Sass, Less, or whatever else.)
How can I use Jigsaw today?
Well, that's just a fantastic question. Let's create a simple site with Jigsaw.
First, install Jigsaw globally (or check the docs for how to install it locally):
$ composer global require tightenco/jigsaw
Now, from your Sites or wwwroot folder, create your new Jigsaw site:
$ cd ~/Sites
$ jigsaw init acme-school
$ cd acme-school
Change into the new directory and you'll see a directory structure a little bit like this:
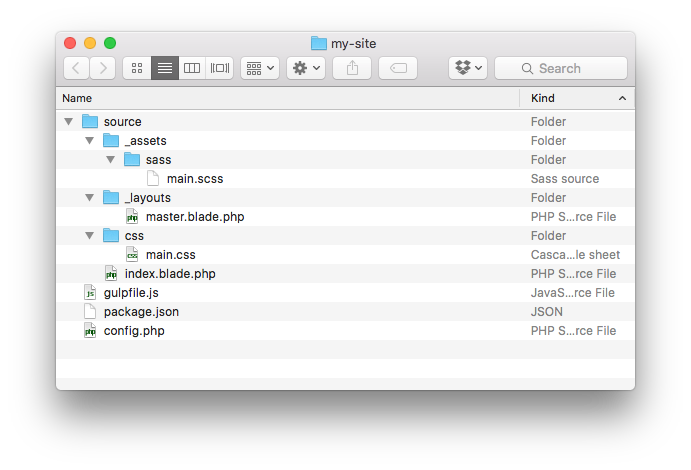
You can see your configuration file in config.php, your source templates and assets in source, and your package.json and gulpfile.js for your asset compilation.
You can run your first build with jigsaw build, which will create a build_local folder containing your distribution files.
Now, let's try to quickly serve these files. You can either spin up a quick PHP server and open http://localhost:8080/ in your browser:
$ php -S localhost:8080/ -t build_local
Or you can rely on Browsersync to show you the site—with the added benefit that it provides automatic live reload. Jigsaw's default Elixir configuration (in gulpfile.js) comes with Browsersync support enabled out of the box, serving from your build_local directory. This will rely on you first installing your npm dependencies and running gulp, which you'll want to do anyway if you want to build your asset files:
$ npm install
$ gulp watch
Once you've done this, all of your assets will be compiled and watched, your source files will be compiled and watched, and Browsersync will serve these compiled files directly from build_local at http://localhost:3000/.
Making your first pages
We can see a Hello, World! example if we open http://localhost:3000. Now, let's build out a really simple site.
Make sure that gulp watch is running in your Terminal; it'll pick up these changes we're making and automatically build them.
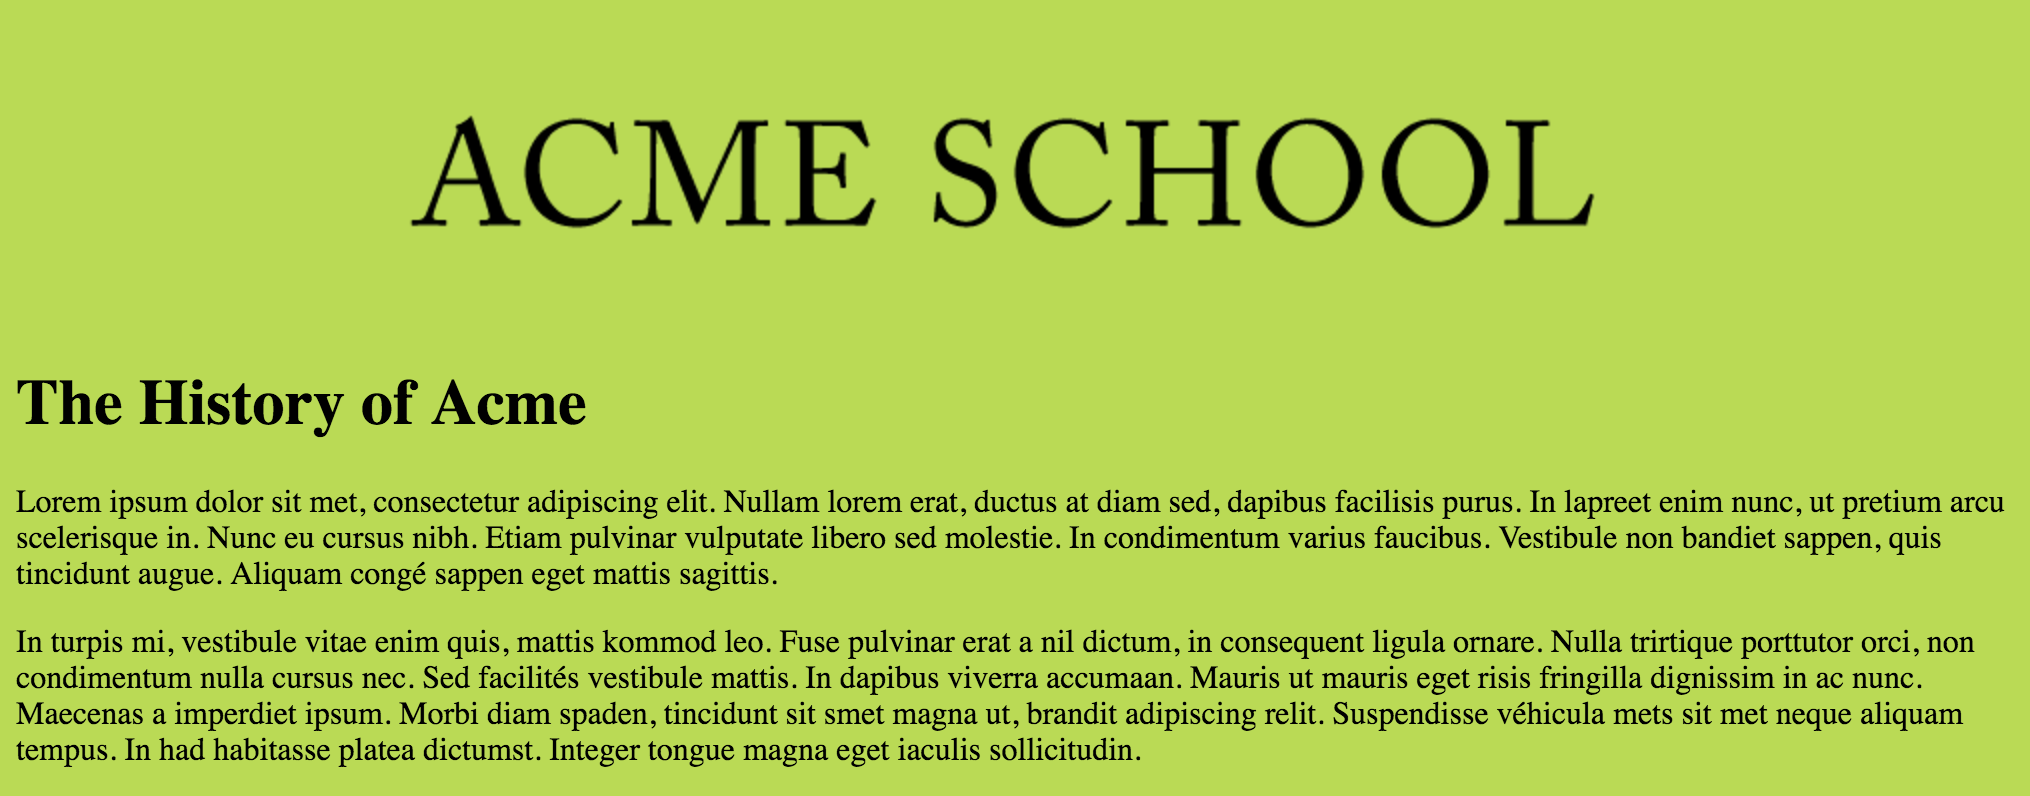
First, let's set the page to look a bit more like Acme School. Open up source\_assets\sass\main.scss and add this line:
html { background: #bada55; }
Next, let's add a logo up top. Open up source\_layouts\master.blade.php and add these lines just after the opening <body> tag:
        <div style="text-align: center;">
            <img src="https://s3.amazonaws.com/f.cl.ly/items/3Y1x3L0s2O3A1u3i3t3E/acme-school-logo.png?v=b25024ea" alt="Acme School">
        </div>
Let's add a bit of content to our home page. Edit _source/index.blade.php, the home page, and add a bit more content:
@extends('_layouts.master')

@section('body')
<h1>Hello world!</h1>
<p>Learn more about our <a href="/history/">History</a>.</p>
<p>Lorem ipsum dolor sit met, consectetur adipiscing elit. Nullam lorem erat, ductus at diam sed, dapibus facilisis purus. In lapreet enim nunc, ut pretium arcu scelerisque in. Nunc eu cursus nibh. Etiam pulvinar vulputate libero sed molestie. In condimentum varius faucibus. Vestibule non bandiet sappen, quis tincidunt augue. Aliquam congé sappen eget mattis sagittis.</p>
@endsection
And finally, we'll add a "history" page. We could just add history.blade.php and write the page with normal Blade syntax, but just to show off, let's make a page using Markdown.
Create a file at source/history.md and put these lines in it:
---
extends: _layouts.master
section: body
---

# The History of Acme

Lorem ipsum dolor sit met, consectetur adipiscing elit. Nullam lorem erat, ductus at diam sed, dapibus facilisis purus. In lapreet enim nunc, ut pretium arcu scelerisque in. Nunc eu cursus nibh. Etiam pulvinar vulputate libero sed molestie. In condimentum varius faucibus. Vestibule non bandiet sappen, quis tincidunt augue. Aliquam congé sappen eget mattis sagittis.

In turpis mi, vestibule vitae enim quis, mattis kommod leo. Fuse pulvinar erat a nil dictum, in consequent ligula ornare. Nulla trirtique porttutor orci, non condimentum nulla cursus nec. Sed facilités vestibule mattis. In dapibus viverra accumaan. Mauris ut mauris eget risis fringilla dignissim in ac nunc. Maecenas a imperdiet ipsum. Morbi diam spaden, tincidunt sit smet magna ut, brandit adipiscing relit. Suspendisse véhicula mets sit met neque aliquam tempus. In had habitasse platea dictumst. Integer tongue magna eget iaculis sollicitudin.
Quick note: when you add a new file to your source, the watcher won't pick it up if it's already running. The best way to ensure it picks it up is to quit your
gulp watchprocess withctrl-c, runjigsaw build, and then rungulp watchagain and it'll pick it up now.
That's all! You can now navigate to the history page and see the output of your Markdown rendered right in front of you.
Variables
There are a few other easy customizations you can make to your Jigsaw site, and those are in the area of passing around variables from custom config files and from Markdown front matter.
Global variables
First, global site-wide variables. What if you want to set the Google Analytics variable in one place, and make it super easy to change?
Edit config.php. By default it will contain something like this:
<?php

return [
    'production' => false,
];
That production variable is not actually used by the system, so you can just delete it for now. Let's imagine we wanted different Google Analytics IDs depending on our environment. Add a key for it and put your local Google Analytics ID here:
<?php

return [
    'google_analytics_id' => 'UA-12345-01',
];
Now, let's get that same variable, but customized for production. Create config.production.php and put this in it:
<?php

return [
    'google_analytics_id' => 'UA-12345-02',
];
Now, in your source/_layouts/master.blade.php, you can refer to your new $google_analytics_id variable and it'll be passed different content depending on which environment you're building for.
    ...
        @yield('body')
        <script>
            (function(b,o,i,l,e,r){b.GoogleAnalyticsObject=l;b[l]||(b[l]=
                    function(){(b[l].q=b[l].q||[]).push(arguments)});b[l].l=+new Date;
                e=o.createElement(i);r=o.getElementsByTagName(i)[0];
                e.src='//www.google-analytics.com/analytics.js';
                r.parentNode.insertBefore(e,r)}(window,document,'script','ga'));
            ga('create','{{ $google_analytics_id }}','auto');ga('send','page view');
        </script>
    </body>
</html>
Custom front matter variables
Sometimes your variables will be per-page instead of global. On your Markdown pages, it's simple to pass custom per-page variables using custom YAML front matter.
Let's imagine a sub-page template, which all of the Markdown-based sub pages on our template extend, and which has a page header that has different text for each page. Create this sub-page template at source/_layouts/subpage.blade.php:
@extends('_layouts.master')

@section('body')
    <div class="sub-page-header">
        <h2>{{ $subPageTitle }}</h2>
    </div>
    @yield('sub-page-body')
@endsection
Now, let's edit our history.md file to update it to use this template, and to pass a string up to the $subPageTitle variable:
---
extends: _layouts.subpage
section: sub-page-body
subPageTitle: The History of Acme
---

Lorem ipsum dolor sit met, consectetur adipiscing elit. Nullam lorem erat, ductus at diam sed, dapibus facilisis purus. In lapreet enim nunc, ut pretium arcu scelerisque in. Nunc eu cursus nibh. Etiam pulvinar vulputate libero sed molestie. In condimentum varius faucibus. Vestibule non bandiet sappen, quis tincidunt augue. Aliquam congé sappen eget mattis sagittis.

In turpis mi, vestibule vitae enim quis, mattis kommod leo. Fuse pulvinar erat a nil dictum, in consequent ligula ornare. Nulla trirtique porttutor orci, non condimentum nulla cursus nec. Sed facilités vestibule mattis. In dapibus viverra accumaan. Mauris ut mauris eget risis fringilla dignissim in ac nunc. Maecenas a imperdiet ipsum. Morbi diam spaden, tincidunt sit smet magna ut, brandit adipiscing relit. Suspendisse véhicula mets sit met neque aliquam tempus. In had habitasse platea dictumst. Integer tongue magna eget iaculis sollicitudin.
That's it! You're now passing variables up to your template from your Markdown.
Deploying your site
Just run jigsaw build production. You now have a build_production folder that's ready to go to prod. Deploy it however you'd like, and you're good to go.
This is the exact same set of files from your build_local that you've been previewing, except it prefers any variables in config.production.php over the defaults in config.php.
Converting your Jigsaw site to Laravel
So, if one of our sales pitches is that it's easy to convert this site to Laravel, how exactly should you do that?
If you're not using any Markdown, converting a Jigsaw site to Laravel is as simple as this:
- Create a new Laravel app in a new directory
- Move your
jigsawsite\source\_assetsdirectory's contents intolaravelsite\resources\assets - Move the rest of the
jigsawsite\sourcedirectory intolaravelsite\resources\views - Copy
gulpfile.jsfrom your Jigsaw site over to your Laravel site - Set up routes in
app/Http/routes.phpto point to all of your templates, like this:Route::get('/', function () { return view('index'); } - Grab any variables from your
config.phpand pass them to your views however you want—controller, view composer, whatever else - Profit
Realistically, you'll probably need to tweak a thing or two here or there, but we're talking an easy transition.
If you're using Markdown and want to convert your Jigsaw site to Laravel, right now you can either bring in your own Markdown parser (Jigsaw uses FrontYAML) or convert those files to Blade. But we might have something fun in the works that makes this even easier than it is today—keep tuned to @tightenco to hear when we announce updates to Jigsaw.
Conclusion n stuff
So, that's why. That's how. We hope you love Jigsaw. We hope you find a crazy number of uses for it, and that it gives you great joy.
Questions? Ideas? Concerns? Hit us up on Twitter or submit an issue or a pull request—the code's all on GitHub.
<3 - The Tighten team
(attribution: Jigsaw was primarily developed by Adam Wathan while building tighten.co)
in your inbox:
let’s talk.
Thank you!
We appreciate your interest.
We will get right back to you.