Let AI Interact with Your App via MCP


Do you remember your first interaction with a computer? Perhaps it was through a command-line interface, where typing commands allowed the machine to perform the desired actions. A few years later, graphical user interfaces (GUIs) were introduced to make it easier to interact with applications. Now, we're about to experience another change: AI that can actually use your app.
I’m talking about Model Control Protocol (MCP) servers. And before you roll your eyes at another acronym, hear me out: this stuff is genuinely helpful.
Let’s dive in!
What are MCPs, and why should I care?
Think Tony Stark talking to Jarvis—that’s the vibe we are going for here. Just as Jarvis can understand Tony and interact with him in everyday language, MCP enables AI to understand what you want and allows it to perform tasks in your app.
MCP is a standard that enables AI to connect with applications and services securely. With MCP, an AI client can interact with your application in a structured manner, allowing it to perform actions, retrieve data, and even control the application itself.
The evolution of AI/Human interaction
About three years ago, OpenAI revolutionized how we interact with LLMs (Large Language Models) with the release of ChatGPT. This was a game changer, allowing users to interact with AI more intuitively. “But LLMs existed before ChatGPT,” you might say, and you are right. However, what made ChatGPT special was the feeling of having a conversation with someone who genuinely understood you.
Then, LLMs began to interact with tools. They could interact with external applications, search the web, analyze data, and perform real-world actions. But there was a catch: The AI could only utilize the tools that the big companies decided to build. Want AI to interact with your own app? That wasn’t an option, unless you happened to be buddies with someone at OpenAI.
So, everyone started building their own AI interfaces to talk to their apps. That’s where MCP comes in.
MCP at a glance
MCP is like having a translator for every country you visit, instead of having to learn a new language every time you visit a new place.
Thanks to the MCP protocol, AI applications like Claude only need to develop a single client that follows the MCP standard, and they can instantly connect to any MCP server. The responsibility shifts to service providers (like you, building your Laravel app) to create MCP servers that expose the functionality of your application.
It’s also important to note the difference between an MCP client and an MCP server. An MCP client is the AI application that wants to interact with your app. An MCP server provides resources and tools that can be accessed by AI models. Think of it like a typical client-server relationship: the server hosts and provides access to specific capabilities or data sources, while the client (the AI assistant) connects to these servers to enhance its abilities.
We are transitioning from a world where users need to learn your app’s unique interface, to one where your interface needs to understand your users. MCP is the bridge that makes it possible.
Now that we understand why MCP matters, let’s build our first MCP server and integrate it with our Laravel application.
Building your first MCP server (the fun part)
I’m going to show you how to build an MCP server for a task management app. Users can create, update, and delete tasks using plain English. I’ve got a complete Laravel example that you can check out and follow along, but here’s the gist: it’s a basic task manager using Laravel Passport for authentication.
The API routes look like this:
Route::middleware('auth:api')->group(function () {
    Route::get('/tasks', [TaskController::class, 'index']);
    Route::post('/tasks', [TaskController::class, 'store']);
    Route::get('/tasks/{task}', [TaskController::class, 'show']);
    Route::put('/tasks/{task}', [TaskController::class, 'update']);
    Route::delete('/tasks/{task}', [TaskController::class, 'destroy']);
});
I also added a metadata route so MCP clients can figure out how to authenticate:
Route::get('.well-known/oauth-authorization-server', function () {
   return [
       'issuer' => config('app.url'),
       'authorization_endpoint' => route('passport.authorizations.authorize'),
       'token_endpoint' => route('passport.token'),
       'registration_endpoint' => route('oauth.register'),
       'response_types_supported' => ['code'],
       'grant_types_supported' => ['authorization_code', 'refresh_token'],
       'scopes_supported' => [
           'claudeai',
           'tasks:create',
           'tasks:update',
           'tasks:delete',
           'tasks:view',
       ],
       'subject_types_supported' => ['public'],
       'id_token_signing_alg_values_supported' => ['RS256'],
       'code_challenge_methods_supported' => ['S256'],
   ];
});
Creating the MCP Server
Now, for the MCP server itself, there are a few ways of building your own. You can refer to the MCP docs for more information; however, for this example, we’ll use the Typescript SDK, which is the most mature SDK available at the moment. Unfortunately, the current MCP implementations for PHP do not handle OAuth gracefully, and aren’t as up-to-spec as other languages’ SDKs are.
To get started, let’s create a new directory for our MCP server outside the Laravel application that we’ve been working on:
mkdir procrastinator-mcp && cd procrastinator-mcp
Here’s the package.json file:
{
  "name": "procrastinator-mcp",
  "version": "1.0.0",
  "main": "index.js",
  "scripts": {
    "build": "tsc"
  },
  "files": [
    "build"
  ],
  "keywords": [],
  "author": "",
  "license": "ISC",
  "description": "",
  "dependencies": {
    "@modelcontextprotocol/sdk": "^1.12.1",
    "cors": "^2.8.5",
    "dotenv": "^16.5.0",
    "express": "^5.1.0",
    "zod": "^3.25.56"
  },
  "devDependencies": {
    "@types/cors": "^2.8.19",
    "@types/express": "^5.0.3",
    "@types/node": "^22.15.30",
    "tsx": "^4.19.4",
    "typescript": "^5.8.3"
  }
}
We’ll be using typescript, so we can create a tsconfig.json file in the procrastinator-mcp directory with the following content:
{
  "compilerOptions": {
    "target": "ES2022",
    "module": "Node16",
    "moduleResolution": "Node16",
    "outDir": "./build",
    "rootDir": "./src",
    "strict": true,
    "esModuleInterop": true,
    "skipLibCheck": true,
    "forceConsistentCasingInFileNames": true,
    "isolatedModules": true
  },
  "include": ["src/**/*",
    "src/types/**/*", "*.ts"],
  "exclude": ["node_modules"]
}
Now, run npm install, and we are ready to roll.
Let’s create a new file called index.ts in the procrastinator-mcp/src directory. We’ll start by setting up a basic Express server that will handle incoming requests. We’ll also set up CORS.
import cors from "cors";
import express from "express";

const app = express();
app.use(express.json());
app.use(cors())

app.listen(3000);
This code sets up an Express server that listens on port 3000, but it does not yet perform any actions. Our MCP server will handle requests to the /mcp endpoint and maintain an in-memory registry of active sessions. Each AI application that connects to our MCP server will create a session, and we will use this session to track the user’s interactions with the application. Let’s start by adding the /mcp endpoint to our server:
import { randomUUID } from "node:crypto";
import { McpServer } from "@modelcontextprotocol/sdk/server/mcp.js";
import { StreamableHTTPServerTransport } from "@modelcontextprotocol/sdk/server/streamableHttp.js";
import { isInitializeRequest } from "@modelcontextprotocol/sdk/types.js"
import { z } from "zod"

const transports: { [sessionId: string]: StreamableHTTPServerTransport } = {};

app.post('/mcp', async (req, res) => {
    const sessionId = req.headers['mcp-session-id'] as string | undefined;
    let transport: StreamableHTTPServerTransport;

    if (sessionId && transports[sessionId]) {
        transport = transports[sessionId];
    } else if (!sessionId && isInitializeRequest(req.body)) {

        transport = new StreamableHTTPServerTransport({
            sessionIdGenerator: () => randomUUID(),
            onsessioninitialized: (sessionId) => {
                transports[sessionId] = transport;
            }
        });

        transport.onclose = () => {
            if (transport.sessionId) {
                delete transports[transport.sessionId];
            }
        };
        const server = new McpServer({
            name: " example-server",
            version: "1.0.0"
        });

        // We'll add our tools here in a sec

        await server.connect(transport);
    } else {
        // Invalid request
        res.status(400).json({
            jsonrpc: '2.0',
            error: {
                code: -32000,
                message: 'Bad Request: No valid session ID provided',
            },
            id: null,
        });
        return;
    }

    await transport.handleRequest(req, res, req.body);
});

const handleSessionRequest = async (req: express.Request, res: express.Response) => {
    const sessionId = req.headers['mcp-session-id'] as string | undefined;
    if (!sessionId || !transports[sessionId]) {
        res.status(400).send('Invalid or missing session ID');
        return;
    }

    const transport = transports[sessionId];
    await transport.handleRequest(req, res);
};

app.get('/mcp', handleSessionRequest);
app.delete('/mcp', handleSessionRequest);
This code sets up the /mcp endpoint to handle incoming requests. It checks if a session ID is provided in the request headers. If a session ID is provided and it exists in the transports object, we use that transport to handle the request. If no session ID is provided, we initialize a new transport and connect it to the MCP server.
Now, our server is capable of handling requests, but we still need to implement the authentication mechanism that will allow AI applications to interact with our Laravel application securely. To do this, we can build a middleware to handle OAuth authentication for our MCP server; this middleware will check if the request has a valid access token and if the token has the required scopes. Create a new file named authenticationMiddleware.ts, in the procrastinator-mcp/src directory, with the following content:
export default async (req: any, res: any, next: any) => {
    const authHeader = req.headers.authorization;

    if (! authHeader || ! authHeader.startsWith('Bearer ')) {
        return res.status(401).json({
            error: 'Unauthorized',
        });
    }

    const token = authHeader.split(' ')[1];

    try {
        const userResponse = await fetch('http://procrastinator.test/api/user', {
            headers: {
                Authorization: `Bearer ${token}`,
                Accept: 'application/json',
                'Content-Type': 'application/json',
            }
        });

        if (! userResponse.ok) {
            return res.status(401).json({
                error: 'invalid_token',
                error_description: 'The access token is invalid or expired.',
            });
        }

        const user = await userResponse.json();
        user.accessToken = token;

        req.user = user;
        req.auth = {
            token: user.accessToken,
        };

        next();
    } catch (error) {
        console.error('Token validation error: ', error);

        return res.status(401).json({
            error: 'invalid_token',
            error_description: 'Token validation failed.',
        });
    }
}
Awesome! Now, let’s wire up the middleware in our main route. We can do this by importing the middleware and using it in our post /mcp Express route:
import authenticationMiddleware from './authenticationMiddleware.js';

app.post('/mcp', authenticationMiddleware, async (req, res) => {});
Perfect, our MCP server now only accepts requests from authenticated users.
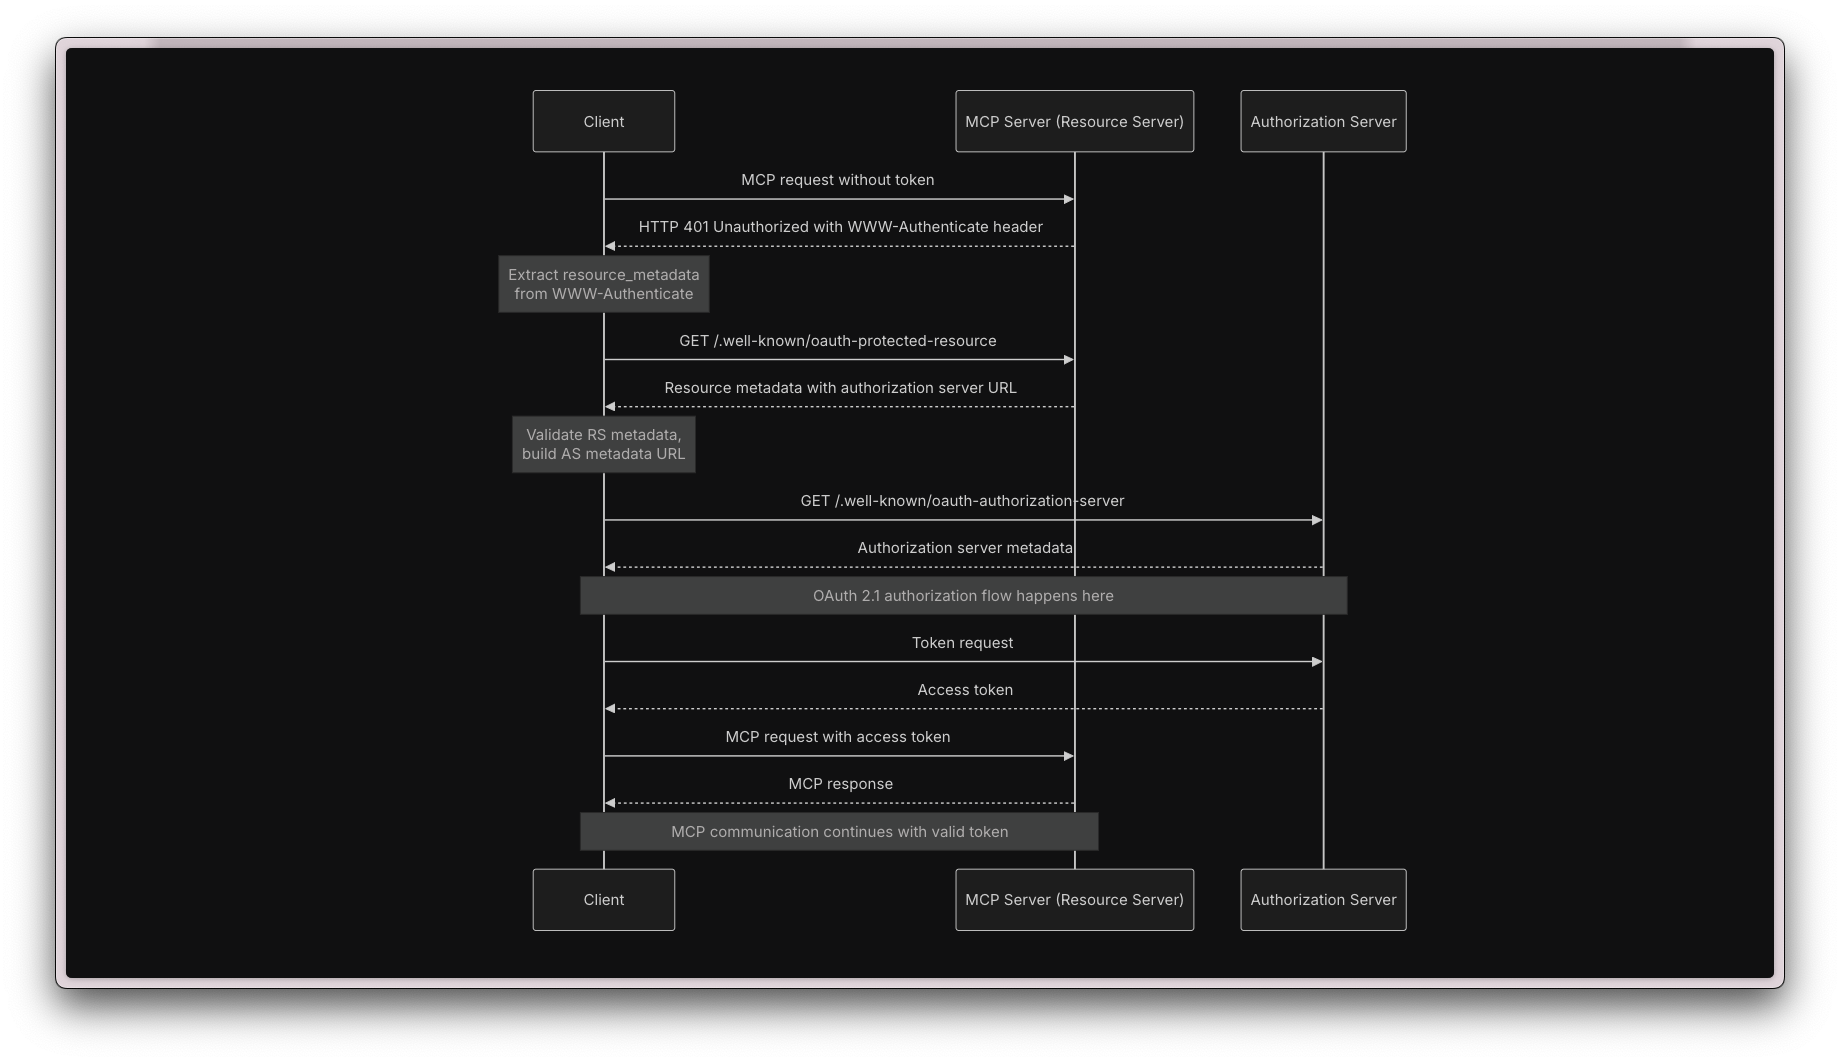
Initiating the OAuth Flow
To enable AI applications to authenticate users, we must implement the OAuth 2.0 authorization flow. This allows users to grant access to their data without sharing their credentials with the AI application.
According to the MCP Specification, MCP clients follow the OAuth 2.0 Authorization Server metadata discovery RFC8414 specification to obtain the necessary information for interacting with the authorization server.
Let’s define the metadata routes that will be used to discover the authentication capabilities of our MCP server. Add the following code to the index.ts file:
app.get('/.well-known/oauth-protected-resource', (req, res) => {
    res.json({
        resource: 'http://localhost:3000',
        authorization_servers: ['http://procrastinator.test'],
        scopes_supported: [
            'claudeai',
            'tasks:create',
            'tasks:update',
            'tasks:delete',
            'tasks:view',
        ],
        bearer_methods_supported: ["header"],
        introspection_endpoint: "none",
        introspection_endpoint_auth_methods_supported: ["none"],
    });
});
Now, the moment of truth: We are ready to test the authorization flow for our MCP server. This is easy to do using the “MCP inspector” tool, which allows us to test our MCP server and see if it is working correctly. You can find more about the MCP inspector here.
Let’s test our OAuth flow by starting both the MCP inspector and our MCP server. Also, make sure your Laravel application is running, as the MCP server requires communication with it to authenticate users. I’m using Laravel Herd, but you can use any other method to run your Laravel application, like running the php artisan serve command.
Let’s start the MCP inspector:
npx @modelcontextprotocol/inspector
On a new terminal tab, start your MCP server with the following command:
npx tsx src/index.ts
If everything is set up correctly, you should see the MCP inspector screen by visiting http://localhost:6274:
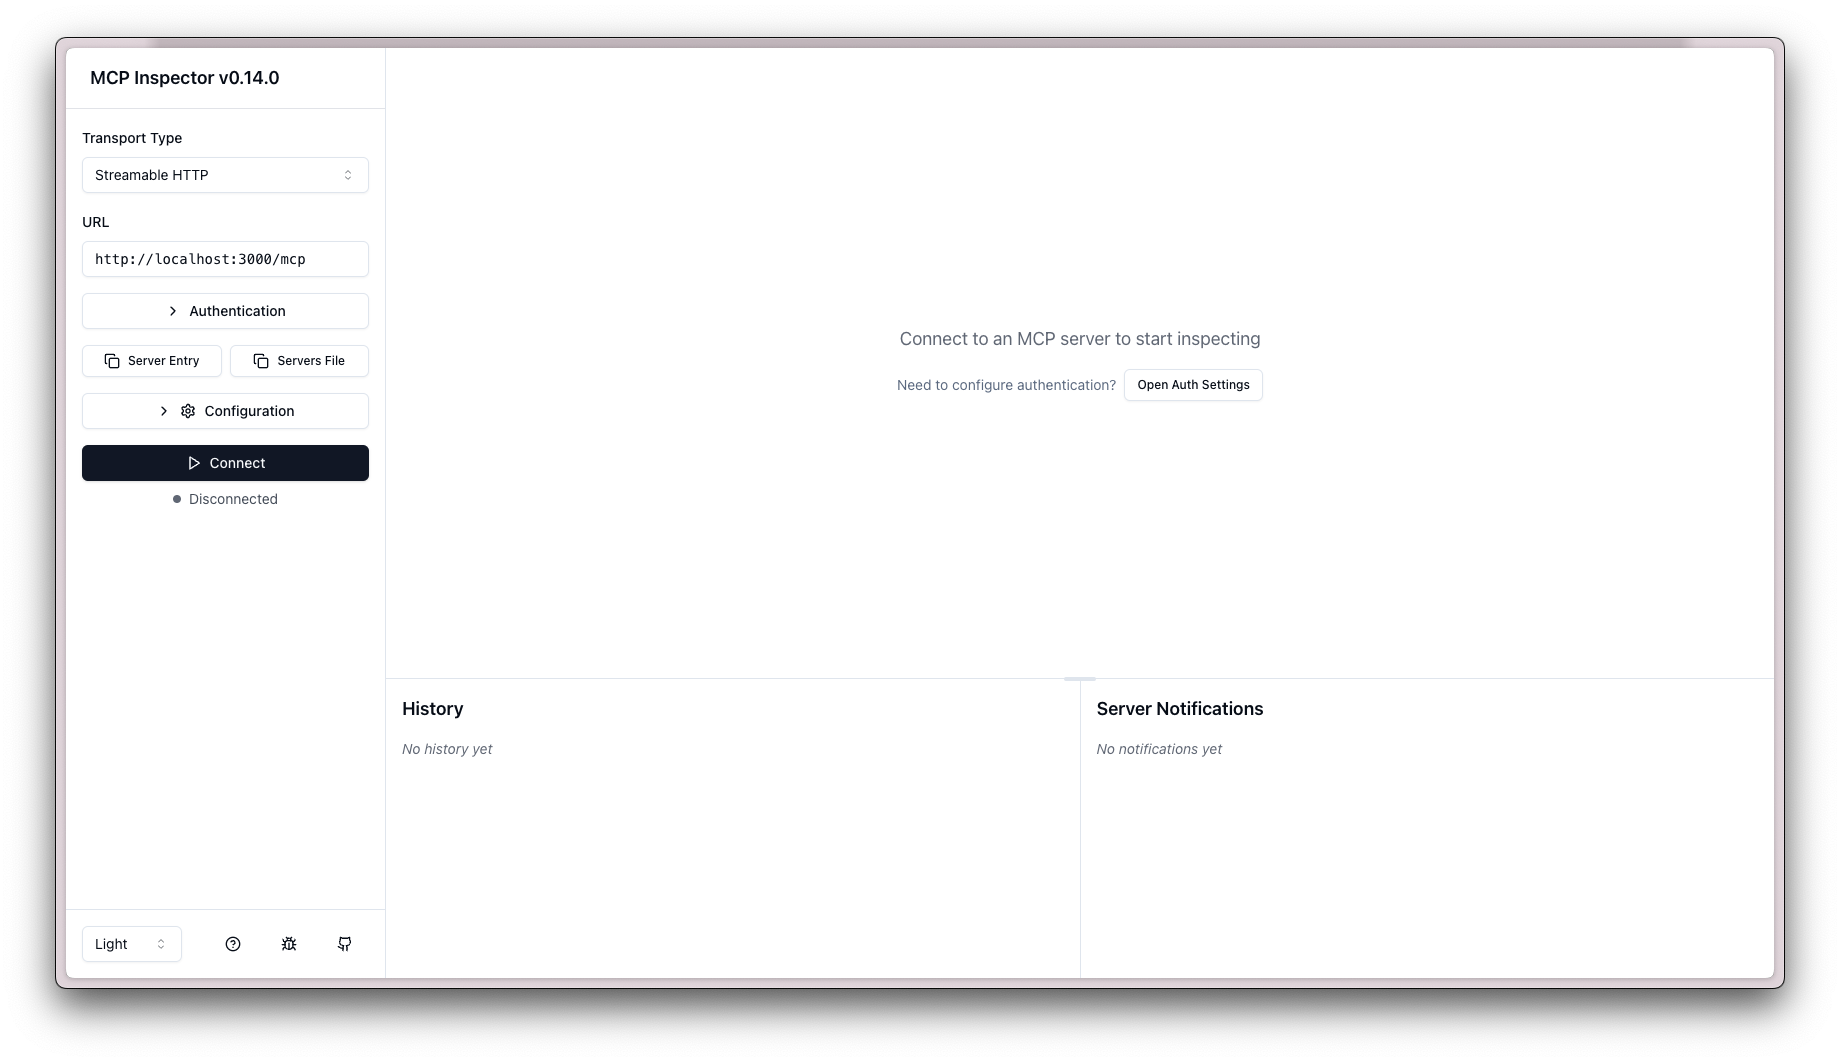
In the top left corner, select “Streamable HTTP” as the transport type, and enter the URL of your MCP server, which should be http://localhost:3000/mcp. Click the “Open Auth Settings” button, then click on the “Quick OAuth flow” button. It should open a new tab and prompt you to authorize the MCP inspector to access your Laravel application:
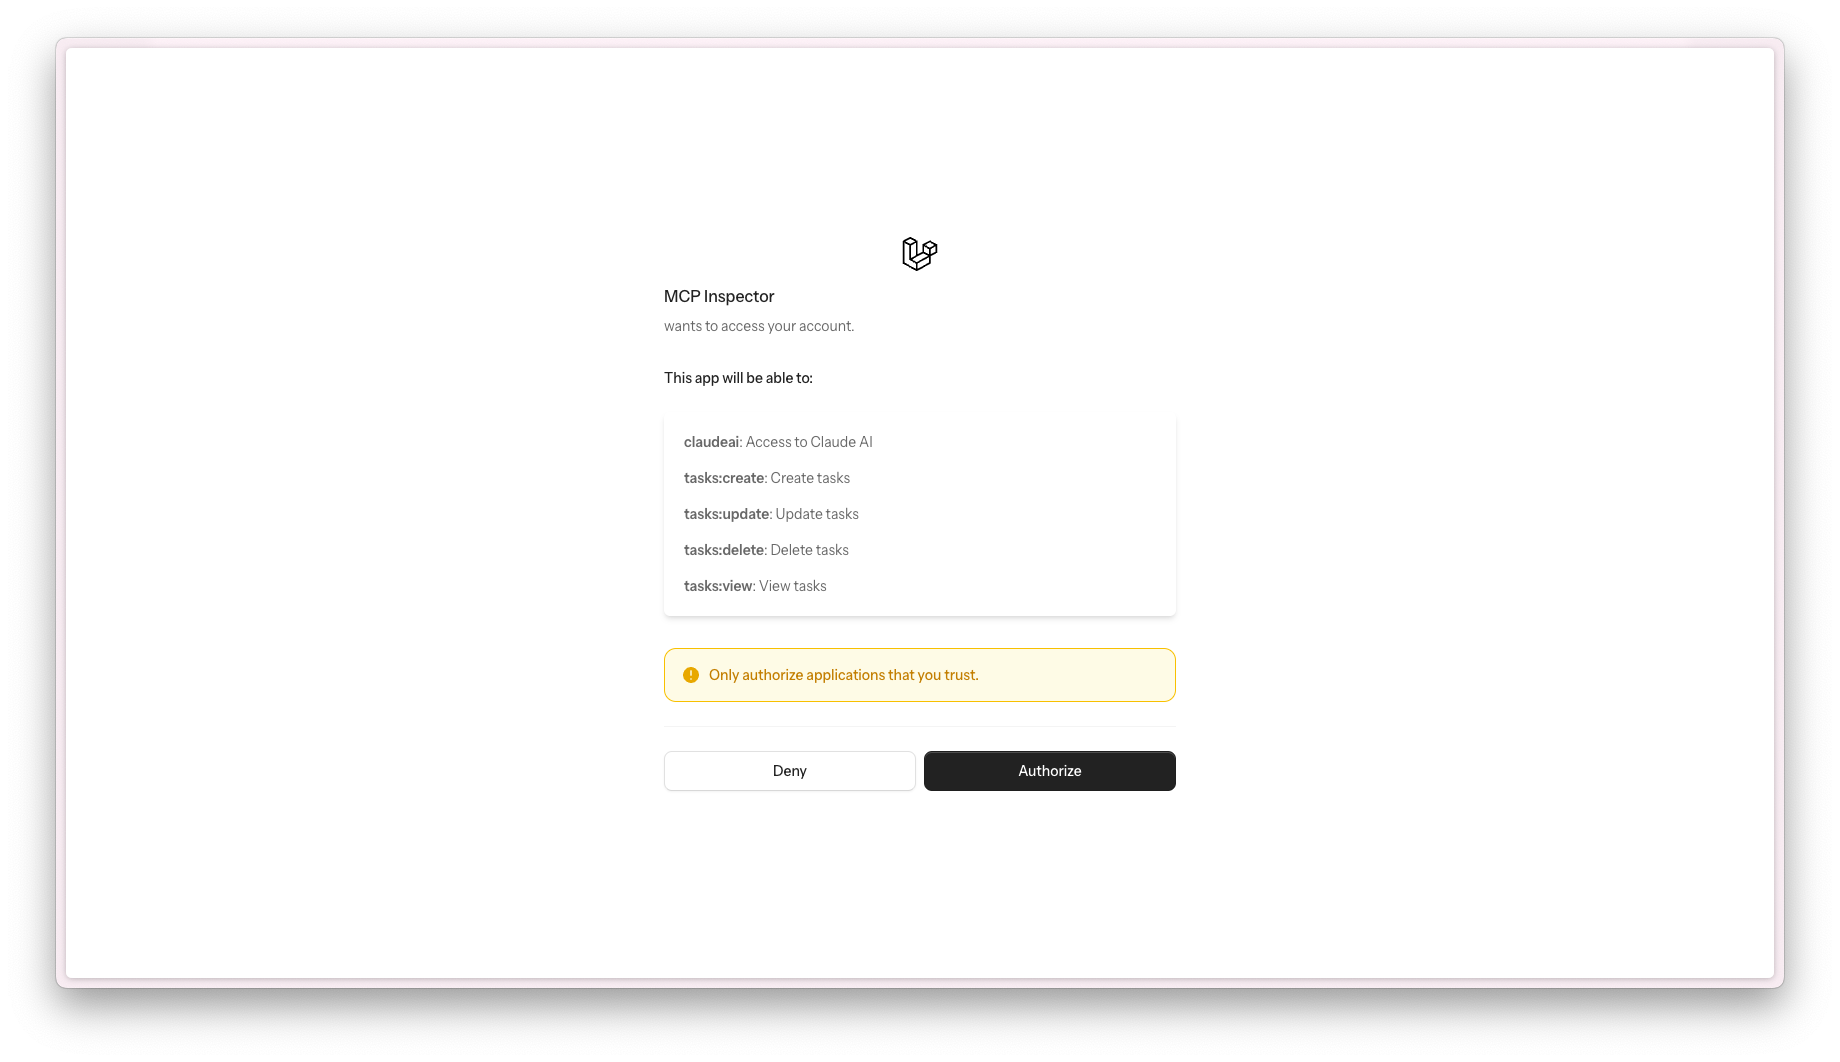
Click “Authorize” to proceed. If everything is working correctly, you will be redirected back to the MCP inspector, and a message should appear stating “Authentication completed successfully.”

Congratulations! You have successfully set up OAuth authentication for your MCP server. This means that AI applications can now authenticate users and securely interact with your Laravel application.
Defining our MCP Tools
We can now define the tools that our MCP server will expose. Tools let LLMs take action through your server. We’ll start with a list_tasks tool, which will allow AI to list all tasks for the authenticated user:
server.tool(
    'list_tasks',
    {},
    async (message, extra) => {
        const userToken = extra?.authInfo?.token;

        const response = await fetch('http://procrastinator.test/api/tasks', {
            headers: {
                Authorization: `Bearer ${userToken}`,
                'Content-Type': 'application/json',
                'User-Agent': 'procrastinator-mcp/1.0.0',
                'Accept': 'application/json',
            }
        })

        if (! response.ok) {
            return {
                content: [
                    {
                        type: "text",
                        text: `Failed to list tasks: ${response.status} ${response.statusText}`
                    }
                ]
            }
        }

        const tasks = await response.json();

        if (tasks.length === 0) {
            return {
                content: [
                    {
                        type: "text",
                        text: "No tasks found."
                    }
                ]
            };
        }

        const formattedTasks = tasks.map((task: any) => [
                `ID: ${task.id}`,
                `Title: ${task.title}`,
                `Description: ${task.description || 'No description'}`,
                `Completed At: ${task.completed_at ? new Date(task.completed_at).toLocaleString() : 'Not completed'}`,
            ].join('\n')
        ).join('\n');

        return {
            content: [
                {
                    type: "text",
                    text: `Tasks:\n\n${formattedTasks}`
                }
            ]
        };
    }
)
This tool fetches the tasks for the authenticated user and returns them in a formatted string. The extra parameter contains the authentication information, which we use to make the request to our Laravel application.
Next, let’s create a create_task tool, which will allow AI to create a new task:
server.tool(
    'create_task',
    {
        title: z.string(),
        description: z.string().optional(),
    },
    async (message, extra) => {
        const userToken = extra?.authInfo?.token;

        try {
            const response = await fetch('http://procrastinator.test/api/tasks', {
                method: 'POST',
                headers: {
                    Authorization: `Bearer ${userToken}`,
                    'Content-Type': 'application/json',
                    'User-Agent': 'procrastinator-mcp/1.0.0',
                    'Accept': 'application/json',
                },
                body: JSON.stringify({
                    title: message.title,
                    description: message.description,
                })
            });

            if (! response.ok) {
                return {
                    content: [
                        {
                            type: "text",
                            text: `Failed to create task: ${response.status} ${response.statusText}`
                        }
                    ]
                };
            }

            const task = await response.json();

            return {
                content: [
                    {
                        type: "text",
                        text: `Task created successfully:\n\nID: ${task.data.id}\nTitle: ${task.data.title}\nDescription: ${task.data.description || 'No description'}\nCompleted At: ${task.data.completed_at ? new Date(task.data.completed_at).toLocaleString() : 'Not completed'}`
                    }
                ]
            };
        } catch (error) {
            console.error('Error creating task:', error);
            return {
                content: [
                    {
                        type: "text",
                        text: "Failed to create task due to an error."
                    }
                ]
            };
        }
    }
);
This tool accepts a title and an optional description as input, and creates a new task using the Laravel API. It returns the created task in a formatted string.
Let’s create one more tool—an update_task tool, which will allow AI to mark a task as completed. You can also make a delete_task tool to enable AI to delete tasks, following the same pattern as the previous tools.
server.tool(
    'update_task',
    {
        id: z.number(),
        title: z.string(),
        description: z.string(),
        completed_at: z.string().regex(/^\d{4}-\d{2}-\d{2} \d{2}:\d{2}:\d{2}$/, "Completed at must be in YYYY-MM-DD HH:ii:ss format").optional(),
    },
    async (message, extra) => {
        const userToken = extra?.authInfo?.token;

        try {
            const response = await fetch(`https://procrastinator.test/api/tasks/${message.id}`, {
                method: 'PUT',
                headers: {
                    Authorization: `Bearer ${userToken}`,
                    'Content-Type': 'application/json',
                    'User-Agent': 'procrastinator-mcp/1.0.0',
                    'Accept': 'application/json',
                },
                body: JSON.stringify({
                    title: message.title,
                    description: message.description,
                    completed_at: message.completed_at ? message.completed_at : null,
                })
            })

            if (! response.ok) {
                return {
                    content: [
                        {
                            type: "text",
                            text: `Failed to update task: ${response.status} ${response.statusText}`
                        }
                    ]
                };
            }

            const task = await response.json();

            return {
                content: [
                    {
                        type: "text",
                        text: `Task updated successfully:\n\nID: ${task.data.id}\nTitle: ${task.data.title}\nDescription: ${task.data.description || 'No description'}\nCompleted At: ${task.data.completed_at ? new Date(task.data.completed_at).toLocaleString() : 'Not completed'}`
                    }
                ]
            };
        } catch (error) {
            console.error('Error updating task:', error);
            return {
                content: [
                    {
                        type: "text",
                        text: "Failed to update task due to an error."
                    }
                ]
            };
        }
    }
)
Now that we have 3 MCP Tools in place, we can test them using the MCP inspector. Open the MCP inspector and try to connect to our MCP server, by visiting http://localhost:6274 and clicking the “Connect” button. If everything is set up correctly, the MCP inspector should connect to your MCP server, and you should be able to list the available tools:
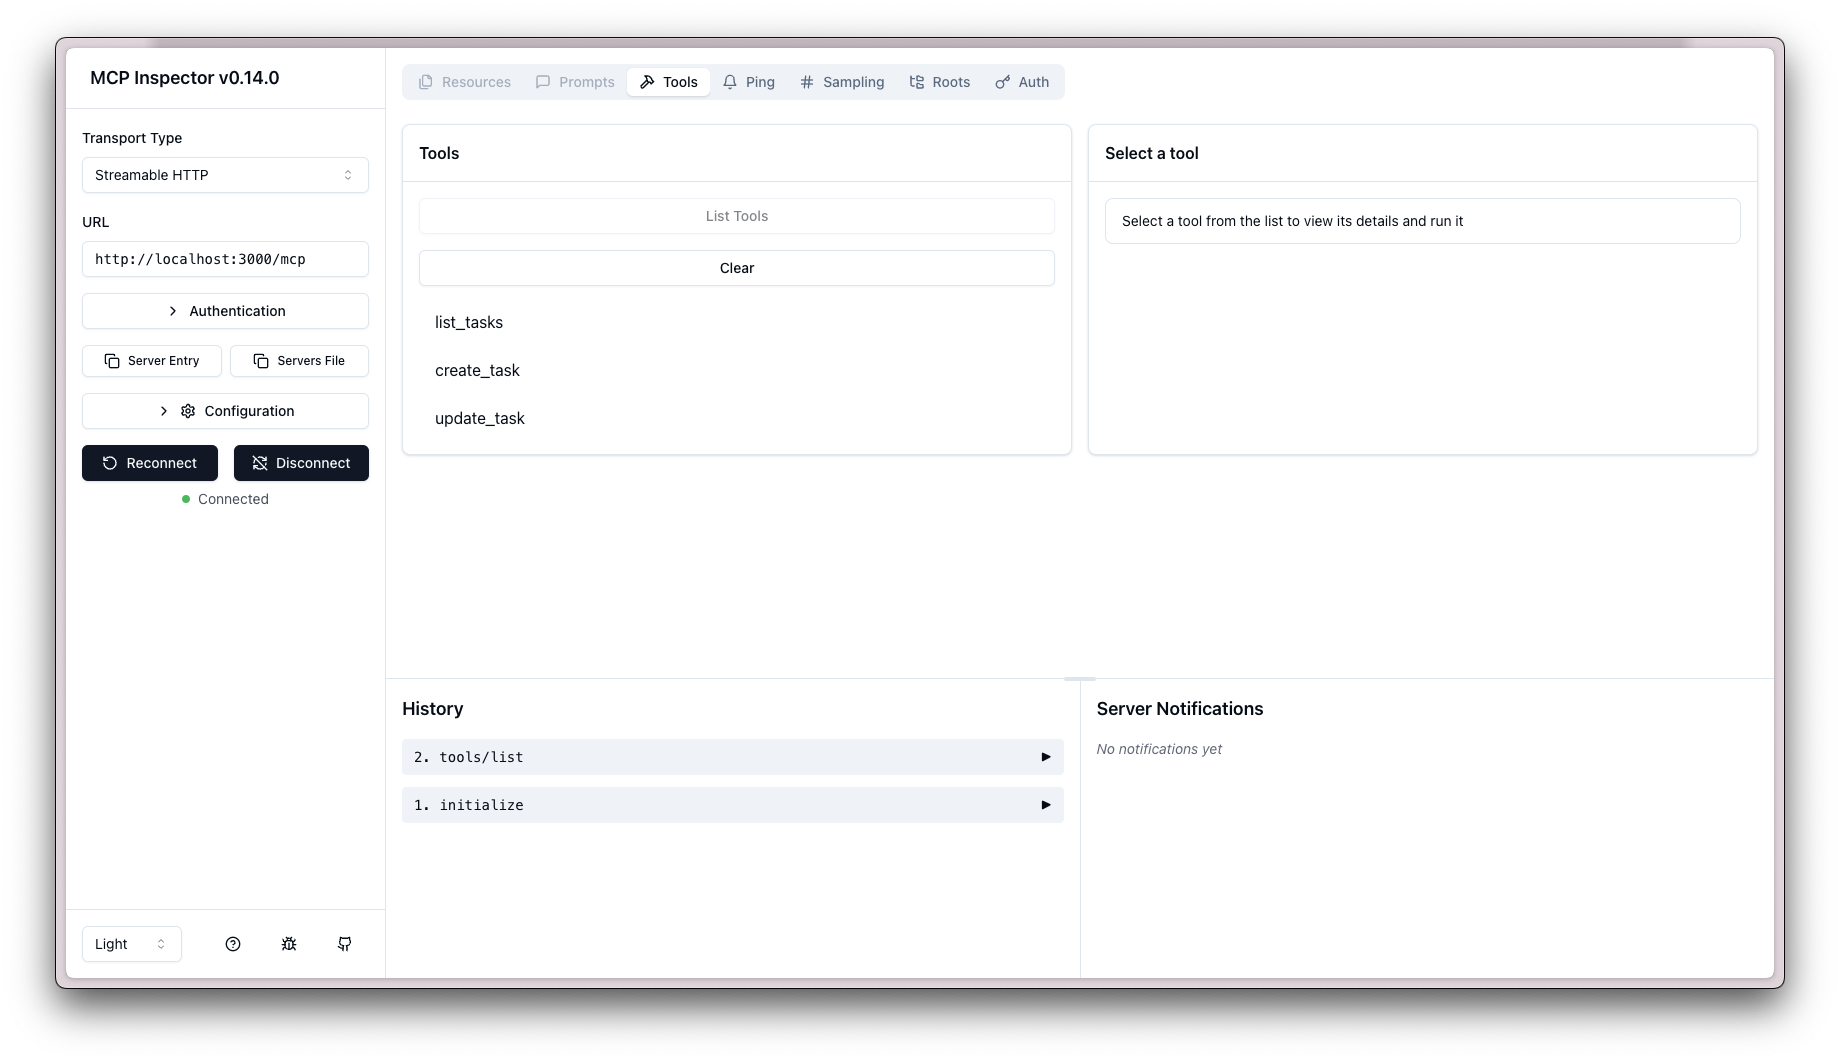
You can verify that your tools are working by selecting one of them and clicking “Run Tool”:
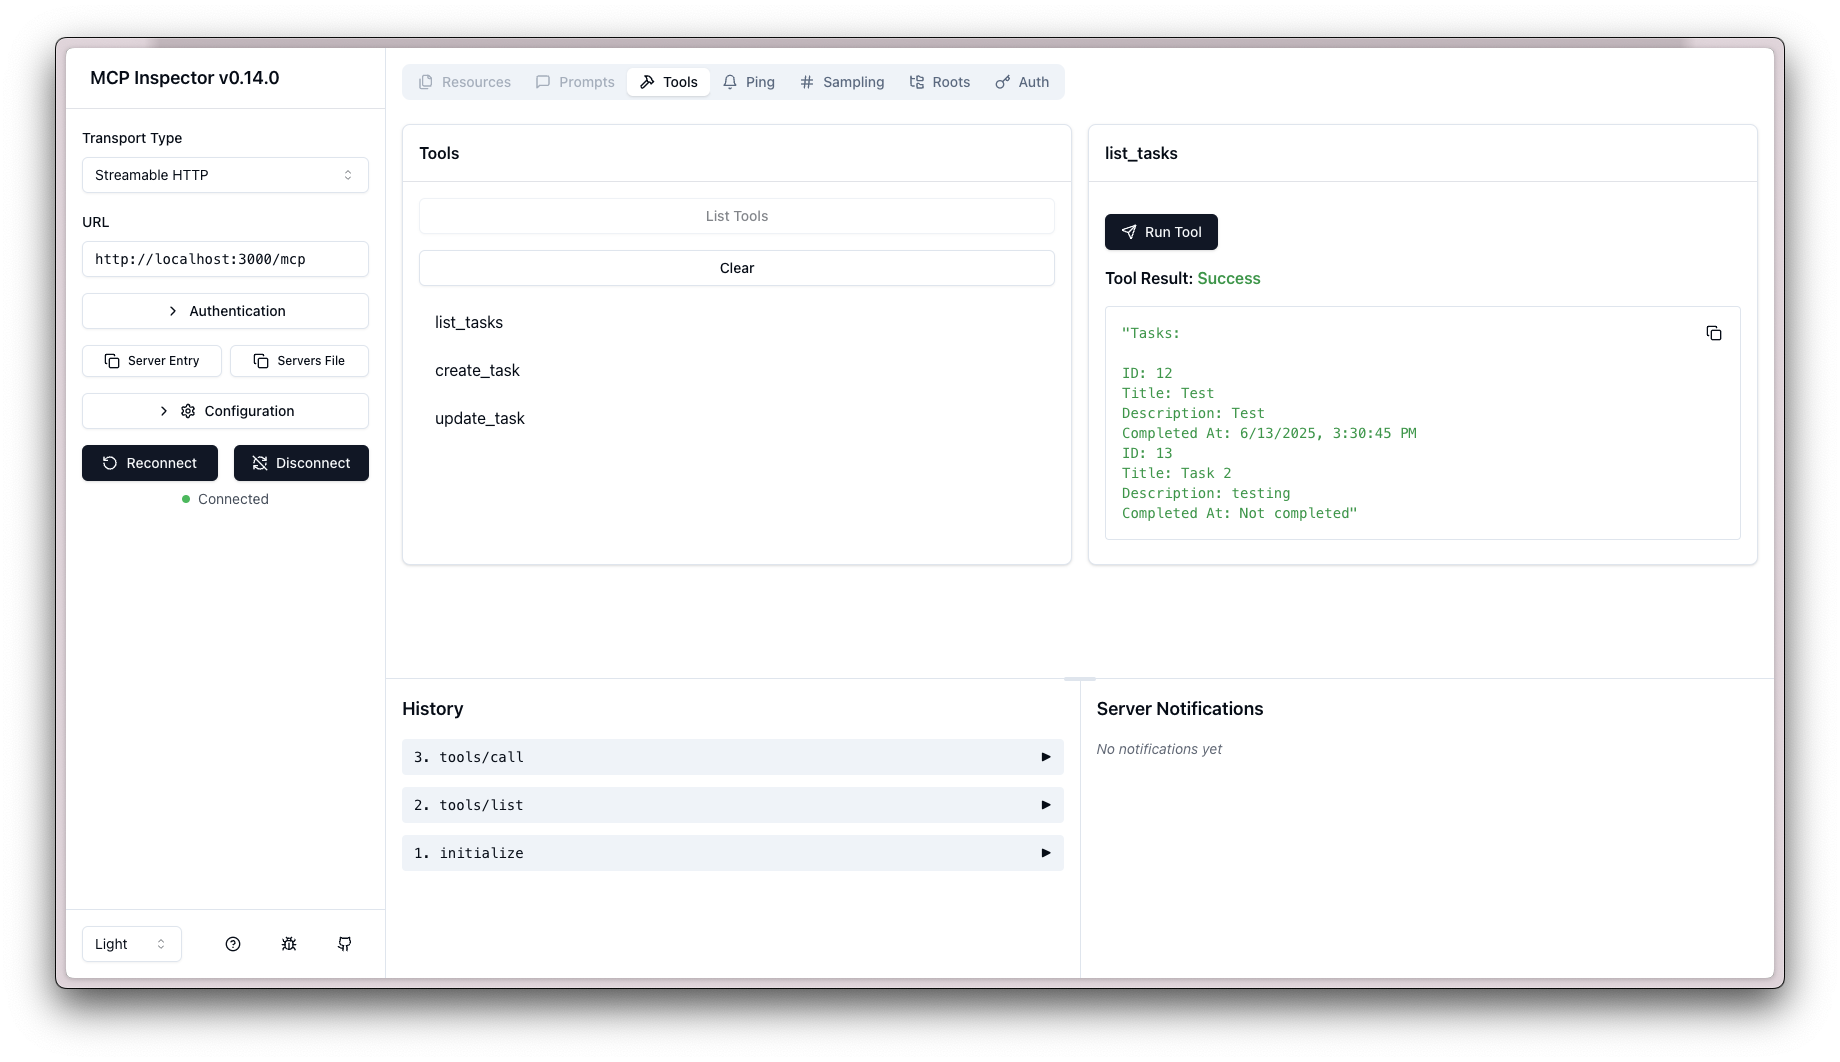
Isn’t this nice? You can now interact with your Laravel application using AI applications that support the MCP protocol. You can use tools like Claude or any other LLM that supports MCP to interact with your application in a structured way.
Now, let’s set Claude up to use our MCP server. If you don't have a Claude account, you can sign up for one at [Anthropic][anthropic]. Once you have an account, download the Claude Desktop app and log in.
Once you have the app, open your settings and click on the “Developer” tab. Then, select “Edit Config”. This will open the location where the claude_desktop_config.json file is stored.
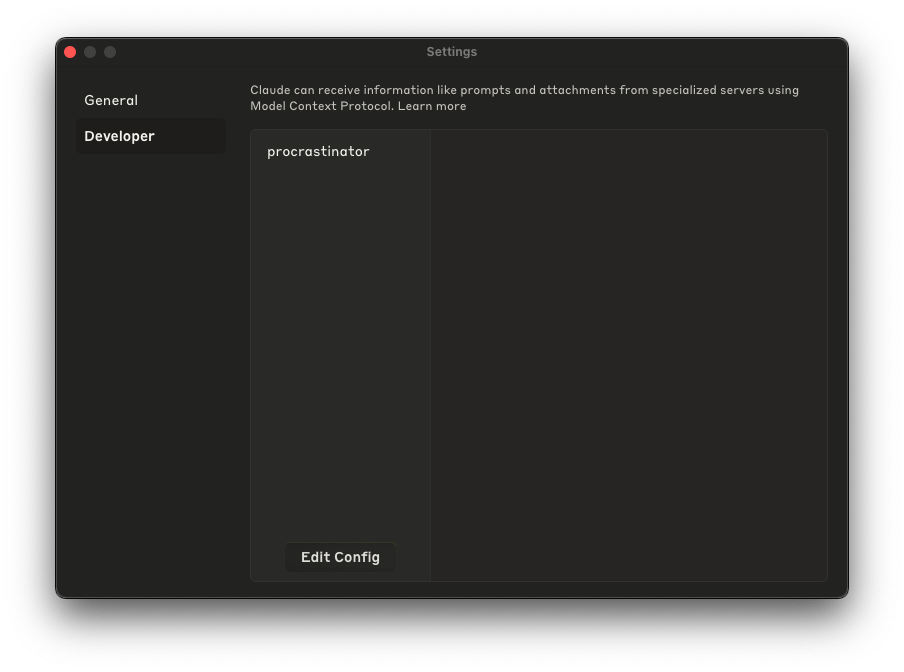
Open this file in your favorite text editor and add the following configuration:
{
  "default": "procrastinator",
  "mcpServers": {
    "procrastinator": {
      "name": "procrastinator",
      "command": "npx",
      "args": ["mcp-remote", "http://localhost:3000/mcp"]
    }
  }
}
This configuration instructs the Claude app to connect to your MCP server, which is running on http://localhost:3000/mcp. Ensure that your Node server is running, then save the configuration file and restart the Claude app. You should now see our “procrastinator” MCP server in the list of available servers by clicking on the second icon in your chat window:
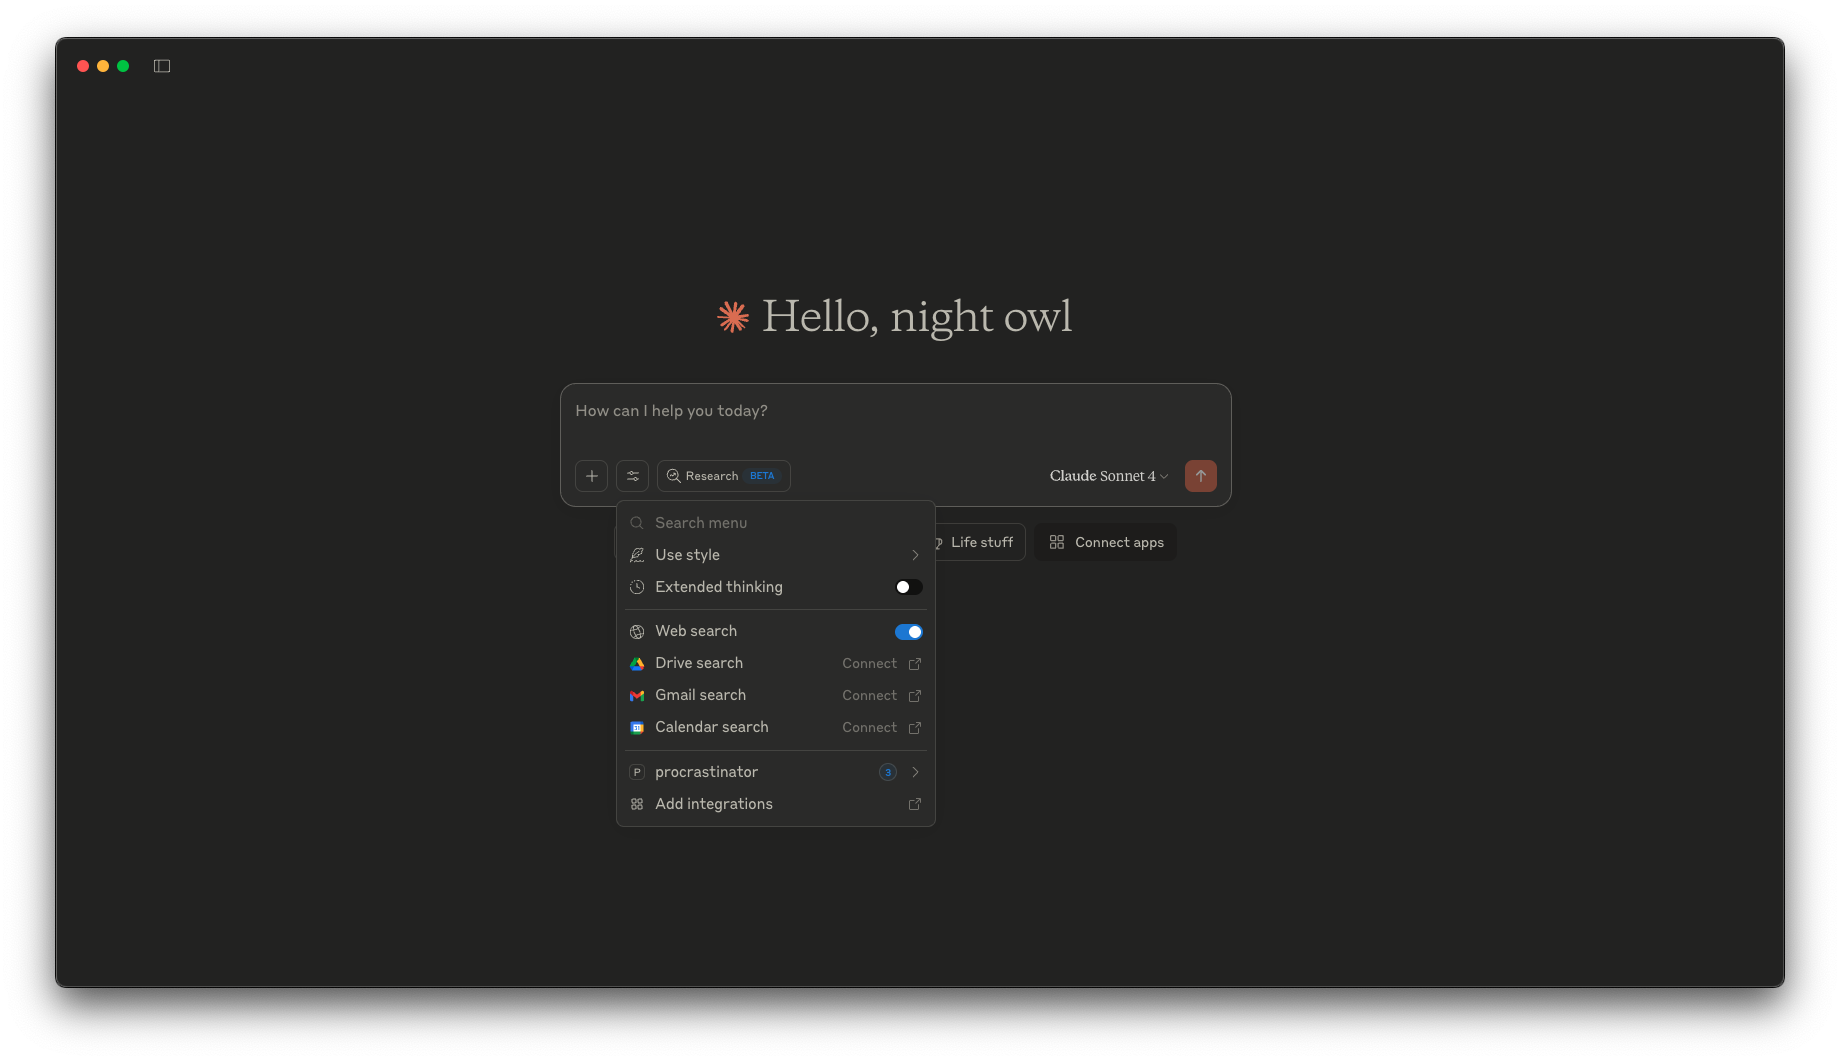
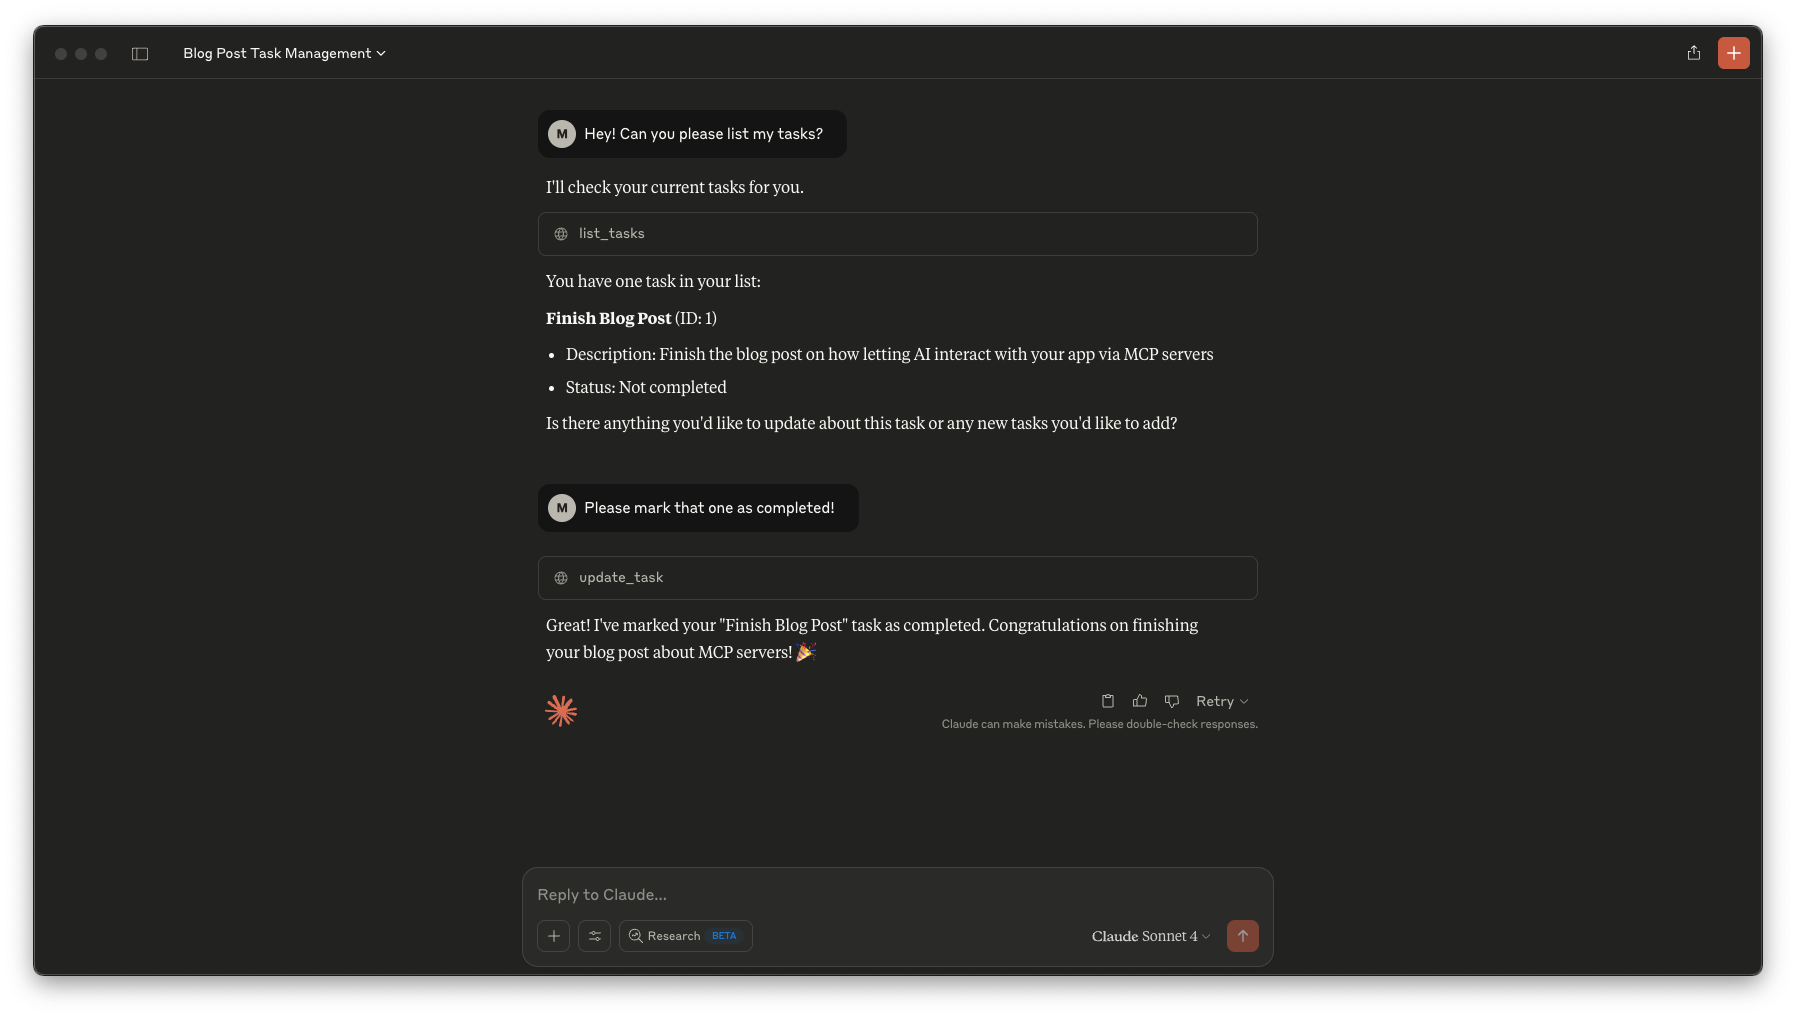
You can now use Claude to interact with your Laravel application using the MCP protocol! For example, you can ask Claude to list your tasks, create a new task, or update an existing task:
In Closing
I’ve seen quite a few tech trends come and go. Most of them are solutions looking for problems ... but MCP is different. It’s solving a real pain point: The gap between what we want to tell our computers and what they can do.
Your Laravel app doesn’t need to learn every possible way someone might want to interact with it. It just needs to expose an MCP server, and any AI that speaks MCP can figure out the rest.
The MCP server built in this blog post is available in the GitHub repository for you to explore.
We’re moving toward a world where your users can interact with your app the way they think, not limited by the way you designed the interface. And honestly? That’s pretty exciting.
Catch you later!
in your inbox:
let’s talk.
Thank you!
We appreciate your interest.
We will get right back to you.