It's Time to Test Your Vue Components: Getting Started With Jest

Unit testing Vue components is something that has always intimidated me. I’ve relied on acceptance testing tools like Laravel Dusk for all my JavaScript testing needs because of its ease of use and place in the Laravel ecosystem. Although extremely useful, Dusk tests can be painfully slow to run and difficult to maintain. Having a speedier way to receive feedback while writing Vue components has been a big improvement to my front-end workflow.
This post walks through setting up a basic Vue testing suite in a Laravel app. Thanks to new developments in the JavaScript testing world, getting started is much easier than it used to be. Hopefully, you'll find the process simple and easy to wrap your head around.
After setting up the test suite, we’ll also explore a powerful testing feature offered by Jest: snapshot testing. Snapshot tests are an easy way to get comprehensive test coverage of your Vue components without doing the tedious work of writing custom assertions. Towards the end of this post, we will explore what it looks like to start using this technique in place of the more typical ways you’re used to writing tests.
The Tools
In the past, I’ve felt overwhelmed by the number of JavaScript testing tools out there and generally confused about how they fit into writing and running my actual tests. Words like karma, mocha, chai, and sinon seemed to blur together. This time around, things are a bit less overwhelming thanks to a more mature ecosystem bringing us nicely packaged tools like Jest and Vue Test Utils.
If you start to feel overwhelmed by the setup at any point, remember these two utilities are the only core tools we are using, despite the number of Node.js packages we will be installing.
What Is Jest?
Jest is a JavaScript testing tool created by Facebook that handles running your tests and making assertions. Think of it like PHPUnit for your JavaScript; as PHPUnit is to Laravel, Jest is to Vue. There are other testing tools out there besides Jest, but I prefer it because of its ease of use.
Installing Jest
First, let’s grab all the dependancies we will need for the setup via npm. Run the following command from your project's root:
npm install -—save-dev jest vue-jest jest-serializer-vue
We can configure Jest for our needs by adding "jest" and "babel" entries to the project’s package.json file. This configuration will tell Jest where to look for components to test and how to interpret non-standard JavaScript files like ES6 syntax, and .vue components.
...
"jest": {
    "moduleFileExtensions": [
        "js",
        "vue"
    ],
    "moduleNameMapper": {
        "^@/(.*)$": "<rootDir>/resources/assets/js/components/$1"
    },
    "transform": {
        "^.+\\.js$": "<rootDir>/node_modules/babel-jest",
        ".*\\.(vue)$": "<rootDir>/node_modules/vue-jest"
    },
      "snapshotSerializers": [
        "<rootDir>/node_modules/jest-serializer-vue"
    ]
},
"babel": {
    "env": {
        "test": {
            "presets": [
                ["env", { "targets": { "node": "current" }}]
            ]
        }
    }
},
That’s it for our Jest setup! Let’s move on to setting up the second and final testing utility we’ll be using: Vue Test Utils.
What is Vue Test Utils?
Vue Test Utils is what makes our tests “Vue aware”, allowing us to easily interact with Vue components in our Jest tests. Without it, we would only be able to write tests against plain JavaScript code, not Vue.
Installing Vue Test Utils
Vue Test Utils is much more straightforward to install and configure. Run the following command to install it via npm, and we will be all set to write our first test:
npm install --save-dev @vue/test-utils
Writing Our First Test
For demonstration purposes, let’s create a simple counter component with an “increment” button to write our test against:
resources/assets/js/components/Counter.vue
<template>
    <div>
        <h1>Count: {{ counter }}</h1>

        <button @click="counter++" jest="increment-button">+1</button>
    </div>
</template>

<script>
export default {
    data() {
        return {
            counter: 0,
        }
    }
}
</script>
Note: I added an HTML attribute to the button element called “jest”. This isn’t special syntax; just my own personal way of making it clear that these CSS selectors are for testing purposes. See this tutorial for more info on this technique.
Now let’s write the test for our Counter.vue component:
tests/javascript/Counter.spec.js
import { mount } from '@vue/test-utils'
import Counter from '@/Counter.vue'

describe('Counter.vue', () => {
    it('increments counter', () => {
        const wrapper = mount(Counter);

        expect(wrapper.vm.counter).toBe(0);

        wrapper.find('[jest="increment-button"]').trigger('click')

        expect(wrapper.vm.counter).toBe(1);
    })
})
Notice we are wrapping our Counter component using a utility called mount provided by Vue Test Utils. The mount() method internally mounts the Vue component and provides an interface for us to interact with and make assertions against the underlying component. For more details on what’s possible with Vue Test Utils head over to the docs for more reference.
After mounting the component and storing it in a wrapper object, we:
- Make an initial assertion about the state of the component
- Perform an action (in this case, clicking on the increment button)
- Make an assertion that the initial data property has changed
Assuming you are familiar with basic unit testing principles, the learning curve will mostly entail familiarizing yourself with what Jest and Vue Test Utils makes available to you. Like I mentioned above, I recommend skimming the docs to learn more about these tools and what you can do with them.
It’s Go Time!
Pop open your terminal and run the following command from the project root:
node_modules/.bin/jest
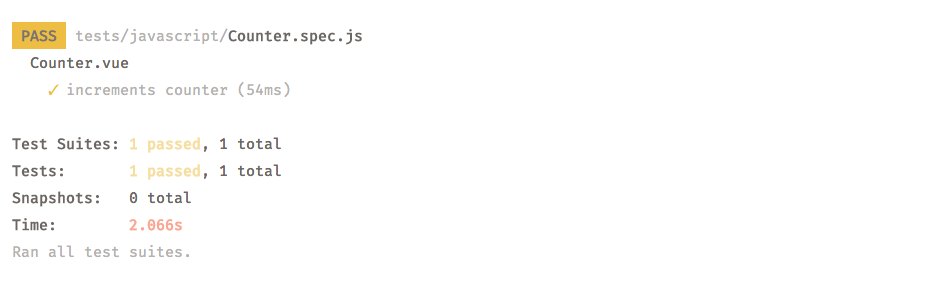
Hooray! If everything went smoothly, you should see a passing unit test.
Before we go any further, let’s clean up that Jest command a bit.
Creating an npm Script to Run Your Tests
Add these npm scripts to your package.json file for a cleaner test running experience:
"scripts": {
    ...
    "test": "jest",
    "test-watch": "npm run test -- --watch"
},
npm run test will run all your Jest tests.
npm run test-watch will re-run the tests when you change a component under test.
Pro Tip: Jest provides some handy features you can access by pressing “w” after running your tests in watch mode. Features like re-running only failed tests that are sorely lacking in PHPUnit are provided to us out of the box with Jest.
Introducing: Snapshot Testing
There’s a lot you can do with your new testing setup. However, if you want to take your Vue testing a step further, let’s explore another powerful testing technique Jest offers out of the box: snapshot testing.
In the previously-covered paradigm, when you act on a Vue component in your test, you write an expectation for a specific outcome. However, in the snapshot testing paradigm, every time you act on a component, Jest takes a “snapshot” of the entire rendered DOM output; in simpler terms, Jest basically converts your rendered component to a string. These snapshots are stored in plain text and used the next time you run your test suite to compare future results against. Consider them automatic assertions, which makes them a great way to put a large system under test quickly.
If it doesn’t make sense to you right away, that’s OK. For me, the concept was better understood through examples.
Let’s modify our original test to use snapshots instead of asserting against specific data attributes.
tests/javascript/Counter.spec.js
import { mount } from '@vue/test-utils'
import Counter from '@/Counter.vue'

describe('Counter.vue', () => {
    it('increments counter', () => {
        const wrapper = mount(Counter);

        expect(wrapper.html()).toMatchSnapshot()

        wrapper.find('[jest="increment-button"]').trigger('click')

        expect(wrapper.html()).toMatchSnapshot()
    })
})
Notice the new .toMatchSnapshot() statements.
Now let’s run the new tests with snapshot matching:
npm run test
After the first run, Jest will generate a __snapshots__ directory in the same directory as the original test. Let’s take a peek at the newly generated snapshot.
tests/javascript/__snapshots__/Counter.spec.js.snap
// Jest Snapshot v1, https://goo.gl/fbAQLP

exports[`Counter.vue increments counter 1`] = `
<div>
  <h1>Count: 0</h1>
  <button jest="increment-button">+1</button>
</div>
`;

exports[`Counter.vue increments counter 2`] = `
<div>
  <h1>Count: 1</h1>
  <button jest="increment-button">+1</button>
</div>
`;
As you can see, Jest renders the Vue component at every step and saves its rendered state as plain text. The next time the tests are run, if any part of the rendered component changes, the test will fail and point you to the difference.
If you intentionally change the behavior of your component, you will need to regenerate these snapshots. To do so, run:
npm run test -- -u
Snapshot tests are a great way to get comprehensive coverage of a component without having to test specific outcomes.
Remember, this approach is only useful in certain circumstances. Snapshot tests are extremely rigid; for instance, small, non-critical changes to a component, such as changing a class name, will cause the tests to fail. You also have to be careful not to allow bugs into your snapshots. If you update your snapshots, be sure to review them thoroughly before committing them.
Wrapping Up
Until recently, Vue testing has been a bit of a fuzzy concept to me. I hope this post will bring some clarity to the topic and make it easy for you to get up and running with some simple component tests. For deeper info on what to test and how to test it, remember to take a look at the docs for Jest and Vue Test Utils.
Finally, there are no more excuses for not testing your Vue components!
✌️ — Caleb
in your inbox:
let’s talk.
Thank you!
We appreciate your interest.
We will get right back to you.