React 101, Part 2: Refactoring with Redux

Articles in the React 101 Series:
- Part 1: React 101, Part 1: Building a GIF search engine
- Part 2: React 101, Part 2: Refactoring with Redux
- Part 3: React 101, Part 3: Routing and Auth
- Part 4: React 101, Part 4: Firebase
Last updated 06/01/17 to use Create React App, Redux Form v6, React-Router v4, and Firebase v3. Looking for the old version of the code? Find it here
Table of Contents:
- Why Redux?
- Adding Redux to React
- Reducers and the Store
- Building Our First Container
- Ready, set, action!
- Rewriting our reducers
- Re-adding our modal
Why Redux?
In Part 1 of this series, we built a search engine that calls the Giphy API and renders gifs on a page. The example was fairly simple, but even so, you might have noticed that state was already getting fairly complicated in the app.
While it is still relatively easy to figure out the data flow in this example, we do only have four components; it's easy to imagine how complicated things would get if we had forty components communicating with each other. Trying to track down where state is initialized and changed would quickly become a nightmare, especially if we add routing, pagination, etc. to the mix.
This is where Redux comes in. Redux is a state management library that stores the entire state of your application in a single object tree known as a store. Instead of components communicating with each other to send state back and forth, they get their state directly from the store. They also inform the store of any changes to the state that need to happen instead of directly mutating the state themselves.
Redux is not the only solution to the problem of complicated state. It is inspired by Elm as well as the principles of Flux architecture recommended by Facebook, and there are some great Flux implementations such as Flummox, Fluxible, and Alt. However, Redux itself is not a Flux implementation; in fact, it's not dependent on React at all. You could use it with whatever other JavaScript framework you'd like!
In order to follow what's happening with Redux, there are three core principles that you must first understand:
1. Single Source of Truth
In our React-only version of this application, we used this.state = {} in the constructor() methods of our App and SearchBar components to set the initial state. In our Redux refactor, one of the main things we're going to be doing is moving all of these to an object tree within a single store.
Redux doesn't have any opinions about how to structure this tree, but you can nest objects within it as deep as is necessary.
2. State is read-only
Remember how I said in part one that, in vanilla React, you should never modify the state directly but do so by calling this.setState()?
Redux takes this one step further. Your application shouldn't write to the state tree directly; instead, you dispatch an action, or an object that expresses your intent to mutate the store.
For example, if we wanted to tell our application to open a modal and pass along a gif to display, our action might look something like this:
export function openModal(gif) {
    return  {
        type: OPEN_MODAL,
        gif
    }
}
The only piece of an action that's actually required is the type property, and that's going to be needed in the next piece of the Redux puzzle, reducers.
3. Changes are made with pure functions
Reducers are the pieces that actually transform the state tree of your application. While actions are meant to signal that something happened, reducers handle the actual change to your state tree.
Reducers are functions that take two arguments, your previous state and an action, and simply return your next state as an entirely new object. You can think of it as Save-As functionality: you make some changes and then save a completely new, separate copy of the state.
Your reducers should never mutate the state directly, but instead create a copy of the state object, modify it, and return it back. (We will talk about this in more detail later on when we start writing reducers.)
It might not come as a surprise that Redux was originally developed as a Hot Reloading with Time Travel experiment—in other words, an experiment in implementing undo/redo functionality with complete copies of the store. Because we're handling complete state objects with slight variations, adding undo/redo functionality becomes much easier.
If we continue the example of the the OPEN_MODAL action we defined above, a reducer might look something like this:
// reducer for handling multiple gif-related actions
function gifs(state, action) {
  switch (action.type) {
    case OPEN_MODAL:
      return {
            ...state,
            modalIsOpen: true,
            selectedGif: action.gif.selectedGif
      };
    default:
        return state;
  }
}
Every time an action is dispatched, our application will run through the switch statement in our application's reducers, checking for a matching action type. If the action type matches, Redux will update the state by setting modalIsOpen to true and the selectedGif to the gif we passed in; if the action type is not found, it will just return the state.
In short, what you should take away is this: if you're using Redux, React is responsible for managing the presentation and views of our application, while Redux is in charge of data management.
This will be the primary goal of our refactoring. In the demo app from part one of this series, state management is very tightly coupled to our React components. We want to pull as much of the state management out of the views and into actions and reducers as we can.
First, let's look at how to hook Redux into our application.
Adding Redux to React
If you followed along with part one of this tutorial, we're going to pick up right where we left off. If you need a copy of the code, you can pull it down here. Part one ended with the code found in the Step 6 commit.
If you want to take another look at the completed project, you can find a demo here.
Let's dive in!
To begin, run $ npm install --save redux react-redux.
There is a bit of housekeeping we need to do before we start writing any Redux code. We'll need to update our directory structure for Redux, since we're now handling actions, reducers, and other Redux-specific helpers.
For now, just create empty files in the new folders you create. We'll be adding to them soon!
+-- src
|   +-- actions
|       +-- index.js
|   +-- components
|       +-- GifItem.js
|       +-- GifList.js
|       +-- GifModal.js
|       +-- SearchBar.js
|   +-- containers
|       +-- App.js
|   +-- reducers
|       +-- index.js
|       +-- gifs.js
|       +-- modal.js
|   +-- store
|       +-- configureStore.js
|   +-- styles
|       +-- app.css
|   +-- index.js
A tool that makes writing Redux apps and tracking the flow of data far easier is the Redux-DevTools library. It is possible to add it as a component to our application, but there is a Chrome extension that makes using it far easier. It's not required for this tutorial, but I highly recommend you download it.
If you don't, you'll be missing out on this:
The last thing we want to do before we start writing any code is to take a look at our existing application to figure out the ways we'll need to interact with the store we'll be creating. This will make it much easier to write our actions and reducers.
We'll need to:
- Request gifs
- Open the modal with the selected gif
- Close the modal
The simplest place to get started is writing our first reducer to return some gifs. It won't do much yet, but it's a good first step in our refactor.
Reducers and the Store
As we discussed before, reducers are simply functions responsible for transforming and returning the store of our application. Of course, we don't yet have a store set up, let alone any actions to send data to our reducers. So, for now, we're going to return dummy data like we initially did with state in part one.
For now, let's have our GifsReducer simply return a hard-coded list of gifs:
src/reducers/gifs.js
The next step is to combine all of our reducers into what is called the rootReducer. We'll pass this main reducing function in as a parameter when we create our store.
For now, we only have our GifsReducer, so let's look at how we might set our rootReducer up:
src/reducers/index.js
This code should be fairly easy to understand; we are using Redux's built-in combineReducers function to create a single object that contains a bunch of reducers. The key on the object—in this case, gifs—is the name of the piece of the state, and the value is the reducer itself (or, more accurately, what is being returned by the reducer).
Any other reducers we build should simply be added to the object in the same way.
Next, let's write a function to handle creating our Redux store. To do so, go into the store/configureStore.js file and add the following code:
store/configureStore.js
Here, we're using Redux's createStore function to—you guessed it—create our store. Notice that we're passing in the rootReducer we created before so that we can update the state tree of our application.
We are also adding some code to allow the Redux Dev Tools Chrome extension to access our store. If you chose not to install this extension, having this extra code won't hurt anything, but feel free to remove that line.
Finally, there's some boilerplate code to make Webpack's hot module replacement play nice with reducers, but you don't have to worry too much about that right now.
Prepping index.js for Redux
We have one final step left to hook our store up to our application. Currently, our App component is sitting in our src/index.js file. In our Redux application, this component is instead going to live in the containers/ directory. We are instead going to use index.js to hook our React application up to Redux.
Why are we putting App into containers/ instead of components/? In Redux, a container is a "smart" React component that's hooked directly into the store, while components refer to "dumb" React components that are unaware of Redux. We're going to have our App handle passing down state as props, much as we did before, and leave our other components more or less untouched.
For now, delete all of the code from the old src/index.js except for the last line, which begins with ReactDOM.render. We'll rewrite our App component later to be more Redux-friendly, but for now, we want to start with an almost-empty index.js file.
Update index.js with the following code:
src/index.js
There are two major things we're doing here:
- We're finally creating our store by calling the
configureStore()method we set up insrc/store/configureStore.js - We're wrapping our
Appcontainer in a ReduxProvider. This is what allows us to connect React to our Redux store.
Just like in part one, we are using ReactDOM to render our application within the div with an id of app in our index.html file.
Before we add any actions or rewrite our App component to handle passing data from our store to the more complex React components we've already written (GifItem, GifList, etc.), let's take a brief detour. We are going to write a component to render the hard-coded data from our reducer so we can see a simplified example of how to connect React to Redux.
Building Our First Container
In part 1, before we actually started requesting data from the Giphy API, we built a simplified GifList to render our dummy data. Here, we are going to do the exact same thing.
Create a file in the components directory called GifsTemp.js and add the following code:
src/components/GifsTemp.js
This is basically just a stripped-down, combined version of our GifList and GifItem components. Because we are going to be deleting GifsTemp once we start adding in our other components, it wasn't necessary to break it into multiple files like we did before.
Note: Remember from part 1 that when your function definition looks like
GifsTempdoes above, where you have something like({gifs})as your parameter list, that means this function is expecting an object passed in that has a propertygifs. Rather than passing in an object with that property and then accessinggifsin our function asobjectNameHere.gifs, this syntax allows us to pull out thegifsproperty of whatever object is passed in, and automatically assign it to a variable namedgifs. So if we pass{ title: 'stuff', gifs: 'abc' }into this function, the function would have agifsvariable available to it that was equal to'abc'.
Next, we're going to start rebuilding our App component, adding some Reduxificiation in the process.
src/containers/App.js
There are a few new things going on here, so let's break this down piece by piece.
The first two import statements are nothing unusual, but in line 3, we're importing only the connect property from react-redux (using a ES6 syntax similar to the one we just talked about with the ({gifs}) parameter of GifsTemp.)
connect is what we need to use in order to link React and Redux; remember, they're two totally separate libraries! The react-redux package will, essentially, give us a way to pull Redux's state into React as props.
Our App class looks exactly like most of the other React components we've written. We are rendering our GifsTemp component and passing in gifs as props—but where is the gifs object coming from? To answer that, we need to look at the next bit of code.
The mapStateToProps function is going to be passed as the first argument of the connect function we imported from react-redux. This function allows the App component to subscribe to the Redux store update; whenever the store changes, mapStateToProps is called.
mapStateToProps must return a plain object, and it then becomes available on the App component as props (which we can then pass down to our GifsTemp component as this.props.gifs.)
But where are these gifs coming from? Way back in our combineReducers function, we set the result of the GifsReducer as part of our state with the gifs key.
src/reducers/index.js
Here, in our mapStateToProps function, we are linking the gifs from our GifsReducer to this.props.gifs on our App component.
Next, let's take a look at the connnect()() function:
When we were writing vanilla React, we would export our components directly by writing something like export default App. Here, we are not exporting our App but instead are exporting the results of the connect function from react-redux.
Remember how we wrapped our App component in <Provider> back in index.js?
src/index.js
The <Provider> made our Redux store available to any connect()() calls within child components. This is how mapStateToProps can access our state.
By doing this, we are not exporting just our vanilla React App component; we are exporting an entirely new, Redux-connected App component.
You may be wondering why
connect()()has two sets of parentheses. There are actually two different function calls going on here! Whenconnect(mapStateToProps)is called, it actually returns another function; because of the second set of parentheses, this second function is then called immediately withApppassed in as an argument.
If we run $ npm start and navigate to http://localhost:3000, we should see our dummy data rendered on the page:
Next, let's take a look at how we might again be able to retrieve our gifs dynamially. To do this, we'll need to write some actions.
Ready, set, action!
As I mentioned before, an action is a plain JavaScript object that sends data from our application to our store. Actions are fired whenever the state needs to change, and the switch statement in our reducers "catch" these actions so that they can update the store.
Whenever you write an action, there are generally three main pieces that should exist:
- The action itself. This is a plain JavaScript object with up to two pieces: a type (required) and a payload (only required if you want to pass data along with your action)
- The action type. In Redux, this is almost always expressed as a
constin all caps so that it can be exported for use in other parts of our application (such as our reducers). You can just use regular strings, but it makes it that much more likely that you'll introduce bugs via typos or if your action names change. - The action creator. Action creators are simply functions that create actions. We can import these into our containers and pass them into child components via
props
Let's write our first action to pass the search term along from the SearchBar. For now, we'll just console.log the results, since we don't have a reducer set up to handle it yet. We are also adding the required type key, setting it to REQUEST_GIFS, and (for now) passing along our term as the payload:
src/actions/index.js
You can see the three pieces in play here:
Action Type:
Action Creator:
Action:
Next, we need to simplify our SearchBar component a bit, since we no longer want it to handle any sort of state:
src/components/SearchBar.js
Since we no longer need to initialize our state in the constructor with this.state = {}, we can get rid of our constructor altogether.
Additionally, we can get rid of the this.setState() call in our onInputChange() method. Our App container, which is wired into Redux, will be handling that now.
We do want to leave the call to this.props.onTermChange(term)—this is how our App component is going to pass our REQUEST_GIFS action to our SearchBar.
Next, we need to update our App to fire our action creator function whenever the search term changes:
src/containers/App.js
There are quite a few changes going on here, so let's break them down:
We're going to talk in more detail about Redux's bindActionCreators() method in a few paragraphs, so let's skip it for now.
Next, we're importing all (expressed with *) exported modules in our actions/index.js file as a single object, Actions. This will give us access to all of our action creators so that we can hook them into our components.
Finally, we're pulling in our SearchBar component again, along with our app.css file, and deleting our GifsTemp component. (Feel free to delete the src/components/GifsTemp.js) as well.)
In addition to adding the SearchBar component, we're passing along our requestGifs action creator to our SearchBar via the onTermChange prop. This means that, whenever the onInputChange method is fired by entering or removing text in the input, our action creator will fire as well.
To get a better understanding of what's going on, let's take another look at the relevant lines in our SearchBar component:
src/components/SearchBar.js
If we break this down step-by-step, we can see the following occuring:
- The
Appcomponent renders aSearchBar, passing through therequestGifsaction creator via a prop calledonTermChange - Whenever text is added or removed from the input field, a JavaScript event fires, and the
SearchBarcalls itsonInputChangemethod onInputChangecalls theonTermChangeprop passed fromApp, and therequestGifsaction creator function receives thetermas an argument
But how did our App receive the requestGifs action creator? To understand this, we must look at the next bit of code:
mapDispatchToProps is the second, optional argument you can pass to react-redux's connect()() method. It can be easy to confuse it with mapStateToProps, but they actually do two nearly-opposite things:
- mapDispatchToProps passes data from our container to the store. It provides the ability for the container to tell the store that it needs to change and enables this by adding action creators to our container as props.
- mapStateToProps passes data to our container from our store. It makes the result of reducers available to our container as props.
In our mapDispatchToProps method, we are setting this.props.actions on our App by calling Redux's bindActionCreators method.
bindActionCreators takes a single object whose values are action creators (in this case, our Actions object that we imported from src/actions/index.js) and wraps every action creator in a dispatch call so that they can be invoked within our container. This is how our app is notified that there is a state change.
To make sure our action is hooked up correctly, go to http://localhost:3000 and enter some text into the search bar. You should see the result logged in the console:
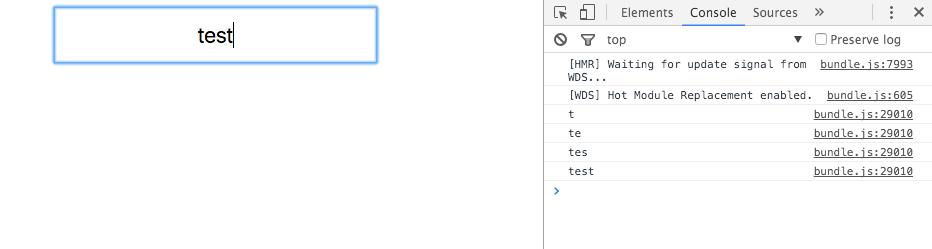
From this, we know our actions are firing correctly. However, we don't want to return the search term as a result of the REQUEST_GIFS action; we want to return an array of gifs.
To do this, we will need to re-add the superagent AJAX library (which we originally called in our App component in part one). We can do this in our requestGifs action creator:
src/actions/index.js
This code is very similar to what we originally had in our App component back in part one. There is one problem, though; here, superagent will return a Request object, which is not automatically resolved when using Redux.
This wasn't a problem when we were just using vanilla React; we could wait for superagent's result and call this.setState on the response, and then our app would update with the change.
However, all Redux actions are synchronous by default, so we don't have a superagent result to pass to our reducer. The action dispatches as soon as the call is made.
There are multiple ways to solve this issue, but my favorite is by adding a library called redux-promise. This allows you to add a middleware function to your store, and if it receives a promise as a payload from an action, it will dispatch the resolved value of that promise.
You may be familiar with the concept of middleare if you've used a server-side framework like Express.js or Laravel. Middleware functions are basically a layer added between a request and a response that perform some sort of check or transformation on your data. They're commonly used to see if a user is authenticated, to add CORS headers, or, as in this case, to resolve a promise.
To install redux-promise, run $ npm install --save redux-promise in your terminal.
Next, we need to write some code to hook our middleware into our store.
src/store/configureStore.js
The biggest change we're seeing here is the addition of Redux's compose method. We need to use this if we're using multiple function transformations to enhance a store—in this case, Redux's applyMiddleware (to which we're passing the imported ReduxPromise) along with our code to enable Redux DevTools.
With just those few extra lines of code, any promises we return from our actions should be fully resolved when they hit our reducers.
If you're not using the Redux DevTools extension / Chrome, you'll also need to update line 11 to change
undefinedtof => f, since you can't passundefinedintocompose. Big shoutout to killarneyman for this fix!
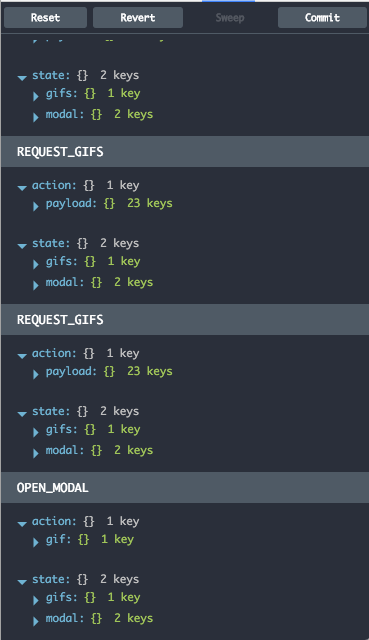
How can we know that the redux-promise middleware is working? Here's where the Redux DevTools come in handy. If you search for something and open Chrome DevTools, then click on the Redux tab, you should see something like this:
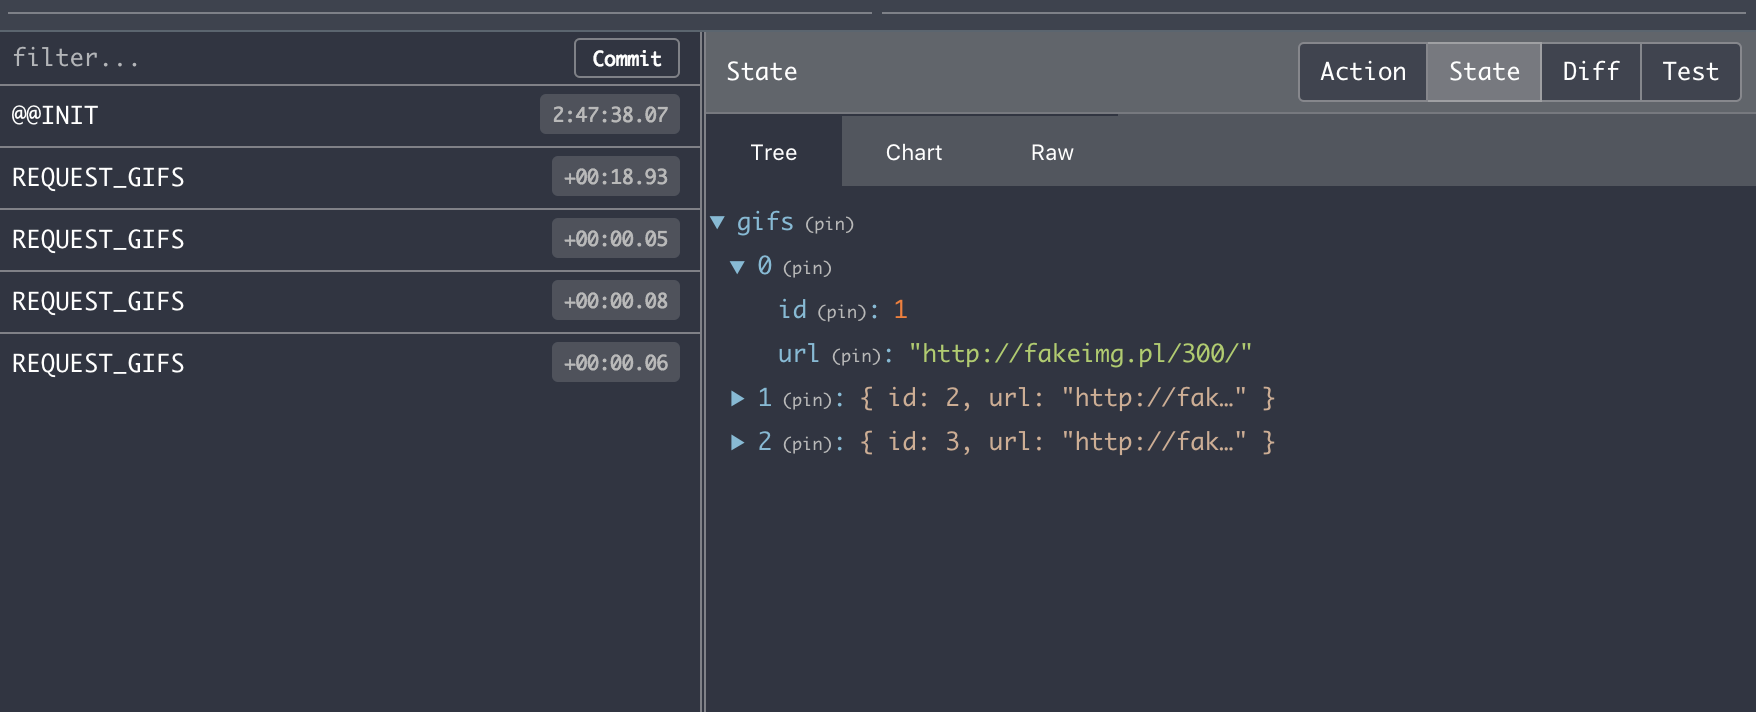
Here, you can see our REQUEST_GIFS action in the left panel. There are two tabs in the right panel: action and state.
If you click the action tab, you can see our payload of the result of the API call to Giphy.
Under state, you can still see the three gifs that we've hard-coded in our GifsReducer. Let's get rid of those hard-coded objects next so that we can pass the data from our action to the store.
Rewriting and rendering our reducer
We've spent some time talking about reducers already, but at the time, we didn't have a clear understanding of where their data is coming from. Now that we've spent some time with actions, let's take a step back and look at reducers in closer detail.
We know already that our application has a single rootReducer that is a combination of all other reducers we've written. In this case, it's only a GifsReducer, although we will be adding a ModalReducer soon as well.
Every single time an action is dispatched, from the INIT action that Redux automatically fires when our app is booted to REQUEST_GIFS our code is calling every time the input changes, our app will run the rootReducer, along with all reducers connected to it, to handle any changes to state.
So here's what our updated GifsReducer should look like:
src/reducers/gifs.js
As before, our reducer is just a function, but this time it takes two arguments: state and action.
The first thing we're doing is setting up an initial state for our reducer by setting a data property to an empty array. This helps us avoid any issues with our gifs coming back as null or undefined before they are loaded—because, if you'll recall, we are running props.gifs.map() in our GifsList.
It is important to note that the state argument on our reducer does not refer to the entire state of our application—just the state that our GifsReducer is responsible for.
The action argument handles any action dispatched in our application. This is why we write switch statements in our reducers: we can check for any actions that our reducer cares about or, if it doesn't care about any of the dispatched actions, it can just return the state from the default case.
If you're not familiar with the newest JavaScript features, this syntax might look unfamiliar to you:
This is known as the object spread syntax. It creates a new version of the store, copying all ennumerable properties from the previous version, and then updates just the value of the the data key on the new object.
Why not just do something like state.data = action.payload.body.data? Back when we talked about the three core principles of Redux, I mentioned the importance of never mutating the state directly. Writing ...state, data: action.payload.body.data allows us to save a new copy of the state with only the data property updated, essentially granting us "Save As" functionality.
However, this is still an experimental feature that's not natively supported by any browsers yet, so it does require Babel in order to transpile the code down to ES5. As a result, in the wild you'll often see code that looks something like this:
return Object.assign({}, state, {
    data: action.payload.body.data
});
As long as you have Babel set up (which you will by default if you use Create React App), both do essentially same thing; it's up to you which one you feel more comfortable with.
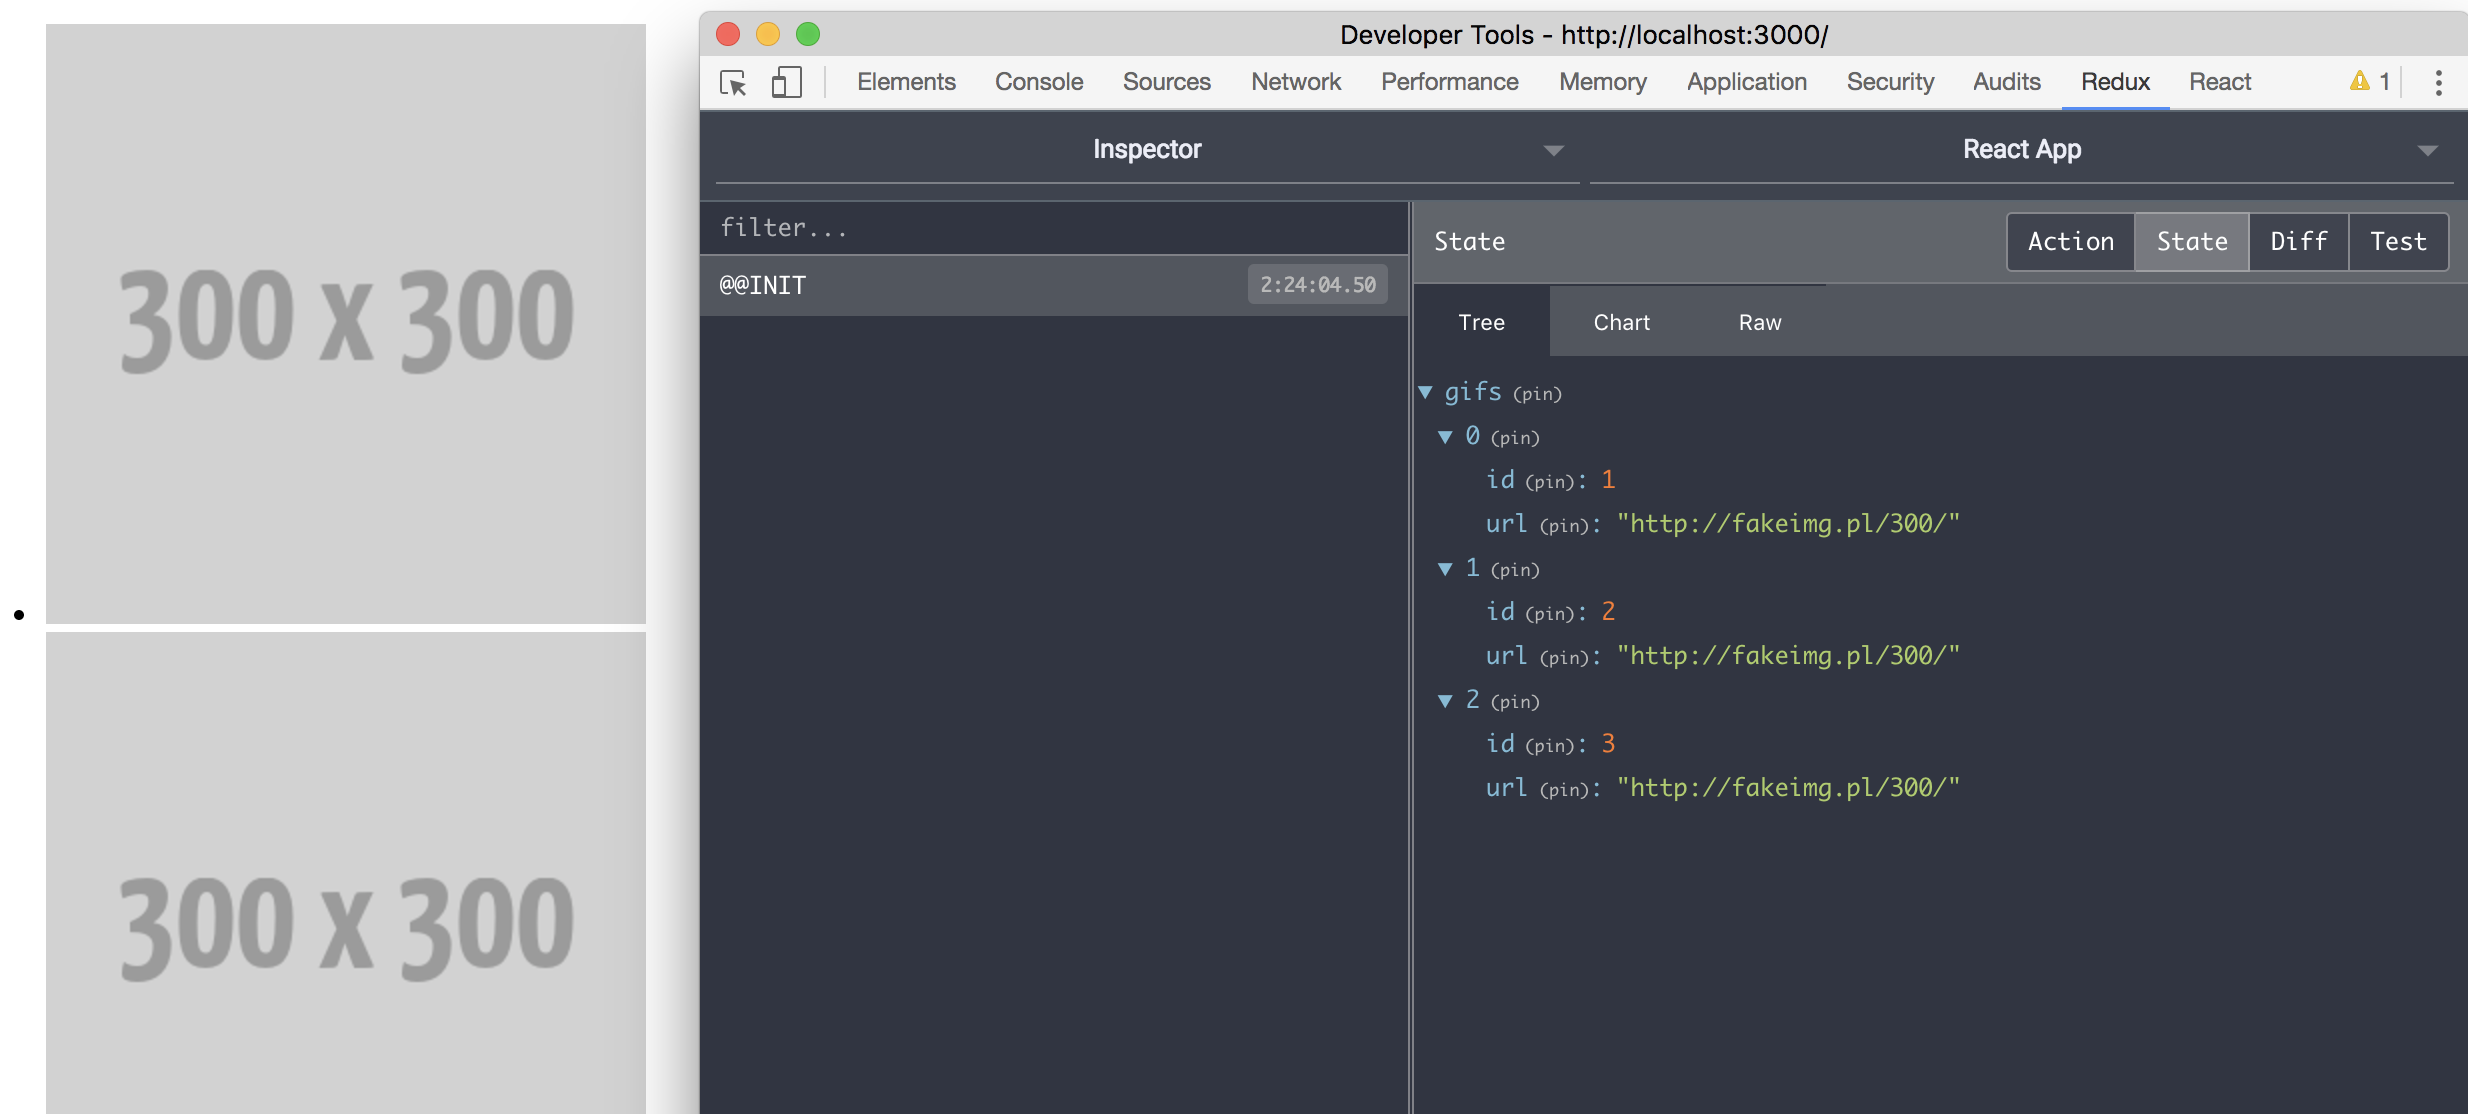
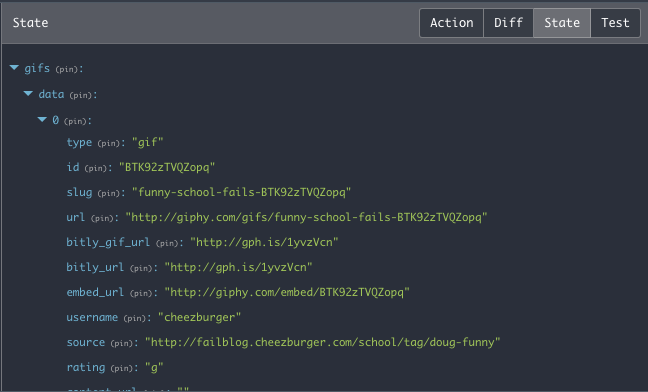
If we check our Redux DevTools again, we can see that our gifs are now being set as a property on state:
Now, we should be able to add our GifList back in to our App container and render our results. Better yet, we can do it with almost no further modifications, since GifList simply expects an array of gifs to be passed down as props, and we're already mapping the results of our GifsReducer to our App's props via mapStateToProps. The only other thing we have to do is add the data key to gifs on mapStateToProps:
src/containers/App.js
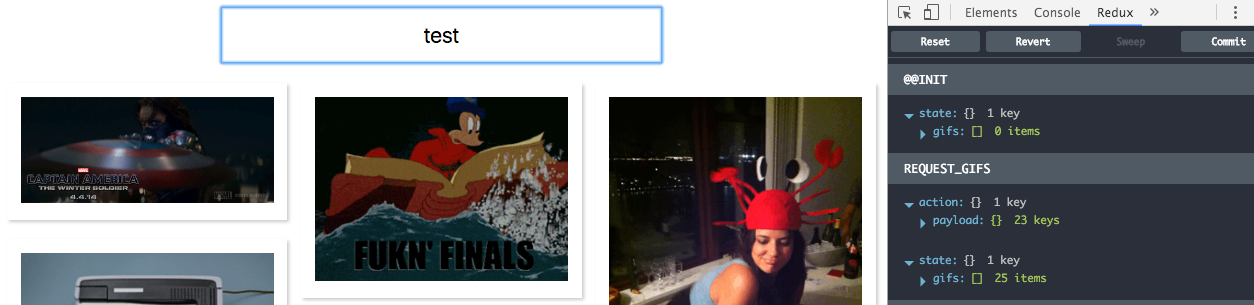
Now, if you search again, you should see gifs being rendered:
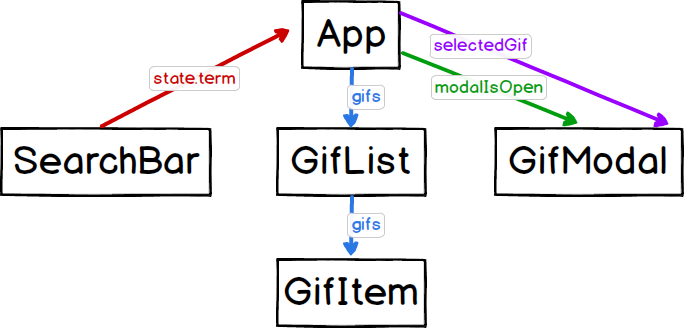
It might seem like there's a lot going on here, and if it's your first time using Redux, figuring out the flow of data can be complicated. It's important to remember that the flow of data is unidirectional—it follows a very specific path through actions and reducers every single time before finally being returned to the container. Let's take a look at this diagram and walk through it together:
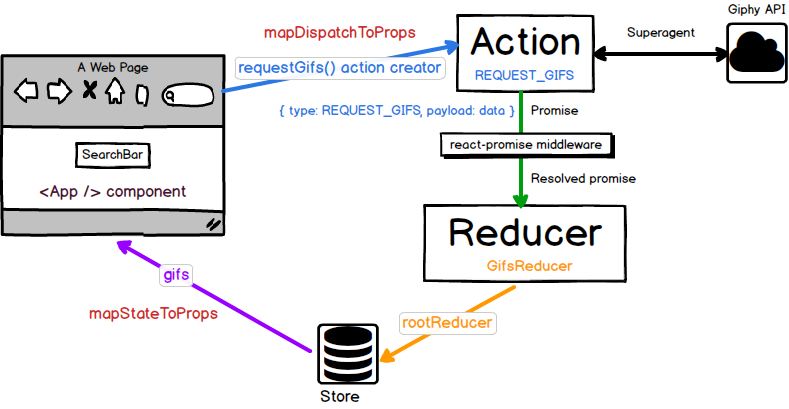
When our app first loads:
- The App renders as a Redux-connected container and fires an
initaction - The
rootReducerreceives thisinitaction and calls theGifsReducer(along with any other reducers that might be connected to it). Since theREQUEST_GIFSaction is not being fired (which is the only action type that theGifsReducercares about at the moment), theGifsReducerreturns its default state of an empty array ongifs.data - In
App.js,mapStateToPropsmakes the emptygifs.dataarray available toAppunderthis.props.gifs mapDispatchToPropsbinds therequestGif()action creator to the App's props, making it available underthis.props.actions.requestGifs
When the user enters text:
- The user enters text into the
SearchBar, triggering itsonInputChangeevent handler onInputChangefires theonTermChangeprop being passed from the parentAppcontainer.onTermChangecontains thethis.props.actions.requestGifsaction creator, and it is firedrequestGifsstarts an API call to Giphy and returns a promise while it waits for a result. It passes this promise to therootReducer- The
redux-promisemiddleware sees that we are passing a promise and resolves it. It passes the result of the Giphy API request to ourrootReducer - The
rootReducerpasses this data through each reducer linked to it - The
GifsReducer's switch statement checks the action type ofREQUEST_GIFS, which matches one of its cases. It uses the data from theREQUEST_GIFSaction to create a new version of the state with an updateddataproperty - Redux notifies the connected
Appcontainer that the store has been updated - The App container receives the updated gifs from store via
mapStateToPropsand passes it to theGifList - The
GifListandGifItemcomponents render the gifs
Still feeling a little confused? No worries! We're going to run through the entire flow again in the next step when we add our modal functionality back in. You will see that, once you get the boilerplate/setup finished, it's pretty easy to hook things into Redux's flow.
Re-adding our modal
This time, instead of adding our reducers first, let's add our actions. We'll need one to open the modal as well as one to close it:
src/actions/index.js
We're adding two action types as constants, OPEN_MODAL and CLOSE_MODAL, along with two action creators, openModal() and closeModal(). Our openModal() action creator takes a gif as an argument: this will be the gif our modal will render.
We're not returning any sort of asynchronous promises here, so when our actions fire, we don't need any middleware transforming our data before it hits our reducers.
Next, let's write our ModalReducer:
src/reducers/modal.js
Similarly to how we handled initializing our state in our GifsReducer, we're creating an initialState const and setting selectedGif to null and modalIsOpen to false, as these will be our default values when our app boots up. Remember, state in this context refers only to the state that our ModalReducer cares about!
Next, we're setting up a switch statement, just like we did in our GifsReducer. We're again using the object spread syntax to copy our state and avoid mutating it, and we're setting our modalIsOpen and selectedGif properties.
We'll also need to add our ModalReducer to our rootReducer so that our application is aware of it:
src/reducers/index.js
Now, both our modalIsOpen and selectedGif should be available on state. Let's update our App container to add our GifModal component back in and handle this new information:
src/containers/App.js
Most of this code should be pretty easy to follow:
- We're adding the
onGifSelectprop from part one back to ourGifListand passing in theselectedGifargument being sent all the way up from theGifItemcomponent. - The
GifModalhas been added back in, withmodalIsOpenandselectedGifbeing passed through as props modalIsOpenandselectedGifare being added toApp's props from the Redux store viamapDispatchToProps
Now, if we search for gifs, the GifModal should work again!
Conclusion
While we didn't add any new features in this part of the tutorial, I hope taking a look at how to build this application using a state management library gives you a good idea of how much easier it is to manage data flow in your application. While Redux does add some initial complexity while you're setting it up and fighting against the learning curve, it makes growing your codebase far more painless.
In part three, we're going to be scaling our app, adding several new features, and scaffolding out authentication in preparation for adding Firebase. See you soon!
in your inbox:
let’s talk.
Thank you!
We appreciate your interest.
We will get right back to you.