Supercharged Static Sites: Introducing Jigsaw Collections


Last year, Tighten introduced Jigsaw, a simple but powerful static site generator based on Laravel's Blade templating engine, created by Tighten Alum Adam Wathan.
We use Jigsaw to power our own site, and we've been thrilled to hear from lots of other folks who have been building great sites with it. But the one missing feature at the top of our wish list (and, as it turns out, at the top of quite a few other users') was the ability to organize and work with groups of related content—things like blog posts, lists of projects, staff bios, product lists, and more.
Jigsaw 1.0: Introducing Collections
Today, thanks to some zondalicious work by Adam and further development by Tighten, we're excited to announce the release of a shiny new version 1.0 of Jigsaw, with support for what we call Collections.
Like the core of Jigsaw itself, collections are designed to be as simple as possible to implement, while at the same time giving you the power and flexibility to build some pretty advanced sites. Collections allow you to push the boundaries of what is normally considered possible from a static site generator, bridging the gap between a static site and a full-fledged content management system. You can create a robust site that is a breeze to deploy without requiring a PHP server, supports near-dynamic content using the familiar Blade syntax, and which—like all static HTML sites—runs crazy fast.
(If you're not familiar with Jigsaw, take a look at our earlier blog post or the documentation to get acquainted with the basics. This post will assume that you have some knowledge about how to set up a simple Jigsaw-based site.)
Starting simple: A blog using Markdown
Let's dive right in with a basic but very common use-case: a blog, with posts that are written in Markdown.
To create a collection, you need to do two things:
- Add the name of your collection to an item in
config.phpnamedcollections. We will create a collection namedposts:
<!-- config.php -->
<?php

return [
    'collections' => [
        'posts',
    ],
];
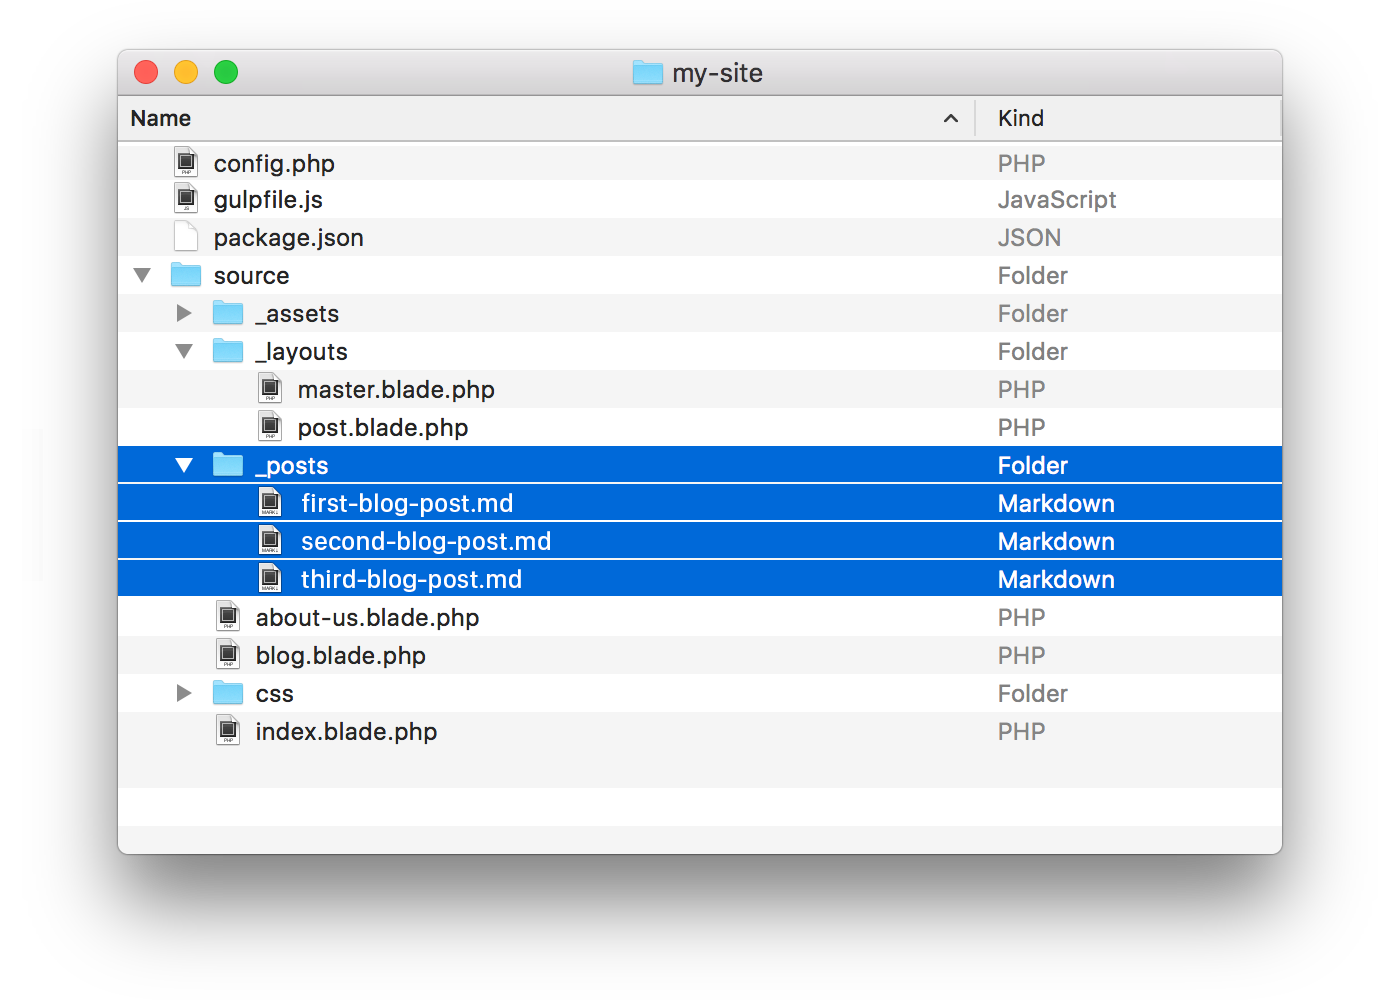
- Create a folder within the
sourcefolder with the same name as your collection, preceded by an underscore (_postsin this example); this is where your collection items will live:
...and, just like that, you've built your first Jigsaw collection. When you run jigsaw build, Jigsaw will look in the source/_posts folder and treat any files in there as entries in the posts collection.
Remember that prepending a file or folder with an underscore tells Jigsaw not to render that file on its own—or, in the case of a folder, to not render any of the files within the folder. So our Markdown files in the _posts folder won't be rendered immediately as ordinary pages; rather, they'll be added to the posts collection, giving us access to a whole set of tools for working with our posts at an aggregate level.
In order to view each individual post, we need a Blade template; we'll call it post.blade.php and store it in the _layouts folder. So, let's create the following files within the source folder:
_layouts
    post.blade.php
_posts
    first-blog-post.md
    second-blog-post.md
    third-blog-post.md
    ...
The file post.blade.php will serve as our "single-item" template, meaning each blog post will use (or "extend") post.blade.php to display its content. In that template, we can also output any page-specific variables that we will define , such as a title and author:
<!-- source/_layouts/post.blade.php -->
@extends('_layouts.master')

@section('content')
    <h1>{{ $page->title }}</h1>
    <p>by {{ $page->author }}</p>

    @yield('postContent')
@endsection
At the top of each post file, we'll include a YAML front matter section that specifies the single-item Blade template using the extends key, and defines the section of the parent template into which the content should be rendered. We'll also populate the custom variables title, author, and date:
<!-- source/_posts/first_blog_post.md -->
---
extends: _layouts.post
section: postContent
title: My First Post
author: Keith Damiani
date: 2017-04-12
---

## This is my _very first_ blog post, and it's a brilliant one!
At this point, we haven't accomplished much more than we would when using regular Markdown files and Blade parent templates in Jigsaw. However, since we've defined posts as a collection, we are now able to access all our blog posts as a group—for example, we can iterate over them to generate an index page that lists all our blog posts.
Adding an index page of all blog posts
In any Blade template, we can refer to our collection of blog posts using a variable named after our collection—in this case, $posts. The $posts variable is an iterable object that references all our blog posts, so we can loop over it using @foreach to obtain a reference to each individual blog post. It is also an instance of Illuminate\Collection, meaning we can use any methods (such as sortBy and chunk) that are available to a typical collection in Laravel.
Let's create a new template for our index view, called posts.blade.php:
<!-- source/posts.blade.php -->
@extends('_layouts.master')

@section('content')
    <h1>Blog Posts</h1>

    @foreach ($posts as $post)
        <h2><a href="{{ $post->getPath() }}">{{ $post->title }}</a></h2>
        <h3>By {{ $post->author }}</h3>
        {{ $post->getContent() }}
    @endforeach
@endsection
And now, when we visit our new page /posts, we'll see a list of all our blog posts:
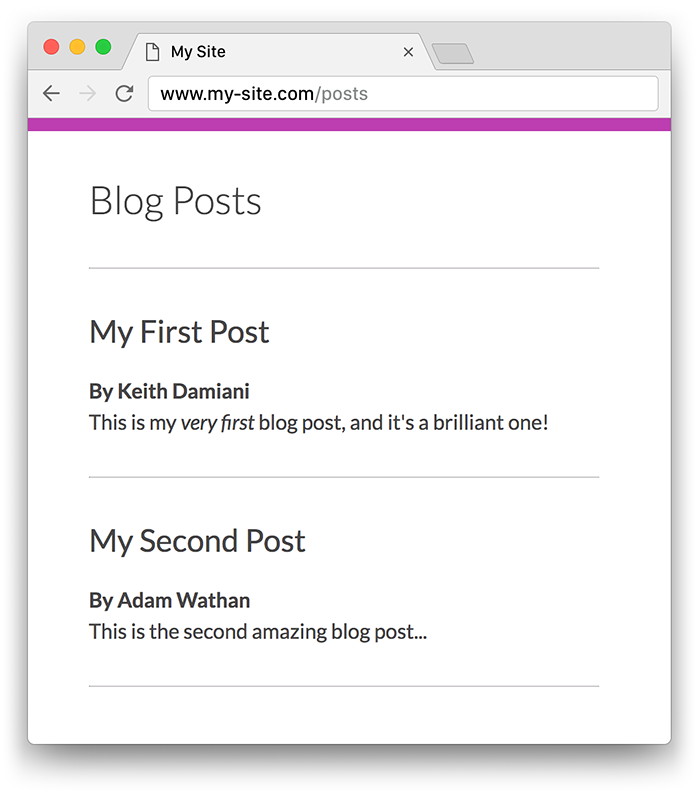
Each collection item ($post) has access to any of the variables defined within the YAML front matter of the individual post's Markdown file—$post->title and $post->author in our example. Notice, also, that our template includes a link to each post using $post->getPath(); this returns a relative path to each blog post, and is automatically generated for each item in our collection. In addition to getPath(), there are a few other methods that Jigsaw automatically makes available for each item of a collection:
getPath()contains the relative path to the itemgetUrl()contains the fully-qualified URL, if abaseUrlkey has been set in theconfig.phparraygetFilename()contains each item's filename, without the file extension ("first-blog-post")getExtension()contains the file extension ("md")getCollection()contains the name of the collection ("posts")getContent()returns the main content of the collection item (i.e. the body of the Markdown file)
By default, the path for a collection item is set to the name of the collection, followed by the filename, e.g. /posts/first-blog-post, /posts/second-blog-post, etc. But we can customize how paths are generated for collection items by adding a path setting in config.php.
Customizing collection item URLs
Heading back to config.php, where we defined the posts collection in the first place, we can control how our blog post URLs are generated by changing posts to an array, and adding a path key. Using a syntax similar to the way route parameters are specified in Laravel, we can return a string that defines the path for each blog post, using bracketed parameters that will be replaced by the variables from each collection item:
<!-- config.php -->
<?php

return [
    'collections' => [
        'posts' => [
            'path' => 'blog/{-author}/{filename}',
        ],
    ],
];
Now, each of our post URLs will look like https://my-site.com/insights/keith-damiani/my-first-post. Note the - preceding {-author}; this will convert the author variable into a URL-friendly slug, using the the separator that precedes the variable name. You can access any variable from a post in the path name, along with collection (for the collection name) and filename (for the filename without extension).
There are several other options for specifying collection item paths, including formatting a date variable and converting it into URL segments like https://my-site.com/insights/2017/april/my-first-post, or even using a PHP closure to use whatever logic you'd like in customizing your paths. Check out the Jigsaw documentation for a full rundown of path options.
Sorting collection items
When we loop over $posts in our index template posts.blade.php, they'll be returned sorted alphabetically by their filenames. We could prepend a date or number to the filename to sort our blog posts in a more meaningful way, e.g. 1-first-blog-post.md or 2017-04-12-first-blog-post.md. Or, heading back to config.php, we can add a sort key to the posts array, and specify a variable to sort by:
<!-- config.php -->
<?php

return [
    'collections' => [
        'posts' => [
            'path' => 'blog/{-author}/{filename}',
            'sort' => '-date',
        ],
    ],
]
This will sort our posts in reverse date order, using the date variable from the YAML front matter of each post. (The - preceding the variable name date indicates a descending sort order.) We can also specify an array of variables, to sort by multiple criteria. For example, if we included a featured variable in our posts, we could display the featured posts first, sorted in reverse date order, followed by the regular posts:
'sort' => ['featured', '-date'],
Default variables
Collection items can include variables, like title and author, in the YAML front matter of each file. You can also set default values for these variables in the collection array in config.php, or even at the root level of config.php:
<!-- config.php -->
<?php

return [
    'author' => 'Default Site Author',
    'collections' => [
        'posts' => [
            'path' => 'blog/{-author}/{filename}',
            'author' => 'Default Blog Author',
        ],
        'tutorials' => [
            'path' => '{collection}/{section}/{-title}',
        ],
    ],
];
A post that references the variable $page->author will first look for the author key in the YAML header of the post, and if there is none, it will use the author defined in the collections => posts array. And, if author was not defined there, it would use the default author defined at the root level of config.php.
Helper methods
In addition to default variables, config.php can include helper methods that are accessible in your pages or collection items. Simply specify the method name as the key in the config.php array, and return a closure. The closure receives the current collection item as its first parameter; you can optionally pass additional parameters to the method when you call it in a template.
Imagine we wanted to include a sidebar on each page of our blog, containing a menu of all posts.
We can create a helper method, isSelected(), to highlight the currently selected post:
<!-- config.php -->
<?php

return [
    'collections' => [
        'posts' => [
            'path' => 'blog/{-author}/{filename}',
            'isSelected' => function ($post, $current_page) {
                return $post->getPath() == $current_page->getPath();
            },
        ],
    ],
];
Now, in a sidebar template, we can loop over all the items in the posts collection and output links to each of them. Then, for each item, we can call the isSelected() method to compare the path of that post to the path of the page that is currently being displayed. isSelected() will return true if the paths match, which we can use to set the class to selected:
<!-- _blog/sidebar.blade.php -->
@foreach ($posts as $post)
    <a class="{{ $post->isSelected($page) ? 'selected' : '' }}" href="{{ $post->getPath() }}">
        {{ $post->title }}
    </a>
@endforeach
Note that for each iteration of the collection $posts, the method isSelected() automatically received a reference to the collection item (i.e., each $post) as its first parameter. We passed the current page where our sidebar appears ($page) as the second parameter.
As with variables, helper methods can also be defined at the root level of config.php, which makes the method accessible on any page throughout your site. Methods defined within a collection's array of settings are only available to items in that collection, and will override methods of the same name defined at the root level. These methods are made available on a page object whether called via the $page variable on the page itself or an individual $post variable when iterating over a collection.
Additional features
Collections offer a variety of additional features for managing your content:
- You can paginate a collection, specifying how many items are displayed per page; built-in functions like
$page->getPrevious()and$page->getNext()are available to help you build pagination links. - Collection items don't necessarily need to
extenda parent template, so you can create collections for content like staff bios that don't have their own pages, but are simply displayed as a group on anAbout Uspage, for example. Simply omit theextendskey from your YAML front matter. - Collection items can extend multiple parent templates, so you can create
detailandsummaryviews, for instance, using the same content. You could even build a product catalog with bothwebandapiviews. See the documentation for some examples.
Plus, the latest version of Jigsaw includes a variety of other enhancements, including:
- Support for the latest Blade and Collections features in Laravel 5.4, including slots and components, and collection higher-order messages.
- Support for pages that use Blade with other text-type file formats, including
.blade.txt,.blade.js,.blade.json,.blade.xml, and.blade.rss. These files will be processed by Blade first, so you can use all the standard Blade control structures like@include,@if/@endif, as well as{{ ... }}or{!! ... !!}for including variables. You can even mix Blade and Markdown in a single.blade.mdfile, which will get parsed first by the Blade parser, and then by the Markdown parser. - Customized source and destination paths, by adding a
buildkey toconfig.phpand specifying yoursourceanddestinationdirectories.
We hope these powerful new features will open up new opportunities for building robust static sites with Jigsaw.
In addition to the Jigsaw documentation, we've set up a demo GitHub repo which contains code for a sample Jigsaw site using collections. Have a look around!
Have you built something amazing with Jigsaw? Share your masterpiece with us on Twitter at @tightenco. Or, if you have ideas for other features that would make Jigsaw even more useful, head over to the GitHub repo and open an issue or pull request with your feature request.
in your inbox:
let’s talk.
Thank you!
We appreciate your interest.
We will get right back to you.