From MySQL to Typesense: Blazing-Fast Full-Text Search in Laravel


Search is everywhere: Finding the nearest gas station, looking up a tutorial on YouTube, or searching for an old message in a chat ... in-app search is there to help us quickly find what we’re looking for.
That’s why today, we’ll explore implementing search in Laravel applications. Whether you want to add a search feature to your app and don’t know where to start, or you are interested in improving the performance of your existing search functionality, this post is for you.
We’ll start with the basics, using MySQL queries with the LIKE operator. Next, we’ll learn how to make faster queries using full-text indexes. Along the way, we’ll also build a search-as-you-type Livewire component.
As we progress, we’ll discover MySQL’s limitations in handling complex search scenarios. This will lead us to Typesense, an open-source search engine that offers robust solutions to these challenges. We’ll implement it using Laravel Scout, which provides an official driver for Typesense.
Ready for the ride? Let’s go!
Setting Up the Project and Seeding 2 Million Rows
Imagine a customer service application where support representatives need to quickly find customer accounts by name, email, or address. The search speed is crucial to efficiently respond to emails and phone calls. Let’s create this application and name it StarSupport:
composer create-project laravel/laravel starsupport

# Or using Laravel Installer:
laravel new starsupport
Follow the steps presented by installation wizard. We are not going to use a starter kit, so please select "No starter kit" when presented the option. Then, choose MySQL as database and configure the env file with the corresponding connection details.
Next, let’s create our Customer model along with its migration, factory, and seeder:
php artisan make:model Customer --migration --factory --seed
This command generates four files:
- app/Models/Customer.php
- database/migrations/2024_06_20_135645_create_customers_table.php
- database/factories/CustomerFactory.php
- database/seeders/CustomerSeeder.php
Let’s edit these files, starting with the migration:
$table->id();
$table->string('name'); // [tl! highlight:5]
$table->string('email')->unique();
$table->string('account_number')->unique();
$table->string('address');
$table->string('country');
$table->string('phone');
$table->timestamps();
We need a quick way to seed the database with fake customer records, so let’s customize the factory:
'name' => fake()->firstName() . ' ' . fake()->lastName(),
'email' => fake()->unique()->safeEmail(),
'account_number' => fake()->unique()->randomNumber(8, true),
'address' => fake()->address(),
'country' => fake()->country(),
'phone' => fake()->phoneNumber(),
Perfect. Now we can use that factory in our CustomerSeeder. We need a large number of records to test our search feature, so let’s create two million, in chunks of 100,000 for better performance:
public function run(): void
{
    $total = 2_000_000;
    $chunkSize = 100_000;

    for ($i = 0; $i < $total; $i += $chunkSize) {
        Customer::factory()->count($chunkSize)->create();
    }
}
Don’t forget to call this seeder in DatabaseSeeder:
public function run(): void
{
    User::factory()->create([
        'name' => 'Test User',
        'email' => 'test@example.com',
    ]);

    $this->call(CustomerSeeder::class); // [tl! highlight]
}
Finally, we want to make all the Customer model fields fillable. You can list all the columns in $fillable, or simply set $guarded to an empty array:
protected $guarded = [];
We're ready! Let's seed the database:
php artisan migrate:fresh --seed
First Attempt at Search: Implementing LIKE Queries
Our goal is to create a customer search feature that allows users to find customers based on their name, email, or address using a keyword. Users can type the keyword into a text input field on the frontend, and as they do, the frontend will send requests to the backend.
The backend will receive these requests and perform a SELECT query using the LIKE operator. For example, if the keyword is “john”, the query might look like this:
SELECT
    *
FROM
    customers
WHERE
    `name` LIKE '%john%'
    OR `email` LIKE '%john%'
    OR `address` LIKE '%john%';
We can implement the query as a scope on our Customer model:
public function scopeSearch(Builder $query, string $keyword): Builder
{
    return $query->where('name', 'LIKE', "%{$keyword}%")
        ->orWhere('email', 'LIKE', "%{$keyword}%")
        ->orWhere('address', 'LIKE', "%{$keyword}%");
}
... and use it like this:
Customer::search('john')->get();
Now, let’s benchmark this query’s performance. While there are several methods available (such as EXPLAIN ANALYZE in MySQL or logging PHP execution time with microtime), we’ll use Laravel’s built-in Benchmark helper.
If you are not familiar with it, don’t worry; it's really simple to use. It accepts a callback as an argument, executes it, and returns the execution time in milliseconds. Open Tinker with php artisan tinker and run the following:
use App\Models\Customer;
use Illuminate\Support\Benchmark;
Benchmark::dd(fn () => Customer::search('john')->get());
You'll see output similar to this:
"3,274.718ms"
Benchmark is pretty cool, right? What’s not as cool is that the query took more than three seconds to run. The exact duration will vary depending on the server running the application, but the summary is that it’s not as fast as we need it to be.
Let’s try again. Using Benchmark, we can run the query multiple times and get an average time. Let’s do 10 iterations. We can use the same keyword for consistency or test each time with a random keyword:
use App\Models\Customer;
use Illuminate\Support\Benchmark;
Benchmark::dd(fn () => Customer::search(Str::random(4))->get(), iterations: 10);
Alright, we now have a more representative number:
"3,039.130ms"
This means that if we search 10 times, we can expect an average execution time of 3 seconds.
I think we can safely assume that waiting 3 seconds for the results to show up is ... not good. And waiting another 3 seconds for the results to refresh when typing more characters (for example, changing the keyword from “john” to “johnson”) is a true test of patience.
So, what can we do to improve this?
Searching Efficiently: Utilizing MySQL Full-Text Indexes
Since version 5.6 (released in 2013), MySQL has supported full-text indexes. While classic indexes excel at exact matches and range queries, they’re not optimized for searching within text content. This is where full-text indexes shine: they enable advanced text-based searches, such as finding specific keywords or phrases within large text fields. This makes them ideal for applications with text-heavy content like articles, product descriptions, or user-generated content.
When MySQL creates a full-text index, it does something clever. It breaks down the text into individual words and builds an index for these words, much like the index at the back of a book. This approach allows MySQL to quickly pinpoint records containing specific search terms without having to scan the entire table. Even better, when we perform a search, MySQL can rank the results based on relevance, ensuring we see the most pertinent matches first.
We can create full-text indexes on CHAR, VARCHAR, or TEXT columns. We can even create a single index for multiple columns combined. In our case, since we need to search across three columns, it makes sense to create one full-text index that encompasses all three.
Let’s create a new migration with php artisan make:migration, to add this full-text index to our customers table:
<?php

use Illuminate\Database\Migrations\Migration;
use Illuminate\Database\Schema\Blueprint;
use Illuminate\Support\Facades\Schema;

return new class extends Migration
{
    public function up(): void
    {
        Schema::table('customers', function (Blueprint $table) {
            $table->fullText(['name', 'email', 'address']);
        });
    }

    public function down(): void
    {
        Schema::table('customers', function (Blueprint $table) {
            $table->dropFullText(['name', 'email', 'address']);
        });
    }
};
Run the migration with php artisan migrate. If you inspect the structure of the table, you’ll find that it now has a new index of type FULLTEXT called customers_name_email_address_fulltext.
To utilize full-text search, we need to update our search scope to use whereFullText instead of where:
public function scopeSearch(Builder $query, string $keyword): Builder
{
    return $query->whereFullText(['name', 'email', 'address'], $keyword);
}
Let’s try this out! Run the following in Tinker:
Customer::search('john')->get();
That was faster, right? In effect, that gets translated to the query:
SELECT * FROM `customers`
WHERE MATCH (`name`, `email`, `address`)
AGAINST ('tom' IN NATURAL LANGUAGE MODE);
Let’s measure the impact of the full-text index by running our previous benchmark with this new code:
use App\Models\Customer;
use Illuminate\Support\Benchmark;
Benchmark::dd(fn () => Customer::search(Str::random(4))->get(), iterations: 10);
And the result is ...
"3.148ms"
Yay! That’s only a bit more than 3 milliseconds. We went from 3 seconds to 3 milliseconds, so our query is now running 1,000 times faster.
Coincidence? Maybe! Benchmark will help us determine that. Let’s try running the query 1000 times (instead of 10) and see what average we get:
Benchmark::dd(fn () => Customer::search(Str::random(4))->get(), iterations: 1000);
The exact number may vary, but in my test I got 2.974ms. How much did you get? I bet it was a number way, way lower than before. This deserves a celebration! But first, we need to check a couple of things.
Let’s run an experiment. Please pick three customers and rename them. Two of them should now be called Tom, and the other should be called Tommy. For example:
UPDATE `customers` SET `name` = 'Tom Brown' WHERE `id` = 99;
UPDATE `customers` SET `name` = 'Tom Martinez' WHERE `id` = 134;
UPDATE `customers` SET `name` = 'Tommy Jones' WHERE `id` = 328;
Now, let's search for them:
Customer::search('tom')->get();
And we get ... zero results. That’s weird, right? If we search for “john” we still get results, but we get none when searching for “tom”, even though we are sure there are people named Tom in our customers table. Don’t worry, this is expected: by default, the minimum number of characters required for full-text search in MySQL is 4. We can adjust this number by editing MySQL’s defaults file, typically located at /etc/mysql/my.cnf. Add the following lines:
[mysqld]
ft_min_word_len=3
Save the file and restart MySQL. After a change like this, we need to drop the previous full-text index and recreate it. We can do that by rolling back the migration that created the index and running it again:
php artisan migrate:rollback && php artisan migrate
Now, let’s search for “tom” once again:
Customer::search('tom')->get();
This time you should get a collection of customers, including the first two we renamed: Tom Brown (ID 99) and Tom Martinez (ID 134). This is good! We have successfully changed the minimum number of characters of our full-text index.
However, using the “tom” keyword we won’t find Tommy (ID 328):
> App\Models\Customer::search('tom')->get()->pluck('id')->contains(328);
= false
Why? Because MySQL full-text search does not match prefixes or suffixes by default. It searches for whole words. For example, searching for “boo” will not match “book” or “boost”. And sometimes that is exactly what you need: exact matches. But, in our case, it would be ideal to get partial matches as well.
To do so, we can use boolean mode in our full-text search. With this modifier, certain characters have special meaning at the beginning or end of words in the search string. For example, the operator * works as a wildcard: the keyword tom* will match all words starting with “tom”:
SELECT * FROM `customers`
WHERE MATCH(`name`, `email`, `address`)
AGAINST ('tom*' IN boolean mode);
We can update our scope to generate that query, by adding the asterisk to the end of the keyword and changing the mode to boolean mode:
public function scopeSearch(Builder $query, string $keyword): Builder
{
    return $query->whereFullText(
        ['name', 'email', 'address'],
        "$keyword*",
        ['mode' => 'boolean'],
    );
}
Now, we should find Tommy (ID 328):
> App\Models\Customer::search('tom')->get()->pluck('id')->contains(328);
= true
Great! Our search function is now updated to find partial matches. However, it will only return entries that start with the given keyword (e.g., “Tommy”) and will not return results that end with the keyword (e.g., “Atom”). More on this later.
Last but not least: we need to remember to limit the number of results. Calling get will return all results, but we have millions of records and we might have thousands of matches. Most likely we just want to list, let’s say, the top 20. In other words:
Customer::search($this->keyword)->take(20)->get();
That’s it, now we can celebrate! And continue with the frontend.
Building a Livewire Search Component
While building the frontend isn’t the main focus of this article, seeing the results visually will be incredibly helpful. Plus, any excuse to work with Livewire is a good one!
Let’s install it via Composer:
composer require livewire/livewire
You can skip this step if your project already has Livewire (for example, if you installed Laravel Breeze choosing any of the “Livewire with Alpine” options). Next, create a search component by running:
php artisan make:livewire customer-search
This command will generate two new files in your project:
- app/Livewire/CustomerSearch.php
- resources/views/livewire/customer-search.blade.php
In the component class, we need a $keyword property to record the search term, and a $customers collection where we can store the matches. We can go ahead and add them as public properties of our Livewire class, which automatically makes them available to use in the view.
Finally, we need an action to search. The component code may look like this:
<?php

namespace App\Livewire;

use Livewire\Component;
use App\Models\Customer;
use Illuminate\Support\Collection;

class CustomerSearch extends Component
{
    public string $keyword = '';

    public Collection $customers;

    public function search()
    {
        $this->customers = strlen($this->keyword) > 2
            ? Customer::search($this->keyword)->take(20)->get()
            : collect([]);
    }

    public function render()
    {
        return view('livewire.customer-search');
    }
}
Perfect! Let’s move to the view. What do we need? Well, essentially two things:
- A text
<input>, where the user can type the search keyword. - A
<ul>list of the customers matching the search. This element should only be rendered if we have a keyword, and show a No matches found message if the search returns no results.
So, the template can look like this:
<div class="customer-search">
    <input
        wire:model="keyword"
        wire:keyup.debounce="search"
        autofocus
        placeholder="Search" />
    @if ($keyword)
        <ul>
            @forelse ($customers as $customer)
                <li>
                    <div>{{ $customer['name'] }}</div>
                    <div>{{ $customer['email'] }}</div>
                    <div>{{ $customer['address'] }}</div>
                </li>
            @empty
                <li>
                    No matches found
                </li>
            @endforelse
        </ul>
    @endif
</div>
The wire:model="keyword" directive binds the input’s value to the $keyword property in our component, ensuring $keyword always matches what the user types.
We use wire:keyup="search" to trigger our search action whenever a key is pressed. But we don’t want to fire a request for every single keystroke — that could flood the server with unnecessary requests. So, we add the debounce modifier: wire:keyup.debounce="search". This tells Livewire to wait briefly after the user stops typing before running the search. By default, it waits 250 milliseconds. Thus, when someone types “john” quickly, instead of four separate requests, we’ll have just one, sent shortly after they finish typing. This way, we get the perks of real-time search without overwhelming our server or network.
All set! Now, we can use this <livewire:customer-search /> component on any Blade view. For this test, we can replace all the contents of welcome.blade.php with:
<!DOCTYPE html>
<html>
    <head>
        <meta charset="utf-8">
        <meta name="viewport" content="width=device-width, initial-scale=1">
        <title>Customers</title>
        @vite(['resources/css/app.css', 'resources/js/app.js'])
    </head>
    <body>
        <livewire:customer-search />
    </body>
</html>
Let’s try it! Run php artisan serve and open the app in your browser. The input should autofocus, and you should be able to start typing your keyword. For example, type “ross”:
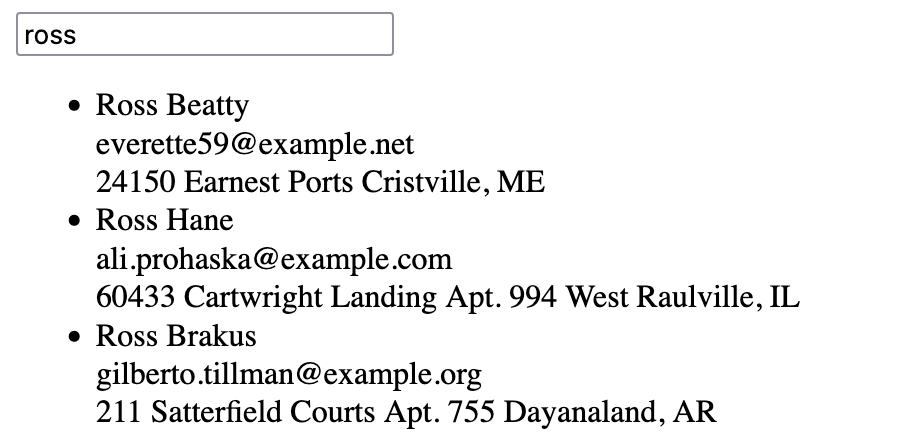
Boom! We can see a list of the records containing the keyword in their name, email, or address. Let’s type more characters to search for “rossie”:
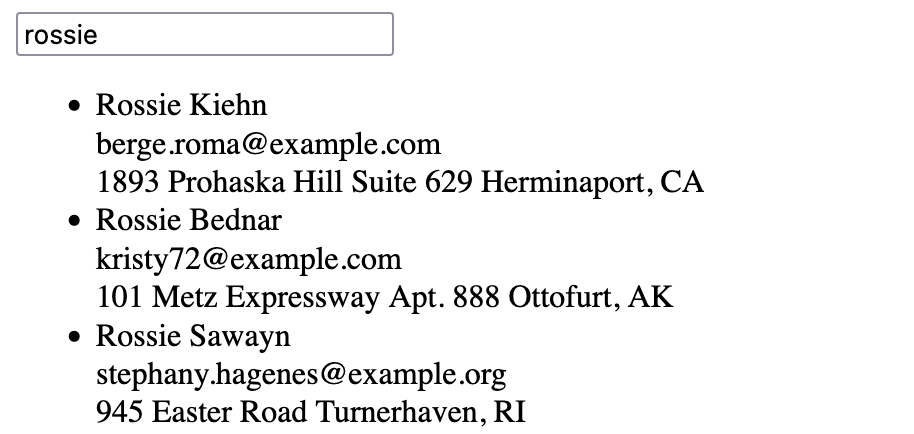
There we go! The exact matches might vary because we seeded the database using Faker, so what you see in these screenshots won’t exactly match what you have in your local database. But the important thing is that we are getting search results for the keyword, as expected.
Adding Keyword Highlight
It would be nice to highlight the keyword in the customer’s details with a <mark> tag. For example, if the keyword is “john”:
<li>
    <div><mark>John</mark> Doe</div>
    <div><mark>john</mark>@gmail.com</div>
    <div>123 Main St., FL</div>
</li>
There are many ways to achieve that. To keep it simple, we can use a Livewire computed property. In the component class, use the attribute:
use Livewire\Attributes\Computed;
... and then add the following method:
#[Computed]
public function highlightedCustomers()
{
    $fields = ['name', 'email', 'address'];
    $highlight = fn ($value) => preg_replace("/({$this->keyword})/i",'<mark>$1</mark>',$value);

    return $this->customers
        ->map(fn ($customer) => array_map($highlight, $customer->only($fields)));
}
Now, replace $customers with $this->highlightedCustomers in the component template (remember, we need to use $this in the template when referencing computed properties).
@forelse ($this->highlightedCustomers as $customer)
    <li>
        <div>{!! $customer['name'] !!}</div>
        <div>{!! $customer['email'] !!}</div>
        <div>{!! $customer['address'] !!}</div>
    </li>
@empty
    <li>
        No matches found
    </li>
@endforelse
We use {!! !!} to print the HTML mark tags. This is fine for the sake of this tutorial, but in real-world applications, you may need to add special precautions to prevent XSS attacks.
Let’s see how the highlight looks like in the browser:
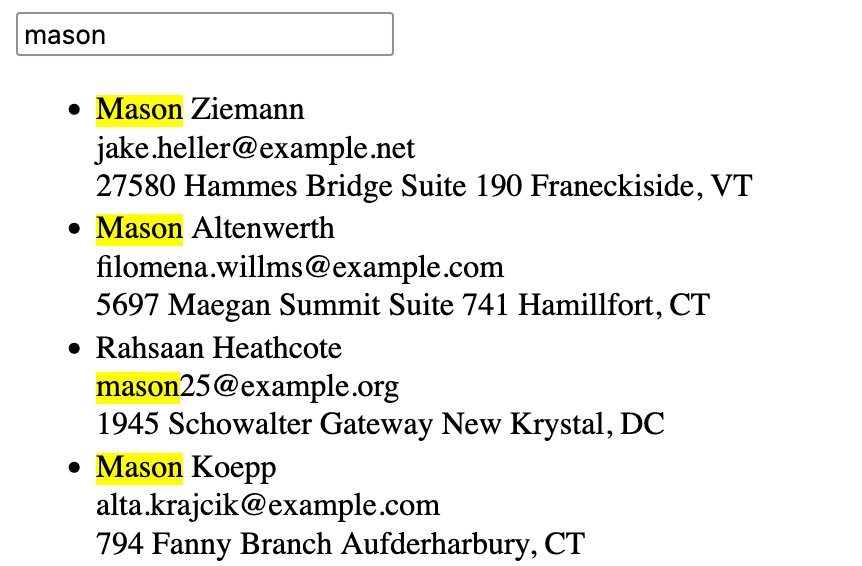
Great! Now, adding a little bit of CSS, our search component could look like this:
Perfect! Our search component is complete.
Limitations of Full-Text Search in MySQL
No Typo Tolerance
Let’s try to find all customers named John!
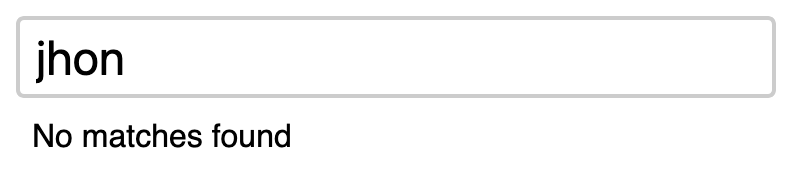
Wait ... no matches found? Well, it makes sense. There’s a typo in the search term. Did you spot it? We searched “jhon” instead of “john”. It would be nice to find customers almost matching the keyword, but that’s one of the limitations of MySQL full-text search: it doesn’t have typo tolerance.
No Support for Suffix and Infix Search
Previously, we mentioned another limitation: with full-text index search in boolean mode, we’re able to match all records where the name, email, or address starts with the keyword, but not those that end with the keyword, nor those which contain the keyword in the middle.
Challenges in Implementing Weighted Results
Now, let's try to find customers named “markus”:
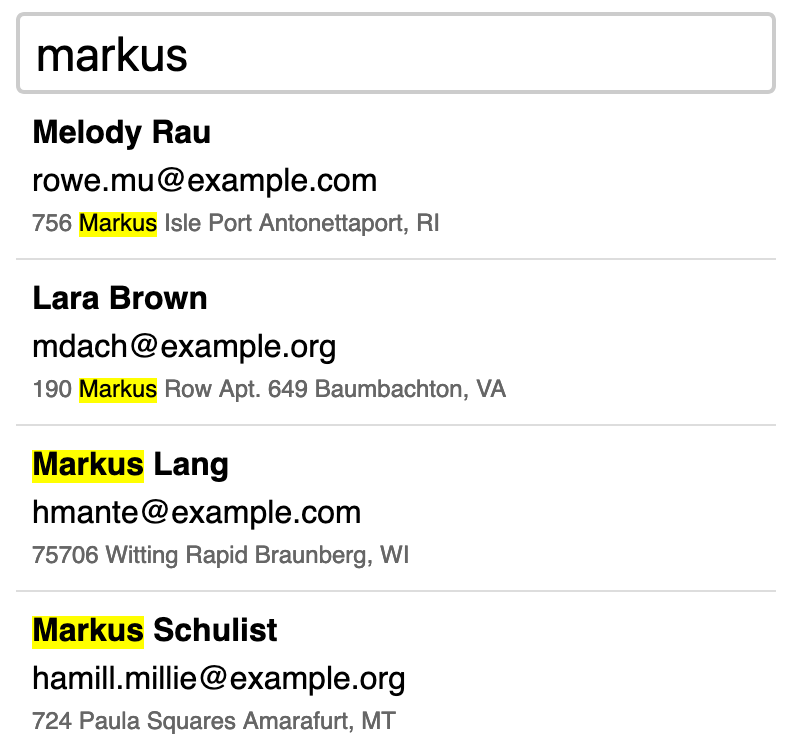
As you can see, the first two results found a match for “markus” in the address field, while the following two results found a match in the name. What if we wanted to give preference to name matches first, followed by email matches, and then address matches? This strategy of assigning different weights to each column and sorting the matches by weight is called weighted results. We can accomplish this in MySQL, but the query can become really complex really fast.
Hard to Dynamically Exclude Fields from Searches
Last but not least, it would be great to be able to exclude certain columns from a search. For example, if the user wants to search only by name, or only by address, or a combination of fields: only by name and email. Right now, our search method does not allow us to do that: it queries the database using a full-text index that includes name, email, and address. Excluding matches from one of those fields means adding extra complex logic, creating new combined indexes (which can dramatically increase the disk size of the database), or not using the index at all (which can significantly increase the query runtime).
In summary, MySQL full-text search is great, but it has these limitations and more. Let’s see how we can address these issues and improve our usersÆ search experience using Typesense.
Enter Typesense: Lightning-fast Open Source Search
Typesense offers a powerful search engine solution, serving as an excellent free alternative to services like Algolia. It is open-source (check out the repo for cool C++ code) and easy to self-host on your own server. Some of its features include:
- Configurable typo tolerance: Finds matches even with misspelled search terms.
- Built-in prefix, suffix and infix support: Matches words that start with, end with, or contain the search term.
- Weighted results for ranking and relevance: Prioritizes results based on term frequency, field matching accuracy, and customizable field weights.
- Flexible search parameters: Index records using multiple fields (for instance, name, email, address). This allows targeted searches on specific fields (for example, only name).
While these features address the limitations we encountered in our demo project, Typesense’s capabilities extend much further. It also supports:
- Geo-Search, to find locations within a certain radius.
- Image search, to find specific image content (e.g., “all images containing dogs”).
- AI-powered conversational search, to answer questions based on your data (like “Can you suggest an action movie?’ from your movie database).
Ready to get started? Let’s walk through the process of installing and integrating Typesense into your project in just three steps.
Step 1. Install Typesense and Laravel Scout
You can follow the official documentation to learn how to install Typesense in your environment.
If you are using Takeout, the Docker container manager by Tighten, you can install Typesense by running takeout enable typesense. Choose the Docker volume name, set your API key, and you’re done! You can skip to the next step.
Otherwise, follow these instructions to install it on Linux, which is most likely the operating system of your server. Run the following commands:
curl -O https://dl.typesense.org/releases/26.0/typesense-server-26.0-amd64.deb
sudo apt install ./typesense-server-26.0-amd64.deb
Once installed, Typesense creates an API key that we need to copy. Run:
cat /etc/typesense/typesense-server.ini
... and copy the API key value. For example:
api-key = BIO2PGT4B3xpauGBpkIX4p8jAHltKBlxEY5VD3EKFtTZP6jq
Step 2. Install Packages and Update Configuration
Add these lines at the end of your Laravel .env file, replacing the API key with yours:
SCOUT_DRIVER=typesense
TYPESENSE_API_KEY=BIO2PGT4B3xpauGBpkIX4p8jAHltKBlxEY5VD3EKFtTZP6jq
Then, use Composer to install the Typesense PHP SDK and Laravel Scout, a driver-based library that adds simple and fluent search methods to Eloquent models:
composer require typesense/typesense-php laravel/scout
Next, run this Artisan command:
php artisan vendor:publish --provider="Laravel\Scout\ScoutServiceProvider"
This will create a scout.php file in your config folder. Open that file in your editor and add use App\Models\Customer; at the top. Then scroll down until you find the “Typesense Configuration”. Remove the commented-out code found in model-settings and replace it with the following:
'model-settings' => [
    Customer::class => [
        'collection-schema' => [
            'fields' => [
                ['name' => 'id', 'type' => 'string'],
                ['name' => 'name', 'type' => 'string'],
                ['name' => 'email', 'type' => 'string'],
                ['name' => 'address', 'type' => 'string'],
            ],
        ],
        'search-parameters' => [
            'query_by' => 'name,email,address',
        ],
    ],
],
This configuration:
- Lists the
fieldswe want to index incollection-schema. Make sure to include theidwith a type ofstring, as Typesense uses string IDs. - Defines the default
search-parameters, indicating that we’d like toquery_byname, email, and address. The order is important: Typesense will add more weight to records matching the first field of the list, then the second, and so on.
Step 3. Update the Customer Model
Open the Customer model and:
- Add the
Searchabletrait to it. - Remove the search scope, as we don’t need it anymore.
- Add the
toSearchableArraymethod. It must return an associative array with the indexable fields. Remember, the primary key ID must be cast as a string.
<?php

namespace App\Models;

use Illuminate\Database\Eloquent\Builder; // [tl! remove]
use Illuminate\Database\Eloquent\Factories\HasFactory;
use Illuminate\Database\Eloquent\Model;
use Laravel\Scout\Searchable; // [tl! add]

class Customer extends Model
{
    use HasFactory;
    use Searchable; // [tl! add]

    protected $guarded = [];

    public function scopeSearch(Builder $query, string $keyword): Builder // [tl! remove:7]
    {
        return $query->whereFullText(
            ['name', 'email', 'address'],
            "$keyword*",
            ['mode' => 'boolean'],
        );
    }

    public function toSearchableArray() // [tl! add:3]
    {
        return ['id' => (string) $this->id] + $this->toArray();
    }
}
Step 4. Add Customers to the Typesense Index
Since we already have records in the table we want to search in, we need add those records to the Typesense index. This is easily done using Laravel Scout’s import command:
php artisan scout:import "App\Models\Customer"
You’ll see progress updates in your terminal:
Imported [App\Models\Customer] models up to ID: 500
Imported [App\Models\Customer] models up to ID: 1000
Imported [App\Models\Customer] models up to ID: 1500
This continues until all records are imported.
After this initial import, Typesense will automatically index new or updated Customer records when you use the create() or save() methods. This automatic indexing leverages model event listeners.
Be aware that methods which don’t trigger model events, such as mass updates, won’t automatically update the index. In these cases, you’ll need to manually re-index affected records.
Typesense in Action
We’re up and running! Now we can search our Customer model entries using Laravel Scout’s search method:
Customer::search('john')->take(20)->get();
This is the same code we used with our previous search scope, so our Livewire component doesn’t need any updates. Let’s test it in the browser:
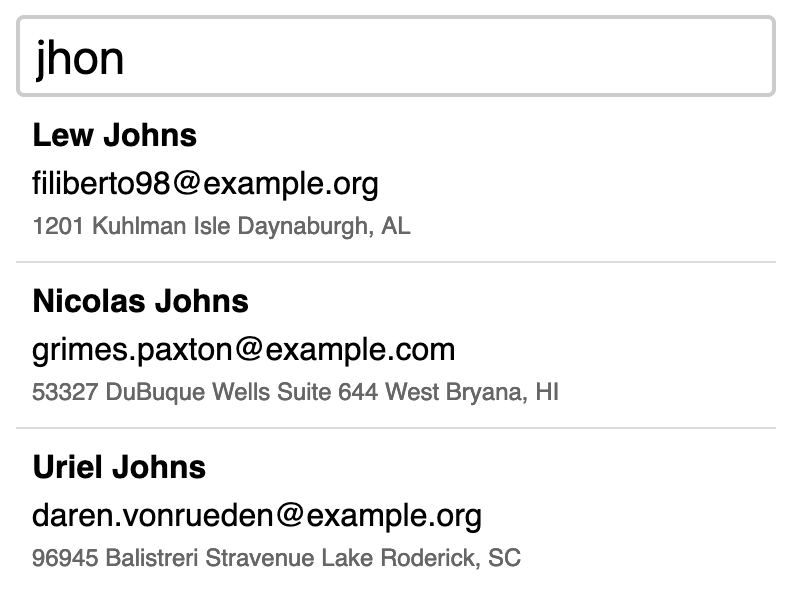
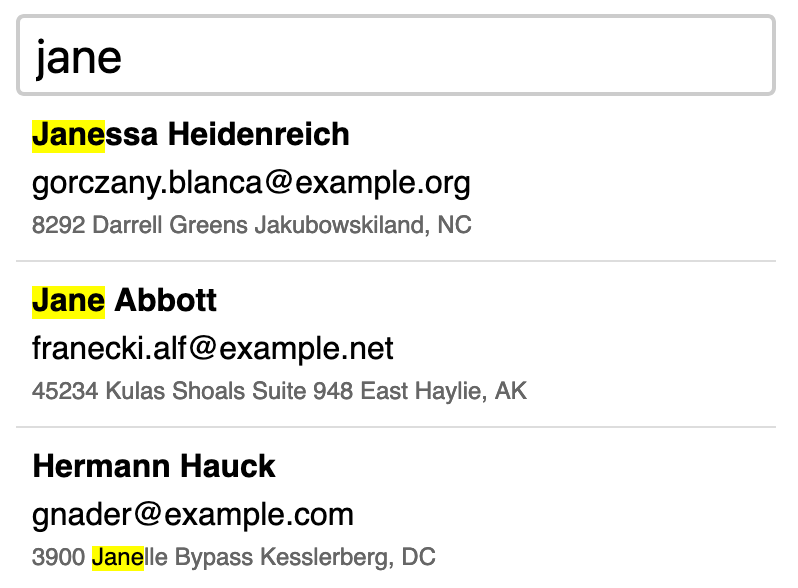
We found John! Even though we typed the name wrong as “jhon”. Typo tolerance: check!
Let’s try the keyword "son":
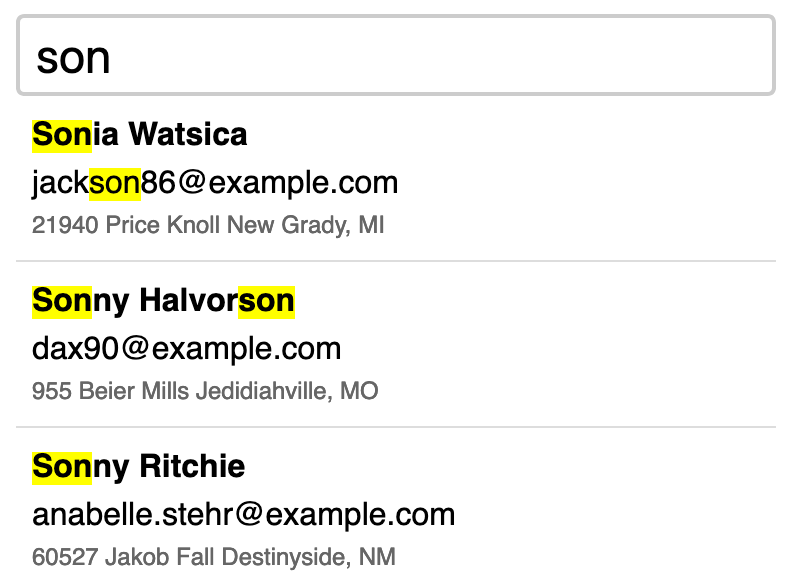
You’ll get results matching “son” at the beginning, end, or middle of words. Prefix, suffix and infix support: check!
Let’s try a two-words search term:
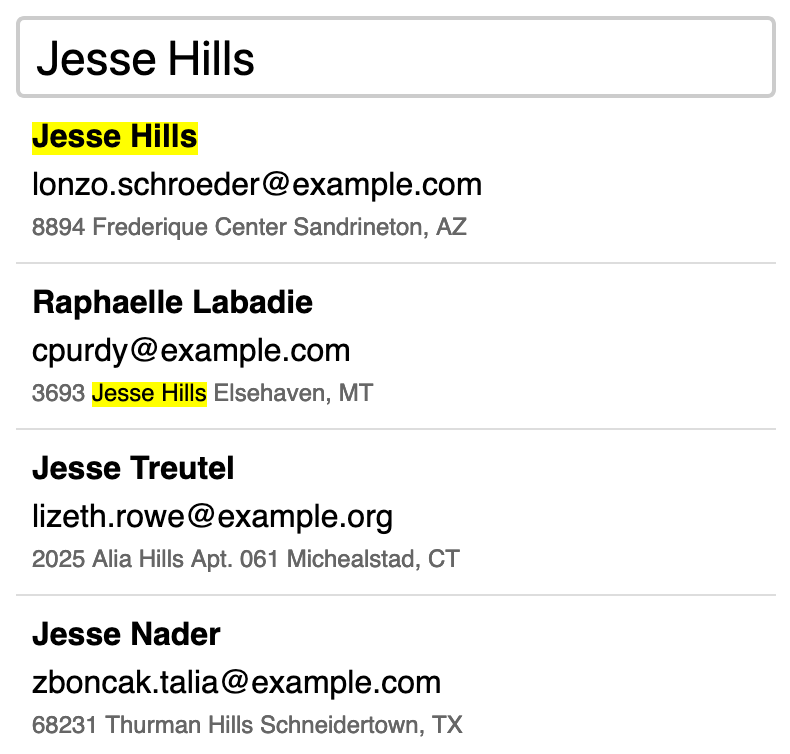
Notice how the results are sorted by relevance, using the column order we defined in query_by: name, email, and address. In this example, searching for “Jesse Hills” returns exact full name matches first, then an exact match on the address, and lastly two records with “Jesse” in the name and “Hills” in the address. Weighted results: check!
Plus, we can easily override the default search parameters using the options method. For example, we can restrict the search to matches by name:
Customer::search($this->keyword)->options(['query_by' => 'name'])->take(20)->get();
Or allow users to select which columns to search:
<input type="checkbox" value="name" wire:model="fields">
<input type="checkbox" value="email" wire:model="fields">
<input type="checkbox" value="address" wire:model="fields">
And make them dynamic with options(['query_by' => $this->fields]). Dynamic search params: check!
Search at the Speed of Type
We’ve ticked off all items on our wishlist, and our search component is now fully featured, powered by Typesense.
Let’s wrap up with a benchmark. Typesense offers all these amazing features, but is it fast?
Benchmark::dd(fn () => Customer::search(Str::random(4))->get(), iterations: 1000);
The results are in:
"5.192ms"
It’s not just fast — it’s super fast! With an average query time of just 5.192ms over 1000 iterations, Typesense proves it can deliver both powerful features and exceptional speed.
Conclusion
By integrating Typesense, we’ve significantly enhanced our search functionality without sacrificing performance. This powerful, open-source solution offers the flexibility and speed needed for modern web applications, making it an excellent choice for Laravel projects.
But this is just the beginning! We encourage you to explore Typesense’s more advanced features, like geosearch and AI-powered conversational search. Implementing a great search functionality can be the difference between an average application and an amazing one.
And if Typesense doesn’t suit your needs, consider using Laravel Scout’s database engine. It leverages native MySQL full-text indexes, providing an alternative solution. Check it out!
We’re eager to hear about your experiences with full-text search in Laravel, whether you’re using MySQL, Typesense, or other search tools. You can drop us a line at @TightenCo.
Need help with a search implementation or migration? Contact us — we’d love to assist!
Until next time, and may you always find what you’re searching for!
in your inbox:
let’s talk.
Thank you!
We appreciate your interest.
We will get right back to you.