Chat with Your Documents: A Practical Guide to RAG Using the New Laravel AI SDK


Have you ever wished you could just ask your documents a question and get an answer? That's exactly what RAG (Retrieval-Augmented Generation) lets you do. It's the technique behind those AI chatbots that can answer questions using your data, not just what the model was trained on.
Today, we'll learn what RAG is, how semantic search and vector embeddings work, and how to build a fully functional RAG system in Laravel using Postgres and the brand new Laravel AI SDK. We'll create a command to ingest and embed Markdown documents, and a chat UI where users can ask questions about them, built with Livewire 4 and real-time streaming.
Let's dive in!
The Problem With Generic Chatbots
Let's say one of your clients is a brand of flying cars: Zonda. They have ten models hitting the market this summer. Back to the Future II promised us flying cars by 2015, so it's about time!
They are expecting thousands of online inquiries during launch, so you offered to build a chatbot. Of course, you could hook up a generic chatbot with an OpenAI API key and call it a day. But if someone asks:
Do all car models fly?
They will receive a generic response, such as:
While the idea of a flying car has been a staple of sci-fi for decades, the short answer is no.
...which would be terrible for sales.
Here, the intention of the person asking is to know if all ten Zonda models are flying cars. And the answer is yes, they all are.
But the model doesn't know that because these are new cars that didn't exist when the model was trained. And even if they did, the chatbot wouldn't be aware of the proper context—that this is being asked in the context of Zonda.
So, let's provide that context in the chatbot's system prompt:
Now, if someone asks:
Do all car models fly?
The chatbot will reply:
Yes, all of our upcoming models at Zonda Aerodyne Vehicles are designed to fly.
That's better! The bot now knows what Zonda is and what it sells. We also told it not to answer questions unrelated to the brand, just so no one can use the chatbot as a math teacher and burn our tokens.
But... the chatbot can struggle again, real fast.
Do you sell them in red?
The bot doesn't have that info in its context. So, two things may happen:
- It could try to politely avoid answering the question, which is fine, but not that helpful.
- Or it could just hallucinate or respond with something that's not true
To avoid that, we could simply add more and more stuff to the chatbot's system prompt:
That works, but it's not scalable. You likely have information you need in this context that will come from hundreds or even thousands of documents currently sitting in your knowledge base: product descriptions, user guides, articles, legal documents, press releases... putting all those directly into your system prompt will quickly consume your context window.
What's a Context Window?
You've probably had a long conversation with an AI chatbot where it starts forgetting things you said earlier. That's the context window running out: there's a limit to how much text a model can juggle at once, and cramming hundreds of documents in there will hit that limit, fast.
Now, some new models have exceptionally large context windows, up to 1 million tokens. So we could potentially fit a hundred documents in the system prompt and trust they can handle it well, right? Yeah, but keep in mind the costs! If you do that, just starting a conversation with your chatbot will burn an incredibly large number of tokens. And you might regret it when you get the bill.
RAG to the Rescue
So, one common solution to this common problem is RAG. RAG helps the AI by providing the context it needs to answer the question. But rather than loading all that context into every query beforehand, it only provides the context the bot needs, right when it needs it.
For example, if someone asks:
What's the top speed of the Zonda Vega?
We can:
- Retrieve documents that are relevant to the user’s question (e.g., documents containing Zonda Vega specifications).
- Provide the model with both the user’s question and the retrieved context, instructing it to generate a response based solely on that information.
Context:
The Zonda Vega is our flagship sports model, designed for high-altitude racing. It features a V12 plasma engine with a max speed of 305 mph (491 km/h), making it the fastest model in the Zonda lineup.
User Question:
What's the top speed of the Zonda Vega?
Then, the AI will reply something like:
The Zonda Vega has a top speed of 305 mph (491 km/h), making it the fastest model in the Zonda lineup.
This prompt is built and sent on every single question. Each time a user asks something, the system searches the knowledge base, finds the most relevant documents for that specific question, and passes them as context, assembling a fresh prompt with them. So you're never stuffing all your documents into the prompt upfront: only what's relevant, per question.
That's the essence of RAG! Think of it like an open-book test: the AI doesn't need to memorize every fact about Zonda's lineup, it just gets handed the right page before answering each question.
The Limitations of Keyword Search
Now we know that RAG involves a search operation to retrieve documents that will help the AI answer the user's prompt. But how does that search work?
RAG doesn't use a traditional keyword search. Instead of matching exact keywords, it matches meaning. That's what we call a semantic search. Let's check an example.
Let's say an employee asks their company's internal chatbot:
I'm planning my vacations in Aruba, can I take 10 days?
A traditional keyword search would look for the exact words in the question: "vacations," "Aruba," even "planning." It won't yield results unless a document contains those exact terms. The documentation has the answer, but it's in a document called "Paid Time Off Policy" and talks about "PTO," "leave days" and "time-off requests," not "vacations."
But semantic search would find it: it understands that "vacations" and "PTO" mean essentially the same thing. It doesn't need the exact word to make the connection.
And once the system finds the right document, it builds the prompt:
Context:
Full-time employees are entitled to 15 paid leave days per calendar year. Leave requests must be submitted at least two weeks in advance through the HR portal. Unused PTO does not roll over to the following year.
User question:
I'm planning my vacations in Aruba, can I take 10 days?
And the chatbot will reply something like:
Yes, you can! As a full-time employee, you're entitled to 15 paid leave days per year, so 10 days is within your allowance. Just make sure to submit your request at least two weeks in advance through the HR portal. Enjoy Aruba!
How Does Semantic Search Work?
Here's the key idea: we can represent words as coordinates on a graph. Imagine a simple 2D plane with an X and Y axis. Each word gets a position on that plane based on its meaning.

Words with similar meanings end up close together. "Cat" lands near "dog" because they're both pets. "Holidays" lands near "PTO" because they both refer to time off work. Meanwhile, "toaster" is way off in a completely different area of the graph.
These coordinates are called vectors, and the process of turning text into vectors is called embedding. When building a RAG system, we take all our documents and run them through an embedding model (an AI model designed specifically for this) to turn them into vectors. This is done ahead of time, so the vectors are ready before anyone asks a question.
Then, when a user asks something, we embed that question into a vector using the same model. The system then compares the question's vector against all the document vectors and picks the closest matches. In our example, "vacations" ends up right next to "PTO," so the system retrieves the PTO policy as context to answer the question.
Semantic search doesn't look for literal words, it looks for documents whose vectors are close to the question's vector. That's what makes it so powerful: it finds the right documents based on what they mean, not what they literally say.
Now, this is a simplified example with just two dimensions, so we can visualize it on a flat graph. In practice, embedding models use hundreds or even thousands of dimensions (OpenAI's model uses 1,536). Each vector is just an array of numbers, one number per dimension. So a single document becomes an array of 1,536 numbers. You can't picture that many axes, but the principle is the same: similar meanings, closer vectors. And to measure "closeness" between vectors, we use cosine similarity, a math operation that, luckily, is taken care of for us by the tools we'll use.
One More Thing: Chunks
Before we start building, there's one more concept to cover: chunks.
You can't just throw an entire document at the embedding model and call it a day. If you embed a whole book, or even a whole chapter, the resulting vector will be a vague average of everything in that text. It won't represent any specific idea well, and your search results will suffer.
Instead, we split documents into smaller pieces called chunks. Each chunk covers a focused topic: a section, a few paragraphs, a single idea. When we embed these individually, each vector actually means something specific, and the semantic search can find exactly the right piece of information.
We'll see how to do this in practice shortly.
Setting Up a RAG System in Laravel
Now that we understand the concepts behind RAG systems, let's build one. We'll set up a Laravel project with Postgres, ingest some Markdown documents, and wire up a chat UI. Let's get started!
Create Postgres Database
We need a database that supports vector columns. MySQL 9.0 and SQLite (via the sqlite-vec extension) can do this, but today we'll use the most popular option: Postgres with the pgvector extension.
Install Postgres and pgvector if you haven't already, create a database, and enable the extension:
CREATE DATABASE zonda_db;
\c zonda_db
CREATE EXTENSION IF NOT EXISTS vector;
Install Laravel and Laravel AI SDK
Open your terminal and type the most beautiful words a Laravel dev can type: laravel new.
laravel new zonda
When asked which database your application will use, select PostgreSQL. Then update your .env with the connection details:
DB_CONNECTION=pgsql
DB_HOST=127.0.0.1
DB_PORT=5432
DB_DATABASE=zonda_db
DB_USERNAME=dev
DB_PASSWORD=
Then, install the SDK:
composer require laravel/ai
And add your OpenAI API key to .env:
OPENAI_API_KEY=your-key-here
The SDK defaults to text-embedding-3-small for embeddings and gpt-5.2 for chat, both through OpenAI. You can change these in config/ai.php if you prefer a different model or provider.
Create the Table and Model for Document Chunks
Let's assume we have a large number of Markdown documents in storage/docs. As we mentioned before, we need to chunk them. So a good model name for this would be DocumentChunk.
php artisan make:model DocumentChunk -m
Fill in the migration:
<?php

use Illuminate\Database\Migrations\Migration;
use Illuminate\Database\Schema\Blueprint;
use Illuminate\Support\Facades\Schema;

return new class extends Migration
{
    public function up(): void
    {
        // Ensure the vector extension exists
        Schema::ensureVectorExtensionExists();

        Schema::create('document_chunks', function (Blueprint $table) {
            $table->id();
            $table->string('source');
            $table->text('chunk_text');
            $table->json('metadata')->nullable();

            // The `dimensions` value must match the embedding model you're using.
            // OpenAI's `text-embedding-3-small` outputs 1,536 dimensions.
            // If you switch to a different model, update this value accordingly.
            $table->vector('embedding', dimensions: 1536)->vectorIndex();
            $table->timestamps();
        });
    }

    public function down(): void
    {
        Schema::dropIfExists('document_chunks');
    }
};
...and the model:
<?php

namespace App\Models;

use Illuminate\Database\Eloquent\Model;

class DocumentChunk extends Model
{
    protected $fillable = [
        'source',
        'chunk_text',
        'metadata',
        'embedding',
    ];

    protected $casts = [
        'metadata' => 'array',
        'embedding' => 'array',
    ];
}
That's it! Migrate and we'll be ready to continue.
Ingesting Content: Chunking, Embedding, and Storing
With the setup in place, we can now work on an ingestion command. We want to run it like this:
php artisan rag:ingest storage/docs
This should take care of:
- Reading all the Markdown files recursively
- Splitting them into meaningful chunks
- Creating embeddings for each chunk
- Saving each chunk in our
document_chunkstable
Let's start with the chunking logic, and then code the full command.
If you want to follow along with our flying car company example, download this collection of Markdown files containing all of Zonda's documentation.
Split Documents into Chunks
We could keep things simple and slice each Markdown document by character count (say, every 10,000 characters). But that's brittle: you could cut a word in half, break a link, or split two paragraphs about the same topic into different chunks.
A smarter strategy is to use Markdown Object, a package that reads your Markdown structure and splits along natural breaks: headings, sections, paragraph boundaries. It measures chunk sizes in tokens instead of characters. You set a target size (512 tokens) and a hard cap (1024 tokens), and it handles the rest.
We can install it with Composer:
composer require benbjurstrom/markdown-object
Here's how to configure and use it:
use BenBjurstrom\MarkdownObject\Build\MarkdownObjectBuilder;
use BenBjurstrom\MarkdownObject\Tokenizer\TikTokenizer;
use League\CommonMark\CommonMarkConverter;
use League\CommonMark\Parser\MarkdownParser;

// Set up the Markdown parser
$environment = (new CommonMarkConverter)->getEnvironment();
$builder = new MarkdownObjectBuilder;

// Set up the tokenizer
// Should be the same model we use for embeddings
// This tokenizer runs locally, so won't fire API calls
$tokenizer = TikTokenizer::forModel('text-embedding-3-small');

// Parse the markdown file
$markdown = file_get_contents('guide.md');
$document = (new MarkdownParser($environment))->parse($markdown);

// Build the structured model and split into chunks
$chunks = $builder
    ->build(
        filename: 'guide.md',  // Stored for reference (citations, debugging)
        document: $document,   // The parsed Markdown AST
        source: $markdown,     // The raw text (the AST doesn't keep it)
        tokenizer: $tokenizer  // To measure chunk sizes in tokens
    )->toMarkdownChunks(target: 512, hardCap: 1024, tok: $tokenizer);

// Now we have an array of chunks, each with `markdown` and `breadcrumb`
$chunks[0]->markdown;   // "To install Laravel, run..."
$chunks[0]->breadcrumb; // ["Getting Started", "Installation"]
For better reusability, let's extract this chunking logic into a service. That way, the ingesting command we'll build shortly will remain thin and focused on orchestration.
Create a Chunker Service
Create the service file:
php artisan make:class Services/MarkdownChunker
And fill it with the following code:
<?php

namespace App\Services;

use BenBjurstrom\MarkdownObject\Build\MarkdownObjectBuilder;
use BenBjurstrom\MarkdownObject\Tokenizer\TikTokenizer;
use Illuminate\Support\Collection;
use League\CommonMark\CommonMarkConverter;
use League\CommonMark\Parser\MarkdownParser;

class MarkdownChunker
{
    protected $environment;
    protected $builder;
    protected $tokenizer;

    public function __construct()
    {
        $this->environment = (new CommonMarkConverter)->getEnvironment();
        $this->builder = new MarkdownObjectBuilder;
        $this->tokenizer = TikTokenizer::forModel('text-embedding-3-small');
    }

    public function chunk(string $filename, string $markdown): Collection
    {
        $document = (new MarkdownParser($this->environment))->parse($markdown);

        $chunks = $this->builder
            ->build($document, $filename, $markdown, $this->tokenizer)
            ->toMarkdownChunks(target: 512, hardCap: 1024, tok: $this->tokenizer);

        return collect($chunks)
            ->map(fn ($chunk) => [
                'text' => trim($chunk->markdown),
                'heading' => implode(' > ', $chunk->breadcrumb),
            ])
            ->filter(fn ($chunk) => $chunk['text'] !== '')
            ->values();
    }
}
Using this service is pretty straightforward:
use App\Services\MarkdownChunker;

$chunker = new MarkdownChunker();

$chunker->chunk(
    'star_wars_script.md',
    'A long time ago, in a galaxy far away [...]'
);
You give it the filename and the Markdown content, it gives you back a collection of chunks ready to embed. All the parser and tokenizer boilerplate stays encapsulated here, in the service class.
Generate Embeddings with Laravel AI SDK
You can create embeddings using Str::of($text)->toEmbeddings(), like this:
use Illuminate\Support\Str;

Str::of('This is Zonda')->toEmbeddings();
That returns an array:
[ 0.018156502, 0.02774196, -0.04842714... -0.0052006985, -0.006156304 ]
We can also embed multiple texts at once with Embeddings::for():
use Laravel\Ai\Embeddings;

// Set all the pieces you want to process in an array
$texts = ['Text 1', 'Text 2', 'Text 3'];

// ...so we can embed them in one single API call
$response = Embeddings::for($texts)->generate();

// Now we can access each matching embedding
$response->embeddings[0] // [ 0.005721249, 0.010299696... ]
$response->embeddings[1] // [ 0.0025932258, 0.017580934... ]
$response->embeddings[2] // [ 0.0010817441, 0.019469406... ]
We'll use this second option in our command.
Build the Ingestion Command
Let's create the command:
php artisan make:command IngestMarkdownDocuments
And write the logic:
<?php

namespace App\Console\Commands;

use App\Models\DocumentChunk;
use App\Services\MarkdownChunker;
use Illuminate\Console\Command;
use Laravel\Ai\Embeddings;
use Symfony\Component\Finder\Finder;

class IngestMarkdownDocuments extends Command
{
    protected $signature = 'rag:ingest {path}';

    protected $description = 'Ingest markdown documents';

    public function handle(MarkdownChunker $chunker): void
    {
        $path = $this->argument('path');
        $files = Finder::create()->files()->name('*.md')->in($path);

        $this->info('Files found: ' . count($files));

        foreach ($files as $file) {
            // Split the file into semantically meaningful chunks
            $chunks = $chunker->chunk(
                $file->getRelativePathname(),
                $file->getContents()
            );

            if ($chunks->isEmpty()) {
                continue;
            }

            // Batch generate all embeddings in a single API call
            $texts = $chunks->pluck('text')->toArray();
            $response = Embeddings::for($texts)->generate();

            // Write chunks to database
            $chunks->each(fn ($chunk, $index) => DocumentChunk::create([
                'source' => $file->getRelativePathname(),
                'chunk_text' => $chunk['text'],
                'metadata' => [
                    'heading' => $chunk['heading'],
                    'hash' => hash('sha256', $chunk['text']),
                ],
                'embedding' => $response->embeddings[$index],
            ]));
        }

        $this->info('Ingestion complete.');
    }
}
Great! Let's see it in action:
php artisan rag:ingest storage/docs
Run it, and you'll see rows appear in document_chunks, each with a populated vector column.
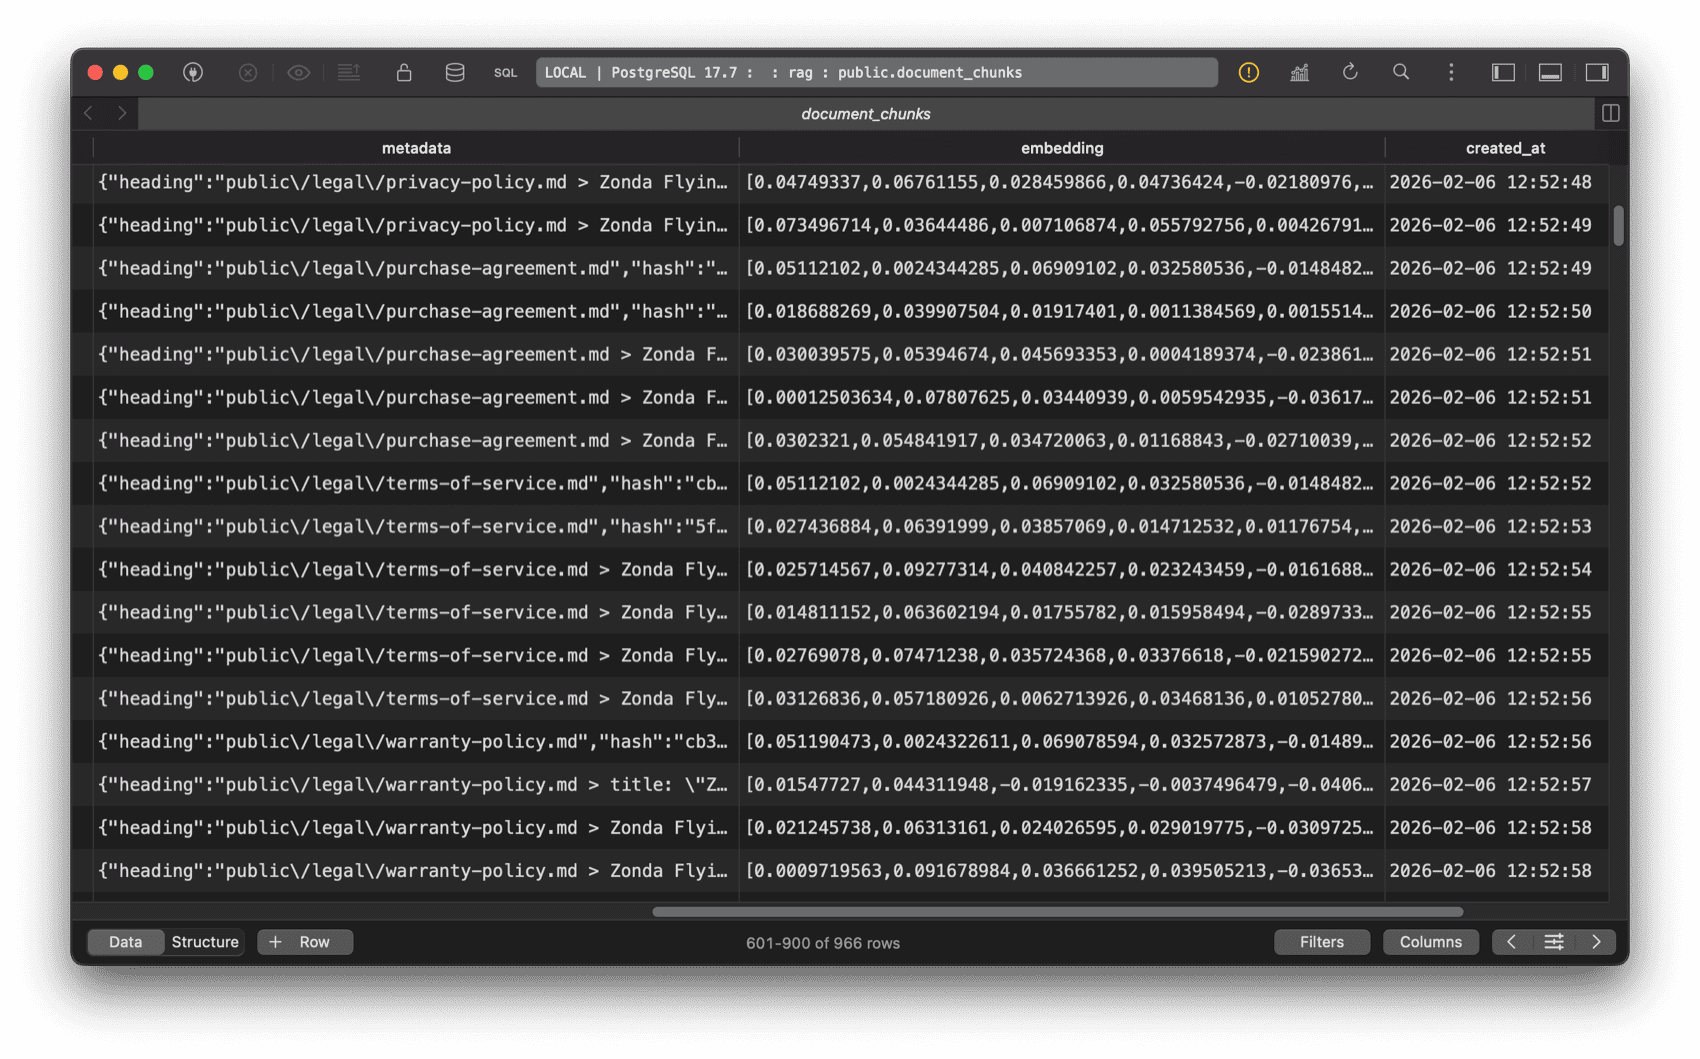
Inspect Your Data
Before moving on, let's inspect the data. Open a tinker session and run:
$chunk = DocumentChunk::first();

dd([
    'text' => $chunk->chunk_text,
    'metadata' => $chunk->metadata,
    'embedding_length' => count($chunk->embedding),
]);
Look at:
chunk_text: A focused piece of your Markdown, not the entire document.metadata: An array withheading(the section breadcrumb) andhash(a SHA-256 of the text). The hash is useful for deduplication: you can configure the ingestion command to check whether a chunk with the same hash already exists and skip it instead of inserting a duplicate.embedding_length: Should be 1,536, matching the dimensions we set in the migration.
If all looks good, we're ready to continue.
Query-Time Retrieval: Finding the Right Context
Now for the exciting part: when a user asks a question, we need to find the most relevant chunks and feed them to the AI. Laravel makes this surprisingly easy with native query builder (by extension, Eloquent) methods.
Search with Vector Similarity
Given a $question, we can use whereVectorSimilarTo to find the chunks closest to it.
use App\Models\DocumentChunk;

$question = 'How many vacation days do I have?';
$chunks = DocumentChunk::whereVectorSimilarTo('embedding', $question, 0.3)->get();
The method signature is whereVectorSimilarTo($column, $vector, $minSimilarity, $order):
$column: the vector column name in your table.$vector: the user's question. You can pass a raw string and the SDK will embed it automatically using the same model we used during ingestion.$minSimilarity: minimum cosine similarity threshold (0.0 to 1.0). Chunks below this score are filtered out.$order: whether to order results by similarity. Defaults totrue, so the most relevant chunks come first.
And since this is just a regular Eloquent query, you can chain any query builder method on top. Need to only search in employee guides and cap the results? Go for it:
DocumentChunk::whereVectorSimilarTo('embedding', $question, 0.3)
    ->whereLike('source', 'employees/guides/%')
    ->limit(10)
    ->get();
Scopes, pagination, eager loading... it all works! Now, let's create our agent.
Create the Agent
The Laravel AI SDK has a concept called Agents, classes that encapsulates instructions and behavior for an AI interaction. Let's create ours:
php artisan make:agent ZondaAssistant
This creates a file at app/Ai/Agents/ZondaAssistant.php. The generated class implements the Agent interface and uses the Promptable trait, which gives us prompt() and stream() out of the box:
use App\Ai\Agents\ZondaAssistant;

// To get a response
$answer = ZondaAssistant::make()->prompt('What is your fastest car?');

// To stream a response
$stream = ZondaAssistant::make()->stream('Do you have a showroom in Tokyo?');
Open the agent class in your editor and set the following:
<?php

namespace App\Ai\Agents;

use App\Models\DocumentChunk;
use Laravel\Ai\Contracts\Agent;
use Laravel\Ai\Contracts\HasTools;
use Laravel\Ai\Promptable;
use Laravel\Ai\Tools\SimilaritySearch;

class ZondaAssistant implements Agent, HasTools
{
    use Promptable;

    public function instructions(): string
    {
        return 'You are a helpful assistant for Zonda, a flying cars brand.
                IMPORTANT: You MUST ALWAYS use the Similarity Search tool before
                answering any question, and reply using ONLY data you found.
                If the retrieved documents do not contain enough information
                to answer, politely say you do not have that information.';
    }

    public function tools(): iterable
    {
        return [
            SimilaritySearch::usingModel(
                DocumentChunk::class,
                'embedding',
                minSimilarity: 0.3,
                limit: 10
            ),
        ];
    }
}
As you might have guessed, we use instructions() to shape the role of the agent and guidelines on how it must reply. Here we're telling it to use the Similarity Search tool to retrieve information, and reply using only that data instead of pre-trained knowledge.
But what's that SimilaritySearch tool? We included it in the array returned by the tools() method. It comes out of the box with the Laravel AI SDK and is a convenient wrapper around the vector queries we learned about in the previous section.
// This vector query:
DocumentChunk::whereVectorSimilarTo('embedding', $question, 0.3)
    ->where('published', true)
    ->limit(10)
    ->get();

// Would be executed by this tool definition:
SimilaritySearch::usingModel(
    model: DocumentChunk::class,
    column: 'embedding',
    minSimilarity: 0.3,
    limit: 10,
    query: fn ($query) => $query->where('published', true),
),
Notice we're setting minSimilarity: 0.3 instead of the default 0.6. The default is often too strict for short queries like product names (e.g., "Zonda Cirrus"), which tend to produce lower similarity scores than full sentences. Lowering the threshold ensures the search finds relevant chunks even for brief queries.
To recap:
- Our agent is instructed to always use the Similarity Search tool
- That search tool will provide the context it needs to answer the user question
- The agent is instructed to always reply with that information, not with pre-trained knowledge
Configure the Agent
We can configure our agent using PHP attributes. For a RAG system, there's one that matters more than the rest: temperature.
Temperature controls how "creative" the model gets. A high temperature (closer to 1.0) means more varied, unpredictable responses. That's great for brainstorming or creative writing, but terrible for a RAG system. When someone asks, "What's the top speed of the Zonda Vega?" you want the model to reply by looking at the context, not by imagining an answer.
Setting the temperature to 0.0 makes the model as deterministic as possible: it sticks to the facts in the context and avoids making things up.
use Laravel\Ai\Attributes\Temperature;
use Laravel\Ai\Attributes\MaxTokens;

#[Temperature(0.0)]
#[MaxTokens(1024)]
class ZondaAssistant implements Agent, HasTools
{
    // ...
}
#[Temperature(0.0)]keeps responses factual and consistent#[MaxTokens(1024)]limits the response length, so the model gives concise answers instead of rambling. Don't set this too low. When the agent uses tools, the model needs enough output tokens to synthesize the retrieved context into a complete answer. If the limit is too tight, the response gets cut off and the underlying library will throw an exception.
Try the Agent
Let's put our agent to the test!
use App\Ai\Agents\ZondaAssistant;

$question = 'What model is best for heavy cargo?';
$response = ZondaAssistant::make()->prompt($question);

echo $response;
The agent should reply something like:
The Zonda Titan is our best cargo AV. The Titan combines heavy-lift capability with the precision and accessibility of VTOL operations.
What If the Model Skips the Tool?
There's a weak point in our setup: we're trusting the model to always call the tool. That "MUST ALWAYS" in our instructions isn't a guarantee. The model can decide to skip it and answer from its own training data, which defeats the whole purpose of RAG. Modern models from the top AI providers handle tools pretty well, but less capable or local models might not.
For a more predictable approach, we can handle the retrieval ourselves: always run the vector query before prompting and inject the results straight into the instructions.
We can achieve this with AI middleware, another feature of the Laravel AI SDK. Just like HTTP middleware intercepts requests before they reach a controller, AI middleware intercepts prompts before they reach the model. This lets us run the vector search and inject the results into the agent automatically, on every single prompt.
Let's create a RetrieveContext middleware. It reads the user's question from $prompt->prompt, runs the similarity search, and passes the matching chunks to the agent:
<?php

namespace App\Ai\Middleware;

use App\Models\DocumentChunk;
use Closure;
use Laravel\Ai\Prompts\AgentPrompt;

class RetrieveContext
{
    public function __construct(
        protected float $minSimilarity = 0.3,
        protected int $limit = 10,
    ) {}

    public function handle(AgentPrompt $prompt, Closure $next)
    {
        $chunks = DocumentChunk::whereVectorSimilarTo('embedding', $prompt->prompt, $this->minSimilarity)
            ->limit($this->limit)
            ->get();

        // Let's take this opportunity to log the retrieved chunks
        // so we can evaluate the accuracy of our RAG system
        logger('RAG context retrieved via middleware', [
            'question' => $prompt->prompt,
            'chunks' => $chunks->count(),
            'metadata' => $chunks->pluck('metadata')->toArray(),
            'sources' => $chunks->pluck('source')->unique()->values(),
        ]);

        $prompt->agent->withChunks($chunks);

        return $next($prompt);
    }
}
Now we update our agent to implement HasMiddleware and register the middleware. Instead of relying on a tool, the agent receives the chunks before instructions() is ever called:
<?php

namespace App\Ai\Agents;

use App\Ai\Middleware\RetrieveContext;
use Illuminate\Support\Collection;
use Laravel\Ai\Contracts\Agent;
use Laravel\Ai\Contracts\HasMiddleware;
use Laravel\Ai\Promptable;

class ZondaAssistant implements Agent, HasMiddleware
{
    use Promptable;

    protected Collection $chunks;

    public function __construct()
    {
        $this->chunks = collect();
    }

    public function withChunks(Collection $chunks): void
    {
        $this->chunks = $chunks;
    }

    public function middleware(): array
    {
        return [
            new RetrieveContext(minSimilarity: 0.3, limit: 10),
        ];
    }

    public function instructions(): string
    {
        return view('prompts.rag', [
            'chunks' => $this->chunks,
        ])->render();
    }
}
This agent renders a Blade template at resources/views/prompts/rag.blade.php to build the system prompt:
You are a helpful assistant for Zonda, a flying cars brand.

Answer the user's question using ONLY the provided context.
If the context doesn't contain enough information to answer,
say you don't have that information.

## Context:

@foreach ($chunks as $index => $chunk)
---
Source {{ $index }} ({{ $chunk->metadata['heading'] ?? 'Untitled' }}):
{{ $chunk->chunk_text }}
@endforeach
---
We use the agent as always:
$response = ZondaAssistant::make()->prompt($question);
But now the retrieval is deterministic: chunks are always fetched, and you can log exactly what came back.
The trade-off is flexibility. With the tool approach, the AI can reformulate the user's question into a better search query. If someone asks "What about the red one?", the model might search for "Zonda available colors red" instead, which is more likely to find relevant chunks.
With this middleware approach, the user's raw question is what gets embedded and searched, as-is. You lose that intelligence, but you gain predictability and debuggability.
And also saves you a roundtrip: with the tool approach, the model is called once to decide to search, then the embedding model converts the query into a vector, and then the model is called again to answer with the results. With middleware, the embedding and search happen before the model is called, so it only takes one roundtrip to the LLM.
Start with the SimilaritySearch tool approach. If you find the model occasionally skipping the tool or you need to fine-tune the retrieval, don't hesitate to customize your agent as we just did.
Building the Chat UI with Livewire
Let's wrap things up by building a simple chat interface with Livewire. It will stream the agent's responses in real time, so the user sees the answer being typed out instead of waiting for the full response.
Create the Component
Install Livewire if you haven't already, and create the component:
php artisan make:livewire pages::chat
This creates a single file component at resources/views/pages/⚡chat.blade.php. First, define the component:
<?php

use App\Ai\Agents\ZondaAssistant;
use Laravel\Ai\Streaming\Events\TextDelta;
use Livewire\Component;

new class extends Component {
    public string $question = '';
    public array $messages = [];

    public function ask(): void
    {
        if (trim($this->question) === '') {
            return;
        }

        // Add the user's message to the chat
        $this->messages[] = [
            'role' => 'user',
            'content' => $this->question,
        ];

        // Store the question and clear the input field
        $question = $this->question;
        $this->question = '';

        // Use stream() instead of prompt() so we get real-time chunks
        $stream = ZondaAssistant::make()->stream($question);

        // Each TextDelta is a small piece of the response
        $fullResponse = '';

        foreach ($stream as $event) {
            if ($event instanceof TextDelta) {
                // Accumulate locally and push each chunk to the browser
                $fullResponse .= $event->delta;
                $this->stream(to: 'streamedResponse', content: $event->delta);
            }
        }

        // Store the complete response in the messages array
        $this->messages[] = [
            'role' => 'assistant',
            'content' => $fullResponse,
        ];
    }
};

?>
And right below, in the same file, write the template:
<div x-data="{ pendingQuestion: '' }">
    @foreach ($messages as $message)
        <div>
            <strong>
                {{ $message['role'] === 'user' ? 'You' : 'Zonda Assistant' }}:
            </strong>
            <p>
                {{ $message['content'] }}
            </p>
        </div>
    @endforeach

    <div wire:loading wire:target="ask">
        <div>
            <strong>You:</strong>
            <p x-text="pendingQuestion"></p>
        </div>
        <div>
            <strong>Zonda Assistant:</strong>
            <p>
                <span wire:stream="streamedResponse"></span>
                <span class="thinking">Thinking...</span>
            </p>
        </div>
    </div>

    <form
        wire:submit="ask"
        @submit="pendingQuestion = $refs.q.value; $nextTick(() => $refs.q.value = '')">
        <input
            x-ref="q"
            type="text"
            wire:model="question"
            placeholder="Ask something about Zonda..."
            wire:loading.attr="disabled"
            wire:target="ask" />
        <button type="submit" wire:loading.attr="disabled" wire:target="ask">
            Ask
        </button>
    </form>

</div>

<style>
    [wire\:stream="streamedResponse"]:not(:empty) + .thinking {
        display: none;
    }
</style>
There's a lot going on here, so let's break it down:
- When the user presses Enter, we capture the question into
pendingQuestionand clear the input immediately, before the server even starts processing. This makes the chat feel instant. - The entire "live area" (user's pending question plus the assistant's streaming response) is wrapped in
wire:loading wire:target="ask", so it's only visible while the Livewire request is in-flight. Once the server responds, it disappears and the@foreachrenders the complete conversation, including the new messages. Because both use the same HTML structure, the transition is seamless. - The
Thinking...span sits right after thewire:streamspan. A CSS rule using:not(:empty)hides it as soon as the first token arrives, no JavaScript needed.
Create the Layout
Livewire 4 page components need a layout file. If you don't have one yet, generate it:
php artisan livewire:layout
This creates resources/views/layouts/app.blade.php with the basic HTML structure, Vite assets, and the Livewire directives your component needs.
Wire It Up
Add a route in routes/web.php:
Route::livewire('/chat', 'pages::chat');
Visit /chat, type a question, and watch the assistant answer using your documents.
That's the full loop: documents go in, chunks get embedded, questions get matched to relevant chunks, and the AI responds with the right context.
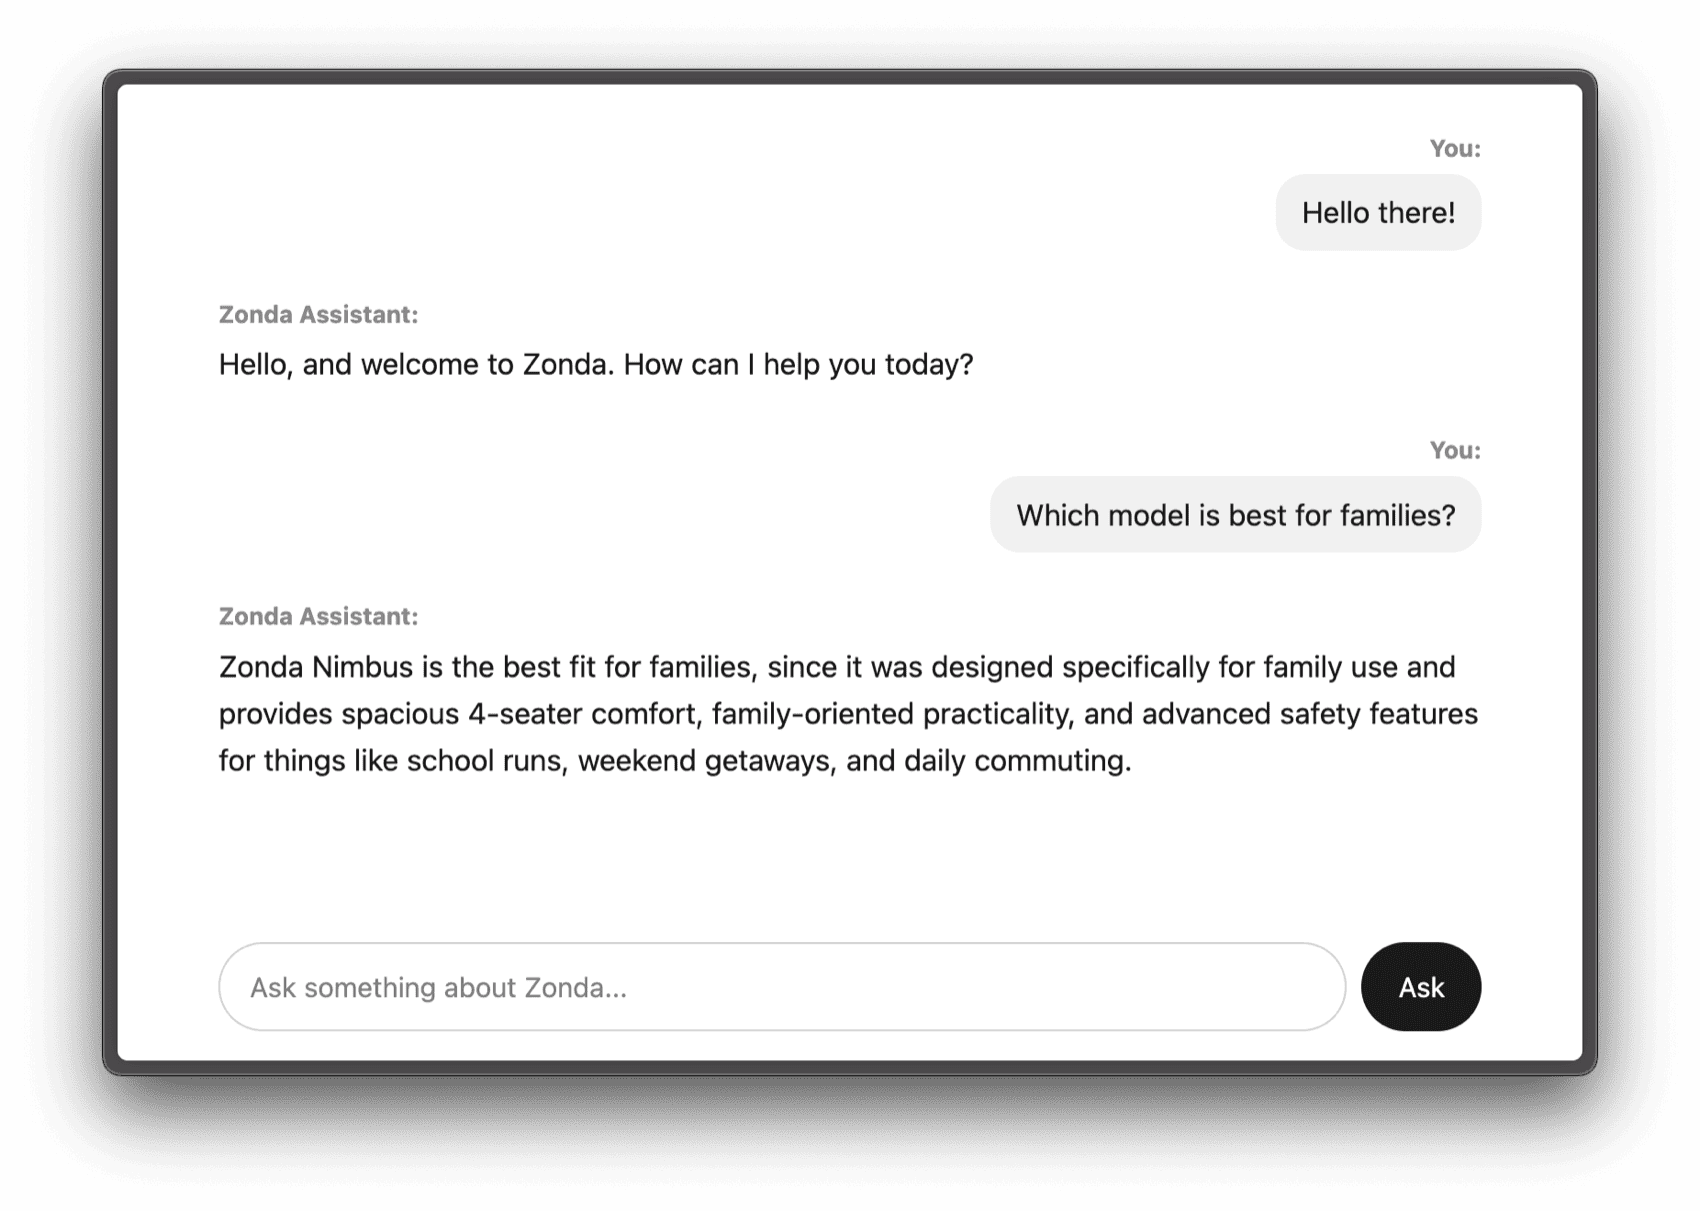
With some CSS to make things prettier, this is what our chatbot looks like:
What's Next?
We built a solid RAG system! But there's plenty more to explore.
A few things we didn't have the time to cover today:
- Reranking: Vector search finds similar chunks, but not always the most relevant ones. Reranking is a second pass that uses a specialized model to reorder your results by true relevance. The Laravel AI SDK supports this with a simple
$chunks->rerank()collection macro. - Conversation memory: Right now, each question is answered independently. Adding conversation history would let the chatbot handle follow-ups like "What about the Pulse model?" without the user repeating context. The Laravel AI SDK ships with a
RemembersConversationstrait that makes this straightforward. - Embedding caching: The SDK supports caching embeddings out of the box via
config/ai.php, so re-ingesting the same content won't burn extra API calls. - Citations: Our chunks already have source metadata. You could display which documents the AI used to answer, so the user can verify the information.
- Hybrid search: Combining vector search with traditional keyword search can catch cases where exact terms matter, like product codes or legal references.
Conclusion
What a journey. We went from “What is RAG?” to a fully working chatbot that can answer questions about your documents, complete with streaming responses and everything in between.
With Laravel and the Laravel AI SDK, vector search, embeddings, and context retrieval feel as natural as writing regular Eloquent queries. That's exactly the kind of developer experience we love! Please keep in mind that the SDK is still under active development. Things may change, so we'll keep this post updated.
Did you learn something new? Want to see more content like this? Let us know if you'd like to see a follow-up article.
Until next time!
in your inbox:
let’s talk.
Thank you!
We appreciate your interest.
We will get right back to you.