Clone Your Voice: Local Text-to-Speech With Chatterbox and the Laravel AI SDK


Text to speech has a wide range of applications:
- It makes written content more accessible to people with visual impairments or reading difficulties.
- It helps anyone who prefers listening, or who can't read temporarily, such as when they're driving.
- It can turn a script into a voiceover for a video or a tutorial, saving you the recording setup.
- It gives characters, assistants, and games a voice of their own.
That last one sounds really fun. And it gets even more fun when the voice is not just a generic one, but yours. A clone!
Today, I'll clone my voice and use it to turn text into audio messages with Chatterbox, a free, open-source text-to-speech model that you can self-host or run locally on your own laptop. Self-hosting the model means no cloud API, no per-character bill, and no recording of your real voice ever leaving your device or server.
Here's the plan:
- Clone your voice from just thirty seconds of audio.
- Point the Laravel AI SDK at the local Chatterbox server, which exposes an OpenAI-compatible API.
- Turn a folder of documents into voiceovers with a single command.
And here's a teaser:
Are you in for the ride? Let's dive in!
Overview
- What Is Voice Cloning, Anyway?
- Installing the Chatterbox Server
- Wiring the Laravel AI SDK
- Making Our Voice More Expressive
- Running It in Production
- In Closing
What Is Voice Cloning, Anyway?
Siri, Alexa, ChatGPT, and friends have been doing text to speech for years. But what exactly is voice cloning?
Most text to speech you've heard speaks in voices prepared ahead of time. Voice cloning adds a second input: a short recording of a specific person. A voice encoder turns the clip into a speaker embedding, a vector of numbers that captures the voice tone quality (also known as timbre). The model then generates a new speech from that embedding and from the clip itself, which also carries the speaker's pacing and style. Even the server's built-in voices work this way: they're just bundled reference clips.
This approach is called zero-shot voice cloning. "Zero-shot" means the model isn't trained or fine-tuned on your voice, so there's no waiting hours for the job to finish. You hand the model a short reference clip along with the text, and a few seconds later, you have speech in that voice.
I know what you might be thinking:
Isn't this exactly how those "Grandma, I need money" phone scams work?
You're right, and that's the uncomfortable part of this technology. So, please, follow these two rules:
- Get consent. Clone your own voice, or a voice whose owner agreed. Never clone a voice without permission.
- Disclose it. Let listeners know they're hearing a digital clone. The Chatterbox model ships with an inaudible watermarker that marks its output as synthetic.
Installing the Chatterbox Server
The Chatterbox documentation shows how to install it as a Python package with pip:
pip install chatterbox-tts
That works great for a Python project, but it can feel foreign if you come from a PHP background like me.
That's why we'll use a server instead: the Chatterbox TTS Server wraps Chatterbox in a small web app with an HTTP API and a helpful UI. The Python process stays encapsulated, and we talk to it via the endpoints it exposes.
To install this server, you'll need Git, Python 3.11, and ffmpeg which is an open source package for audio handling. It runs on NVIDIA GPUs, AMD GPUs, Apple Silicon, and plain CPUs. For this guide, we'll work on an Apple Silicon Mac, since that's what I have on my desk.
The server's README recommends Python 3.10: they say some dependencies don't ship prebuilt packages for newer Python versions. However, Python 3.10 reached its end of life in October 2026, so I tested the setup with Python 3.11 on macOS (on an M1 and an M5) and on Linux (on ARM and x86), and it worked on all of them. That's the version we'll use in this article.
Go ahead and clone the repo:
git clone https://github.com/devnen/Chatterbox-TTS-Server.git
cd Chatterbox-TTS-Server
Now that we have the server, we are ready to launch it.
On macOS: one more thing
If you're on a Mac, there's one more step before running the launcher. Open config.yaml and change the device setting from auto to cpu:
tts_engine:
  device: cpu
With auto, the server runs the model on Apple's GPU, and the PyTorch version the launcher installs can't run some of the model's operations there, so generation fails. Running on the CPU avoids that entirely. On my M5, the CPU was even faster than the GPU, and an M1 with 8 GB of RAM handled it fine.
The project ships with a launcher that installs everything the model needs and starts the server. Run it:
python3.11 start.py --cpu
A note on that --cpu flag: PyTorch, the framework the model runs on, comes in a few prebuilt flavors, one per kind of GPU, and the flag tells the launcher which one to install. Pick the one that matches your machine:
- macOS:
--cpu, together with theconfig.yamlchange above. - Linux with an NVIDIA GPU:
--nvidia, or--nvidia-cu128for an RTX 50-series card. - Linux with an AMD GPU:
--rocm. - Windows with an NVIDIA GPU:
--nvidia, or--nvidia-cu128for an RTX 50-series card. - Windows with an AMD GPU:
--cpu, since the--rocmoption only works on Linux. - Any computer without a supported GPU:
--cpu.
On Windows, the launcher uses Portable Mode by default: it downloads its own copy of Python 3.10 into the project folder and runs the server with it, whichever Python version you used to start the launcher.
The first run downloads a few gigabytes of dependencies and then the model weights itself. After a few minutes, the log settles down and there it is:
[INFO] engine: TTS Model loaded successfully on cpu. Engine sample rate: 24000 Hz.
INFO:     Uvicorn running on http://0.0.0.0:8004 (Press CTRL+C to quit)
If you open http://localhost:8004, you'll find a web UI with a text box and some predefined voices. It should look like this:
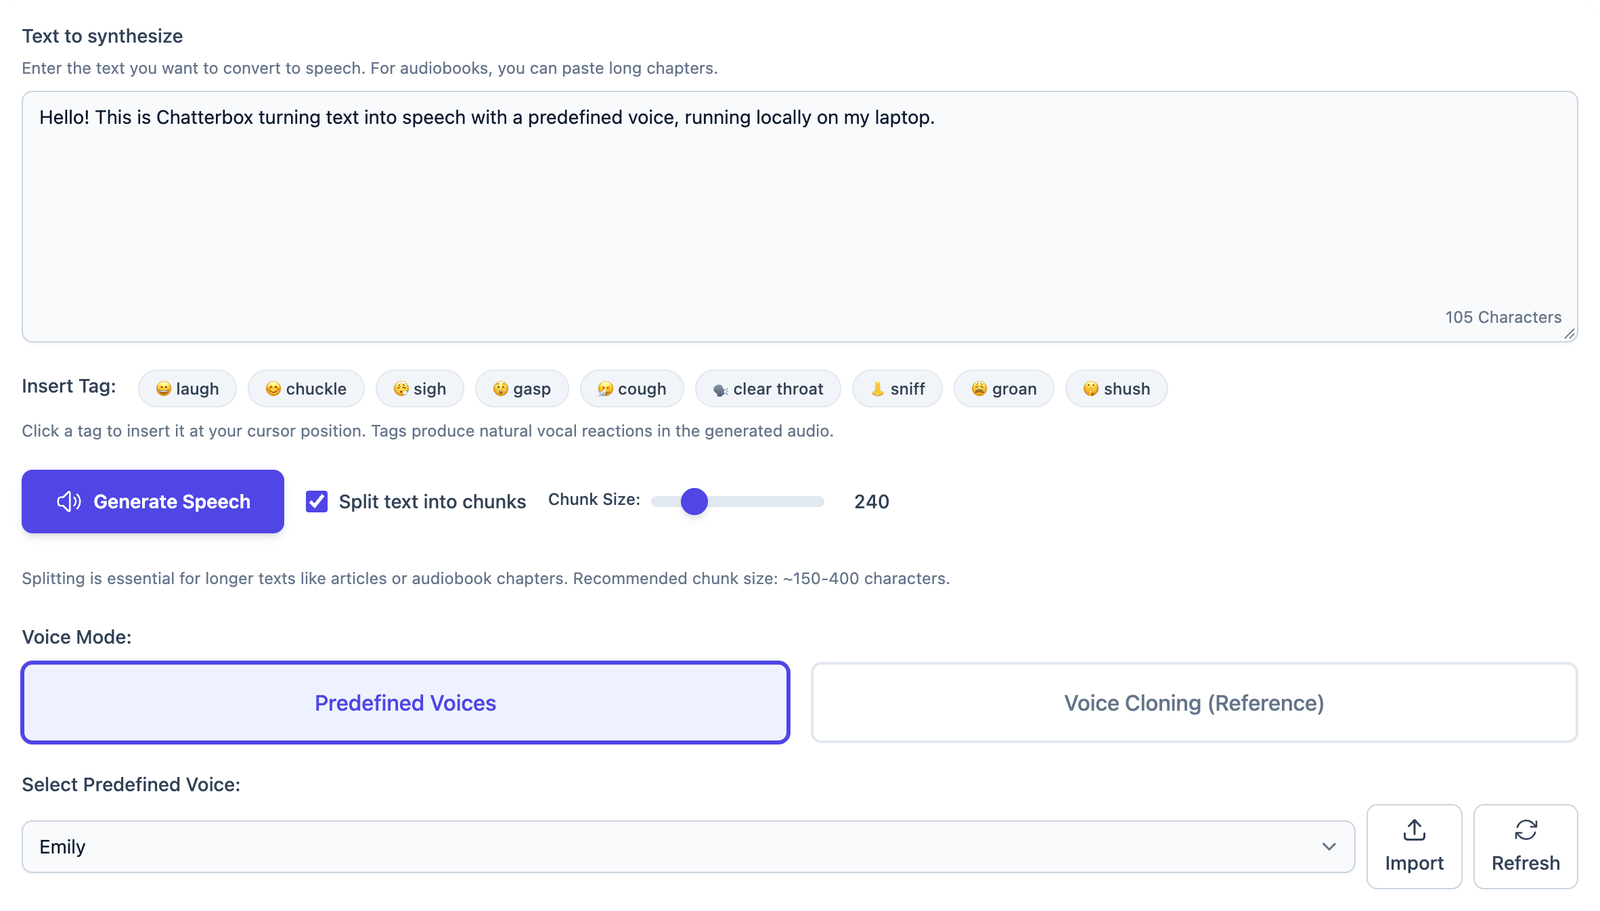
If you type something and hit generate, an AI voice reads it back to you.
That's it! The server is ready.
Troubleshooting
You might spot this warning in the log after the first run:
Perth watermarker unavailable — audio will not be watermarked
It means the library that adds Chatterbox's inaudible watermark failed to load. It needs a module that recent versions of setuptools no longer include. To fix it, stop the server with Ctrl+C and, from the Chatterbox-TTS-Server folder you cloned, install an older version inside its venv folder, which is Python's equivalent of vendor:
venv/bin/pip install "setuptools<81"
Then, start the server directly with venv/bin/python server.py. The launcher only needs to run once.
Recording Your Reference Voice
The built-in voices are cool, but let's clone our own. Aim for a clean reference clip between ten and thirty seconds long. The server rejects uploads longer than thirty seconds by default. The quality of the clip also sets the ceiling for everything you generate afterward, so it's worth getting it right:
- Record in a quiet room, with no background noise.
- Talk normally, as if you were talking on the phone.
- Minimize echo as much as possible.
Use any mic and software you have on your laptop or your phone. It doesn't need to be professional gear, good enough is good enough.
I recorded my clip in QuickTime, which exports a .mov file. Let's extract the audio track with ffmpeg, downmix it to one channel, resample it to 24 kHz (the model's sample rate), and trim it to thirty seconds. The model can convert audio to mono itself, but we'll do it here while preparing the clip:
ffmpeg -i take.mov -vn -ac 1 -ar 24000 -t 30 me.wav
Then, drop the result into the server's reference_audio folder. That's where the server looks for cloned voices. If your server runs on another machine, there's an upload endpoint for this exact purpose:
curl -X POST http://localhost:8004/upload_reference -F "files=@me.wav"
But if your server runs on your local machine, just refresh the web UI, switch to "Voice Cloning" mode, pick me.wav, and generate a sentence:
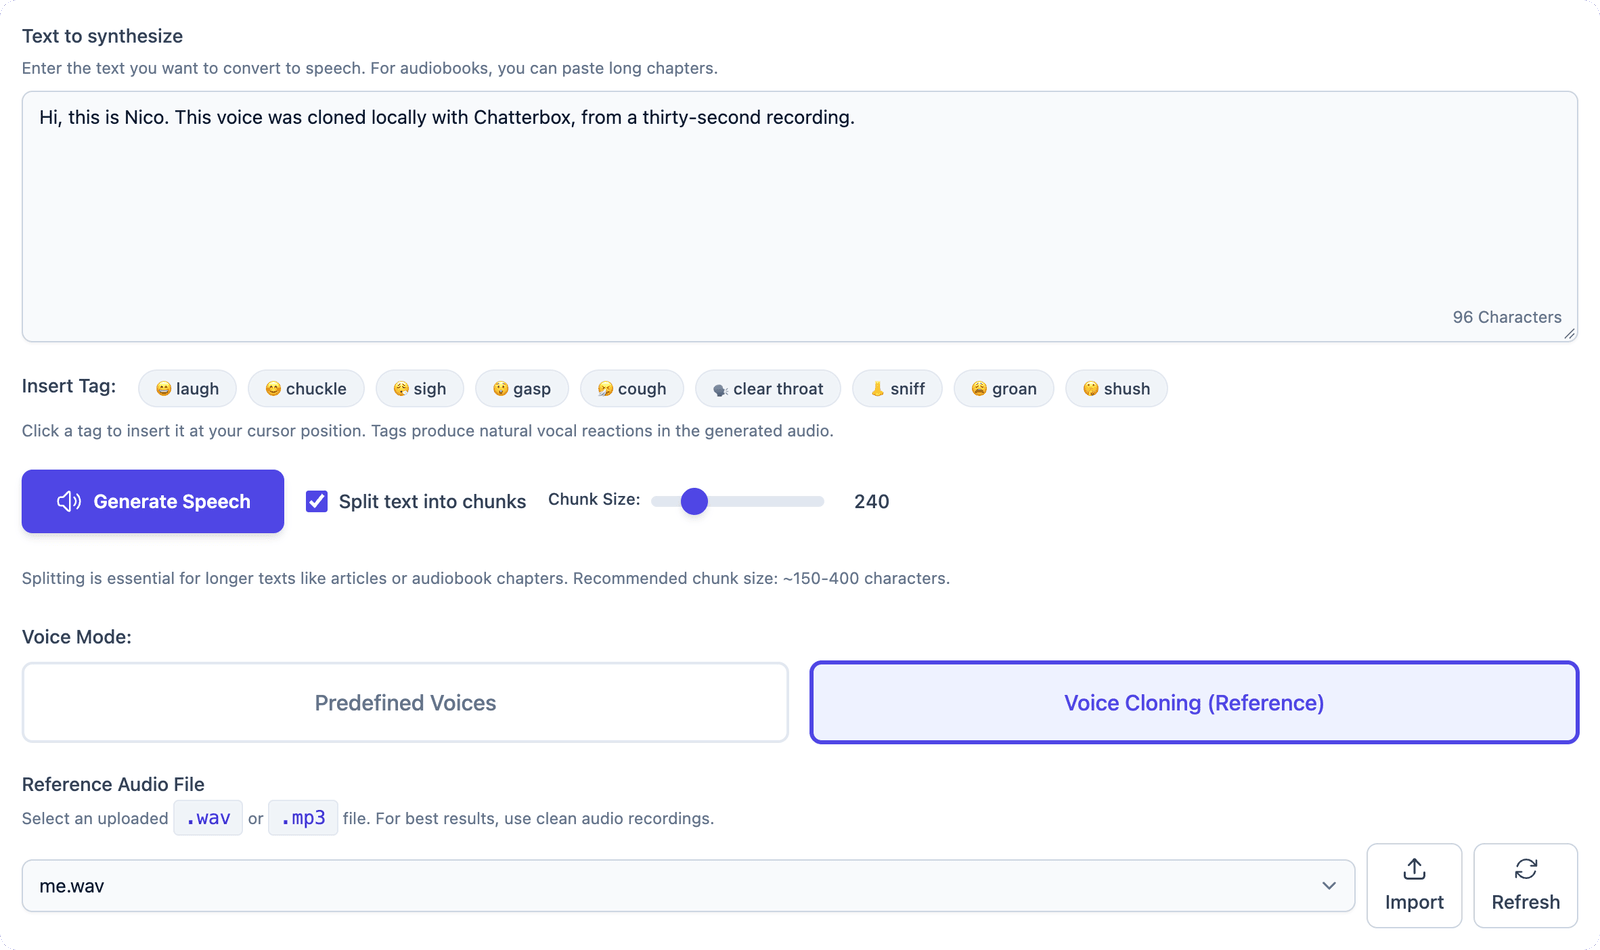
The first time you hear your own voice say something you never said is a strange little moment. Pretty cool, right?
Talking to the Server Like It's OpenAI
Chatterbox TTS Server implements POST /v1/audio/speech, an endpoint compatible with OpenAI's speech API. That means you can reuse the same integration if you switch to OpenAI later. You only need to update your provider configuration and choose a voice that OpenAI supports. Our me.wav voice refers to a file on the Chatterbox server.
Here's an example request:
curl -X POST http://localhost:8004/v1/audio/speech \
  -H "Content-Type: application/json" \
  -d '{"model": "tts-1", "input": "Hello from the terminal!", "voice": "me.wav", "response_format": "mp3"}' \
  -o hello.mp3
The request has four fields:
modelis required by the OpenAI schema. The server ignores it, so any string works.inputis the text we want turned into speech.voiceis the reference sample we recorded and saved earlier.response_formatis the audio format we want back.
Once that runs, you should get a hello.mp3 audio file. Did it work? Great! We're ready to integrate this into Laravel.
Wiring the Laravel AI SDK
You could call that endpoint directly with Laravel's HTTP client, but the Laravel AI SDK gives us a much nicer contract for the same call:
$audio = Audio::of('Hello from Laravel!')->generate();
It also gives us storage helpers, queueing, and fakes for testing, all of which we'll use.
Let's create a fresh Laravel app and install the AI SDK:
laravel new voice-clone-demo
cd voice-clone-demo
composer require laravel/ai
php artisan vendor:publish --tag=ai-config
The SDK organizes everything around providers configured in config/ai.php. It supports text-to-speech providers such as OpenAI and ElevenLabs. Chatterbox isn't built in, but its OpenAI-compatible API lets us use the OpenAI driver. This driver accepts a custom url meant for proxies and gateways. Our gateway will be the server we have running on port 8004.
Open config/ai.php and add a new provider next to the existing ones:
'providers' => [
    'chatterbox' => [ // [tl! add:start]
        'driver' => 'openai',
        'key' => env('CHATTERBOX_API_KEY', 'not-needed'),
        'url' => env('CHATTERBOX_URL', 'http://127.0.0.1:8004/v1'),
    ], // [tl! add:end]

    'openai' => [
        'driver' => 'openai',
        'key' => env('OPENAI_API_KEY'),
        'url' => env('OPENAI_URL', 'https://api.openai.com/v1'),
    ],

    // ...
],
Let's break this down:
driverisopenaibecause the request and response formats are the ones the OpenAI driver already knows how to produce and parse.keyhas to be present because the driver sends it as a bearer token. The server never checks it, so any string will do.urlpoints at our local server, including the/v1prefix. The driver appendsaudio/speechto it.
Next, make it the default for audio, so we don't have to name it on every call:
'default_for_audio' => 'chatterbox',
Let's give ourselves a way to test it. We'll create a console command to keep it simple:
php artisan make:command Speak
Paste in the following code snippet:
<?php

namespace App\Console\Commands;

use Illuminate\Console\Command;
use Illuminate\Support\Facades\File;
use Illuminate\Support\Str;
use Laravel\Ai\Audio;

class Speak extends Command
{
    protected $signature = 'speak {paths* : Text or Markdown files, or a glob like docs/*.md} {--voice=me.wav}';

    protected $description = 'Turn text files into speech with a locally cloned voice';

    public function handle(): int
    {
        $files = collect($this->argument('paths'))->flatMap(fn ($path) => File::glob($path));

        foreach ($files as $file) {
            $text = File::get($file);

            if (Str::endsWith($file, '.md')) {
                $text = html_entity_decode(strip_tags(Str::markdown($text)));
            }

            $audio = Audio::of($text)
                ->voice($this->option('voice'))
                ->generate();

            $path = $audio->storeAs(File::name($file).'.mp3');

            $this->info("Saved to storage/app/private/{$path}");
        }

        return self::SUCCESS;
    }
}
paths*accepts one or more arguments, andFile::glob()expands each one, sonotes/hello.txtanddocs/*.mdboth work.- The model will read aloud everything, including Markdown pound signs in headings and backticks around code snippets. So, for Markdown files,
Str::markdown()renders the file to HTML,strip_tags()throws the tags away, andhtml_entity_decode()turns leftovers like"back into characters. This removes Markdown formatting, but code blocks and table contents will still be read aloud. You can strip those too if needed. Audio::of()starts a pending generation with the text.voice()sets the voice name, which the driver passes straight through to the server. For us, that's the reference filename.generate()sends the request.storeAs()writes the MP3 to your default filesystem disk, named after the input file.
Let's see it in action. Write a short note in notes/hello.txt and pass it to the command:
Hi, this is Nico. This voice was cloned locally with Chatterbox, and generated from a Laravel app using the Laravel AI SDK.
php artisan speak notes/hello.txt
Did it work? Great!
If it didn't, you might have run into a timeout. Perhaps you got this error:
Laravel\Ai\Exceptions\ProviderConnectionException

Could not connect to AI provider [chatterbox].
This message can mean a connection error, but it can also mean a timeout. The SDK gives audio requests thirty seconds by default, and local generation can take longer. If the server is reachable and its logs show that generation is still running, the SDK may have stopped waiting before the audio was ready. To give it more time, chain a timeout() call:
$audio = Audio::of($text)
    ->voice($this->option('voice'))
    ->timeout(1800) // [tl! highlight]
    ->generate();
Run the command again, wait a few seconds, and play storage/app/private/hello.mp3. Success? Let's go!
Queueing Audio Generation
Waiting is fine for a console command. But if you plan to generate audio inside an HTTP request, you should queue it instead. The SDK makes it simple. If you swap generate() for queue(), each generation becomes a queued job with Laravel's retries and failure handling included.
Add the following use statement at the top of Speak.php:
use Laravel\Ai\Responses\AudioResponse;
Then, replace the generation code inside the foreach loop, including the "Saved to" message, with this code:
Audio::of($text)
    ->voice($this->option('voice'))
    ->timeout(1800)
    ->queue() // [tl! highlight]
    ->then(fn (AudioResponse $audio) => $audio->storeAs(File::name($file).'.mp3')); // [tl! highlight]

$this->info("Queued {$file}");
That's it! If you point the command at a folder containing multiple docs with php artisan speak docs/*.md, each document will turn into an individual job. The worker chews through them in the background, and the callback stores each file once it's done. Of course, make sure a worker is running locally by running php artisan queue:work, or that you have Horizon running in production.
To give you an idea of what to expect, I ran exactly that on my machine. My setup was an Apple M5 MacBook with 24 GB of RAM, the server running on the CPU as described above, the default Turbo model, and a single queue:work process on Laravel's database queue. The input was ten text files, five sentences each:
- Input: ten files of ~340 characters each, ~3,400 in total.
- Output: ~20 seconds of audio per file, ~3.5 minutes in total.
- Generation: ~13 seconds per job, so ~2.5 minutes for the batch with a single worker.
With my setup, generating the audio took less time than playing it back. On an M1 with 8 GB of RAM, the same model took about one and a half times the playback duration, so expect slower results on older machines. Keep that in mind when configuring your queue's timeout and retry settings, especially for longer documents.
Testing Without Waking the Model
Our setup works great, but there's a catch: we want to test this feature, but our test suite can't take minutes to run.
The AI SDK's fakes solve this. After you call Audio::fake(), every generation returns a fixed response instantly, while still recording what was asked. Let's test the command:
use Illuminate\Support\Facades\Queue;
use Illuminate\Support\Facades\Storage;
use Laravel\Ai\Audio;
use Laravel\Ai\Prompts\QueuedAudioPrompt;

test('the speak command queues the file contents in my voice', function () {
    Audio::fake();
    Queue::fake();
    Storage::fake();

    Storage::put('notes/hello.txt', 'Hi, this is a test note.');

    $this->artisan('speak', ['paths' => [Storage::path('notes/hello.txt')]])
        ->expectsOutputToContain('Queued')
        ->assertSuccessful();

    Audio::assertQueued(fn (QueuedAudioPrompt $prompt) =>
        $prompt->contains('test note') && $prompt->voice === 'me.wav'
    );
});
With the fake in place, no HTTP request is made, the test runs in milliseconds and passes with the server stopped. Queue::fake() keeps the job from running. The test environment's queue is synchronous, so without this call, the storage callback would run and write a file. Storage::fake() gives the note an isolated local testing disk. The assertion checks the prompt the SDK recorded: the text it received and the voice it was asked to use.
Making Our Voice More Expressive
We've been using the Turbo version of Chatterbox, the server's default, lightweight version of the model. Turbo has a cool trick: it performs bracketed stage directions such as [sigh] and [chuckle] instead of reading them aloud.
The tags I've confirmed on this setup are [gasp], [groan], [clear throat], [sniff], [cough], [sigh], [chuckle], [shush], and [laugh]. Keep them lowercase and in square brackets.
Let's try it. Write a note with a couple of directions in it, and save it in notes/clones.txt:
This voice cloning thing... [sigh] [gasp] Reminds me of that Star Wars movie: [clear throat] "Attack of the Clones"! [chuckle] Anyone remember? The prequels? [groan] Am I really that old?
Run it through the command:
php artisan speak notes/clones.txt
And here's how my test sounds:
That's so cool, in an uncanny valley way!
While Chatterbox can produce expressive speech, the results vary. You may not get the polish of a paid service, but for this project, it does the job: speech in our own voice, generated privately, with no API fees.
Running It in Production
Everything ran on a laptop up to this point, with the server in one terminal window and Laravel in another. Moving it to a server changes a few things, but none of them big.
Run the server on Linux. A suitable NVIDIA GPU can improve generation throughput, although the speedup depends on the hardware. If you have an NVIDIA GPU, use the launcher's --nvidia flag on the first run.
Keep it alive. A terminal window won't survive a reboot. Run the server as a service so it restarts on failure. The project includes Dockerfiles and Docker Compose configurations, or you can wrap venv/bin/python server.py in a systemd unit.
Point Laravel at it. The provider we configured reads its address from the environment, so production is one line in .env:
CHATTERBOX_URL=http://tts.internal:8004/v1
Keep it private. The server has no authentication. The use_auth option in its config.yaml is a placeholder that isn't enforced, and the API key the SDK sends is ignored. By default, it listens on every network interface. If you change host in config.yaml from 0.0.0.0 to 127.0.0.1, it will only accept requests from the same machine. If Laravel runs on a different server, keep both on a private network and block the port from the outside with your firewall.
Warm it up. The server loads the model during startup. Wait for it to finish loading, then send a throwaway generation before accepting real work. The first generation may be slower than subsequent ones.
In Closing
It's incredible what this technology unleashes. However, with great power comes great responsibility: use this for good purposes only, to make your apps more accessible and fun!
With this setup, you get all the benefits of running local models: you don't depend on a provider and your real voice never hits third-party servers.
What will you build? Whatever it is, let us know.
Now, if you'll excuse me, I'm going to rewatch the prequels. They were fine, actually. [chuckle] Until next time!
in your inbox:
let’s talk.
Thank you!
We appreciate your interest.
We will get right back to you.