How to Automatically Generate Dynamic Open Graph Images for All Your Jigsaw Site’s Pages

You just published an amazing post on your blog and are ready to share it with the world when you remember you need to create an Open Graph (OG) image for it. You open Photoshop, thinking, "There has to be a better way." Well, there is!
In this post, we'll learn how to automatically generate a dynamic OG image for each page of your website using:
- Jigsaw, the amazing static site generator by Tighten
- The OG, an Open Graph image generator written purely in PHP by Simon Hamp
Let's get started.
What Is an OG Image, and Why Do All Your Pages Need One?
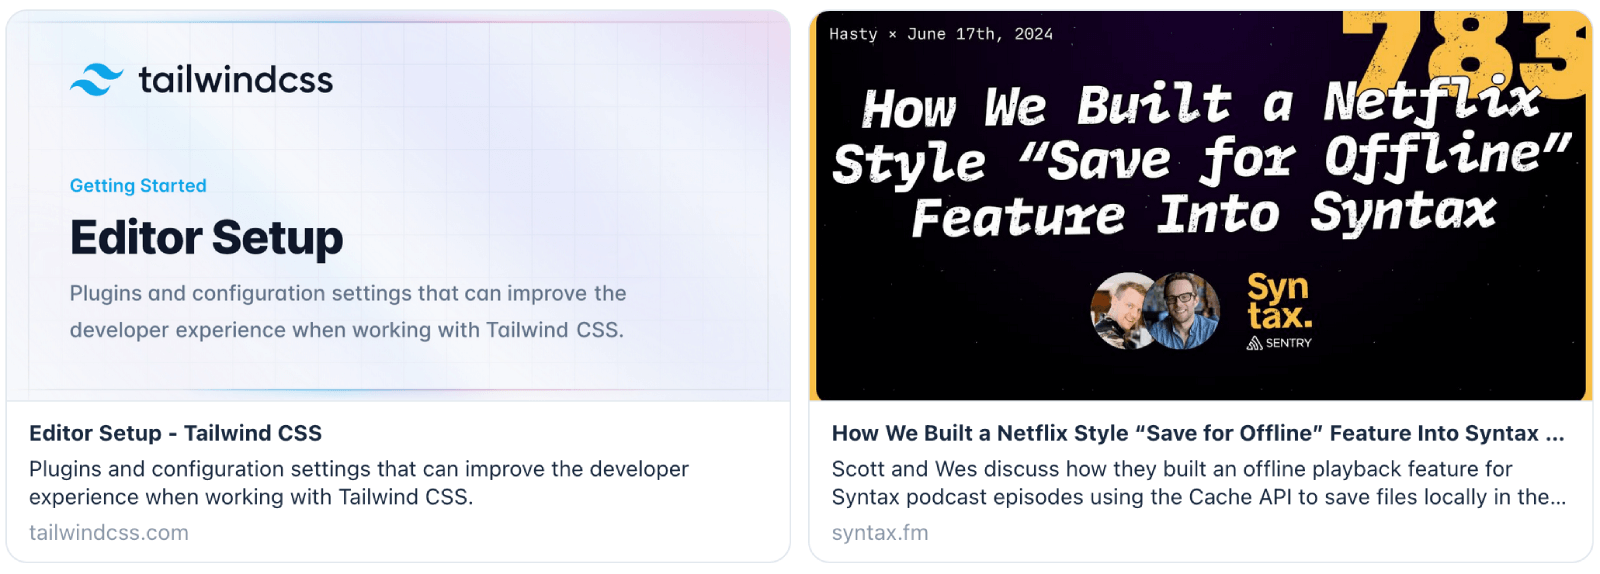
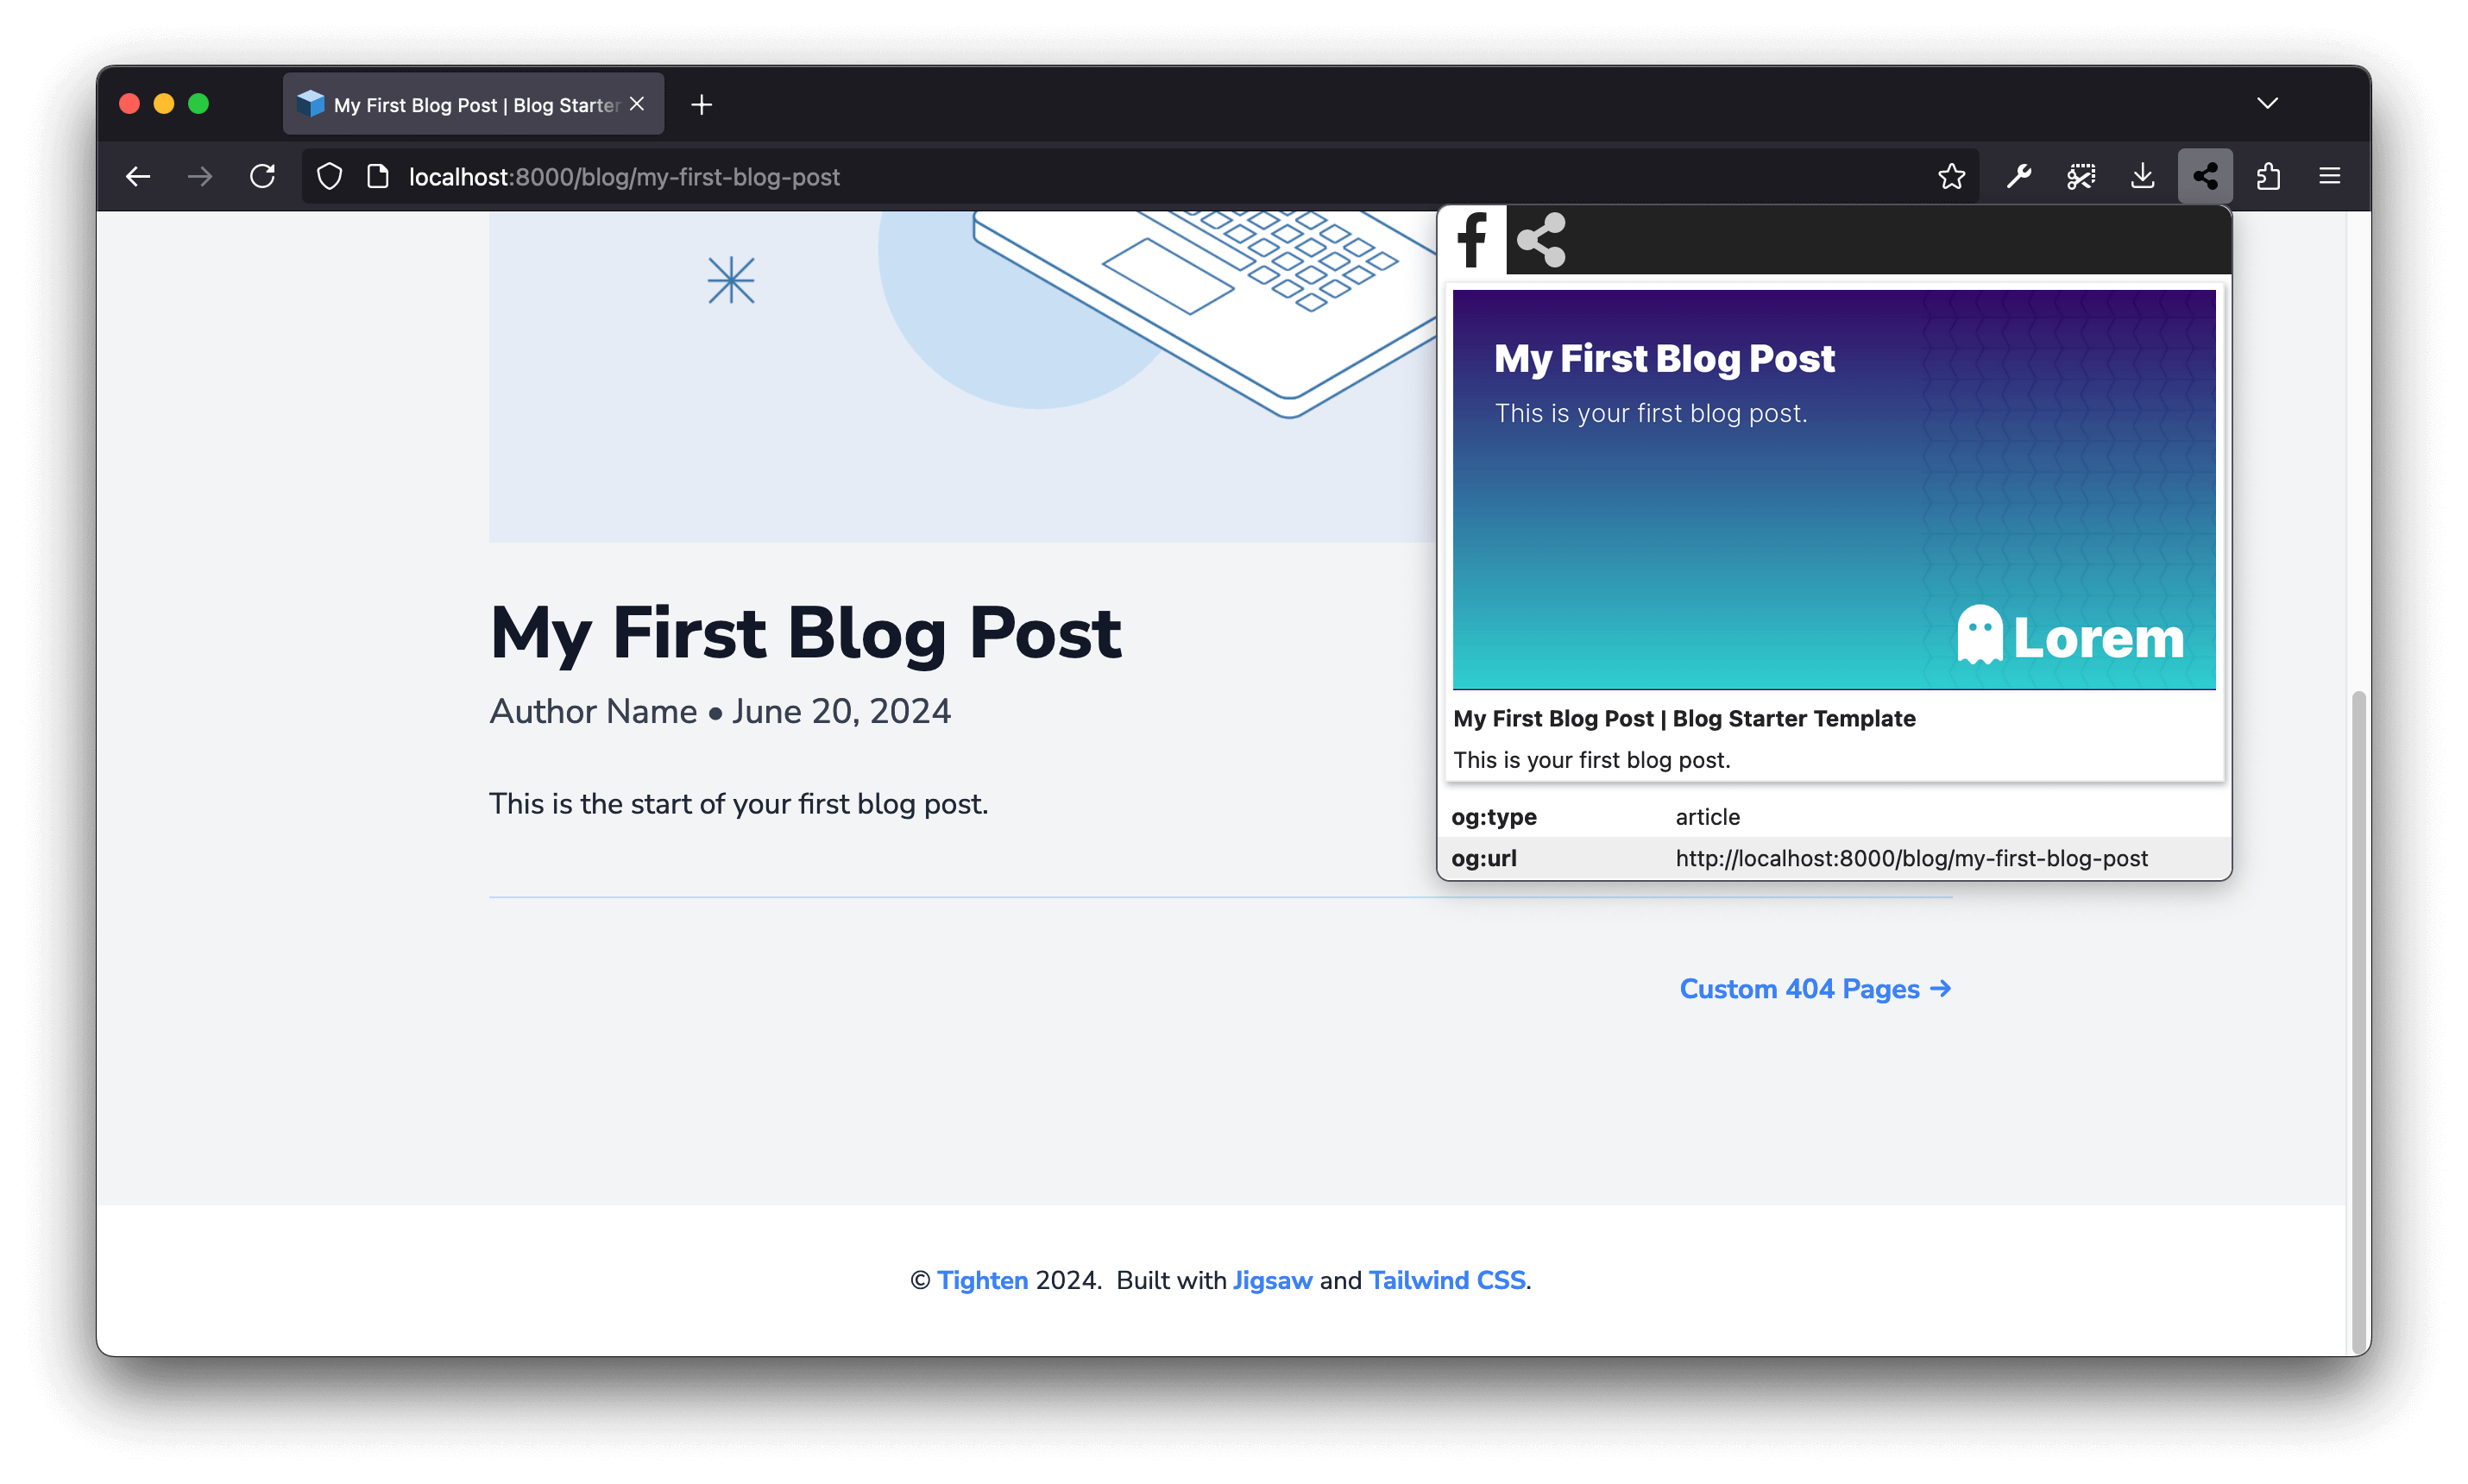
When you share a link on social media or in a messaging app, a small preview card appears. This widget typically shows an image, the page title, and a brief description. For example:
You can customize this preview using Open Graph meta tags in the <head> of your document. There are many og tags that can help you describe the content of your page, but the four required are og:title, og:description, og:url and og:image.
<head>
 <meta property="og:title" content="Your Page Title" />
 <meta property="og:description" content="A brief description of your page." />
 <meta property="og:url" content="https://example.com/your-page" />
 <meta property="og:image" content="https://example.com/path/to/image.jpg" />
</head>
As you may expect, the og:image tag specifies the URL of the preview card image. This image doesn't appear on the page itself; it's only requested by social media or messaging platforms to generate the preview. It needs to be eye-catching and engaging, as it can significantly influence whether a user clicks on your link... or keeps scrolling.
Each URL on your website intended for social media sharing should have a custom OG image relevant to its content.
- Using a single generic OG image for all your links is fine, but not ideal.
- Not defining an OG image can cause you to lose social media traffic, even if your content is great.

However, it can be a considerable time investment to hand-craft a custom image for your blog posts, the lessons in your course, or the products in your online store.
The good news is, we can automate this process and generate hundreds of custom, dynamic OG images on the fly, one for each item. Picture this:
- A nice background
- The title and description of the item at the top
- The logo of your website at the bottom
For example:

Sounds interesting? Let's see how we can quickly implement this in Jigsaw.
Step 1: Installing Jigsaw
If you already have a Jigsaw website, feel free to skip this step.
But if you're new to it, welcome! Jigsaw is a Laravel-powered static site generator that allows you to write content in Markdown and layouts and components in Blade. In a way, you already know what Jigsaw can do: the blog you are reading right now (and the whole Tighten website) is powered by it.
To follow along, create a new project:
mkdir myblog && cd myblog
composer require tightenco/jigsaw
Jigsaw comes with a handy blog starter template. Install it as follows:
vendor/bin/jigsaw init blog
You can compile assets when they change with npm run watch and preview the site on http://localhost:8000 by running vendor/bin/jigsaw serve.
Step 2: Printing the OG Image Meta Tag
As we've seen before, the og:image tag must have this format:
<meta property="og:image" content="http://example.com/path/to/image.png" />
The image URL must be absolute. If it is a relative path, the image will not be displayed in the preview card.
<!-- ❌ Incorrect -->
<meta property="og:image" content="/path/to/image.png" />

<!-- ✅ Correct -->
<meta property="og:image" content="http://example.com/path/to/image.png" />
To print that absolute path, we must first define the correct baseUrl in our config.php file.
'baseUrl' => 'http://localhost:8000',
We also need to define the public URL for production by editing config.production.php:
'baseUrl' => 'http://example.com',
Now, we can add the meta tag to our layout. The starter template we're using has that layout located in source/_layouts/main.blade.php. Open it in your code editor and locate the following line:
<meta property="og:url" content="{{ $page->getUrl() }}"/>
As you can see, the og:url tag outputs the return value of the $page->getUrl() function, a built-in Jigsaw method for retrieving the current page's URL.
We can use this as a reference to create a function that returns the full URL of the OG image. Fortunately, extending Jigsaw is super straightforward. We can define a new getOgImageUrl function in config.php.
<?php

use Illuminate\Support\Str;

return [
    // Other properties and helpers...
    'getOgImageUrl' => function ($page) {
        return $page->baseUrl . '/assets/img/default.png';
    }
];
Great! This helper is ready to use in our Blade files as $page->getOgImageUrl(). It takes the $page as a parameter, and for now, it always returns the baseUrl we defined earlier, concatenating it with the path to a default image stored in our assets directory. Don't worry, we will make it dynamic in the next step.
Go back to the layout and add the og:image tag right below the og:url tag:
<meta property="og:url" content="{{ $page->getUrl() }}"/>
<meta property="og:image" content="{{ $page->getOgImageUrl() }}" /> // [tl! highlight]
Now, let's move on to the main challenge: refactor this method to create the image file on the fly based on the page title, description and return its public URL.
Step 3: Creating Dynamic OG Images
It's time to install the package that helps us generate our thumbnails: The OG by Simon Hamp. Since it depends on ImageMagick, make sure this extension is installed in your environment. Then, install the package via Composer:
composer require simonhamp/the-og
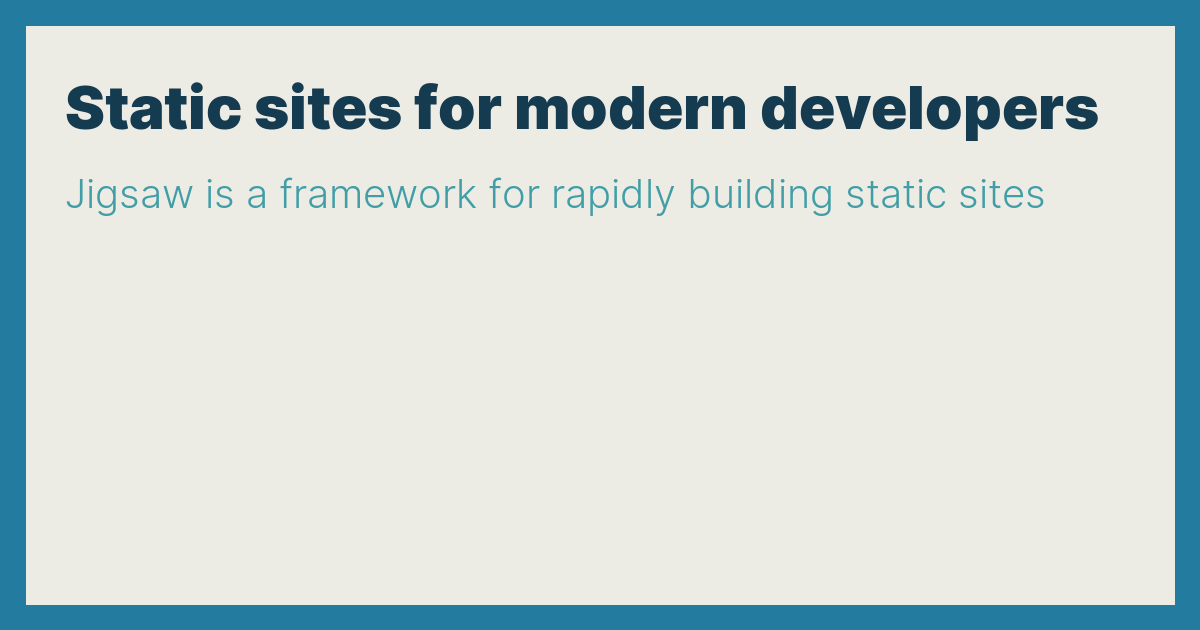
Using The OG is super simple. Let's create an image using the default light theme, a catchy title, and a short description.
use SimonHamp\TheOg\Image;

(new Image())
    ->title('Static sites for modern developers')
    ->description('Jigsaw is a framework for rapidly building static sites')
    ->save('demo.png');
That's it! The PNG file is saved at the specified path.
The package comes with two themes (light and dark), two fonts (Inter and Roboto Slab), and a variety of background images. These built-in features will take you far, but you can also customize it with your own themes, fonts, and backgrounds.
For our example, let's use a custom theme, remove the default borders, and use the following background image (which you can save as source/assets/og-background.png).

For ease of use, we are going to encapsulate the image rendering in a function. In config.php, add:
use SimonHamp\TheOg\Image;
use SimonHamp\TheOg\Theme\Theme;
use SimonHamp\TheOg\Theme\Fonts\Inter;
use SimonHamp\TheOg\Theme\Background;
use SimonHamp\TheOg\BorderPosition;

function storeImage ($title, $description, $path) {
    (new Image())
        ->theme(new Theme(
            baseColor: '#FFFFFF',
            accentColor: '#FFFFFF',
            backgroundColor: '#000000',
            baseFont: Inter::light(),
            titleFont: Inter::black(),
        ))
        ->background(new Background('source/assets/og-background.png'))
        ->border(BorderPosition::None)
        ->title($title)
        ->description($description)
        ->save($path);
}
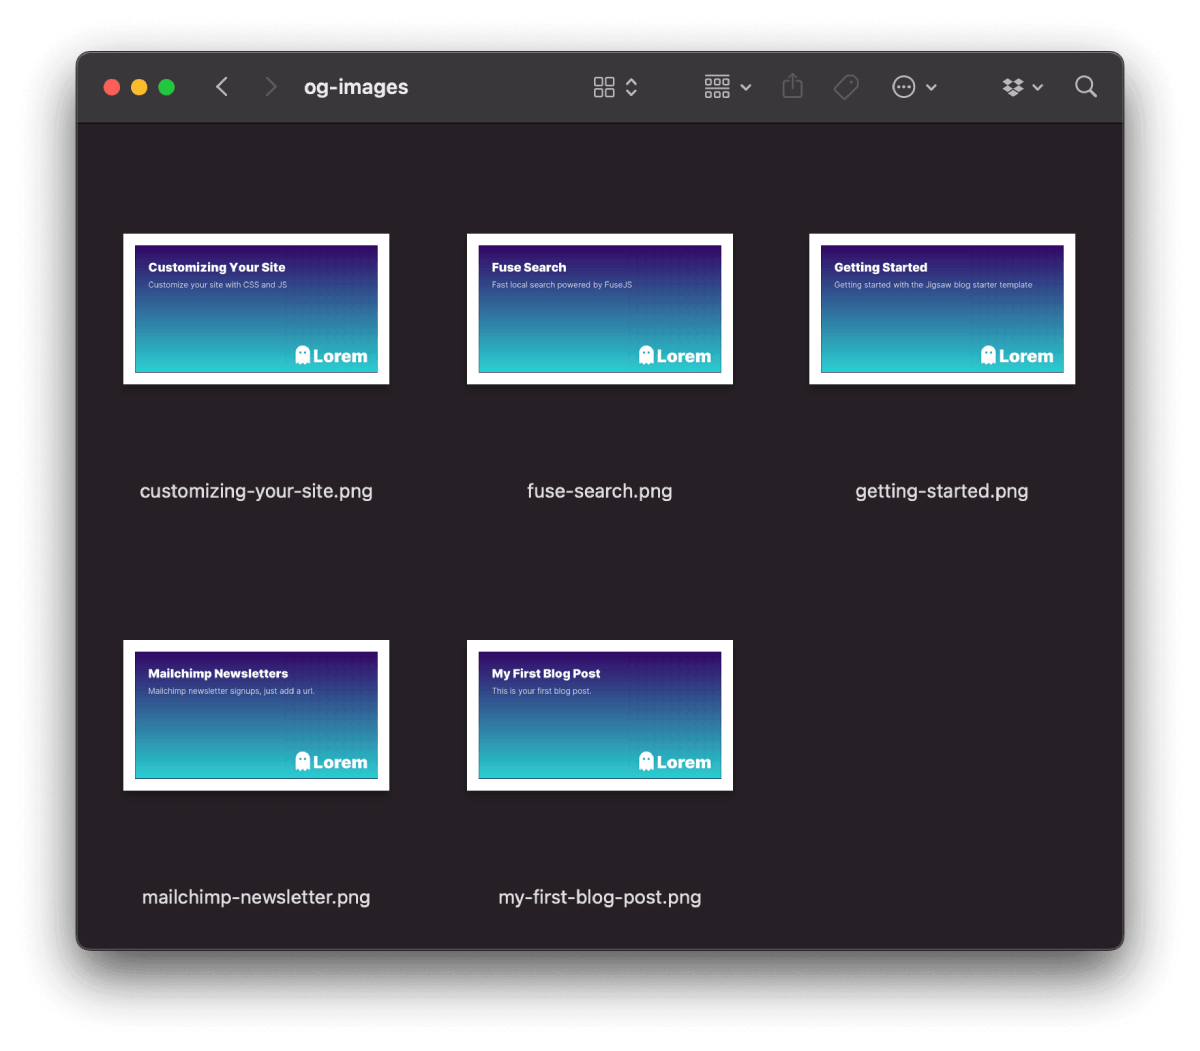
Now that our template is ready, let's create a folder to store our images.
mkdir source/assets/og-images
Next, we need a way to determine if a page should use the default generic OG image or a custom one to avoid generating images for pages you don't want to. If a custom image is used, we must also define its filename. This is important for SEO. Fortunately, Jigsaw makes it easy to define custom properties for our content.
Open a content file, for example source/_posts/my-first-blog-post.md, and add a og_image property to the front matter:
extends: _layouts.post
section: content
title: My First Blog Post
date: 2024-06-20
description: This is your first blog post.
cover_image: /assets/img/post-cover-image-2.png
og_image: my-first-blog-post # [tl! highlight]
In this example, we specify that we want to create a custom OG image for this page using the filename my-first-blog-post.png.
We are ready to go! Open config.php and update getOgImageUrl to return the dynamic public URL of the OG image, creating it on the fly if needed.
<?php

use Illuminate\Support\Str;
use SimonHamp\TheOg\Image;
use SimonHamp\TheOg\Theme\Theme;
use SimonHamp\TheOg\Theme\Background;
use SimonHamp\TheOg\BorderPosition;
use SimonHamp\TheOg\Theme\Fonts\Inter;

function storeImage($title, $description, $path) { // [tl! collapse:start]
    (new Image())
        ->theme(new Theme(
            baseColor: '#FFFFFF',
            accentColor: '#FFFFFF',
            backgroundColor: '#000000',
            baseFont: Inter::light(),
            titleFont: Inter::black(),
        ))
        ->background(new Background('source/assets/og-background.png'))
        ->border(BorderPosition::None)
        ->title($title)
        ->description($description)
        ->save($path); // [tl! collapse:end]
}

return [
    // Other properties and helpers...
    'getOgImageUrl' => function ($page) {

        // If a page has no og_image defined, return the default one.
        if (!isset($page->og_image)) {
            return $page->baseUrl . '/assets/img/default.png';
        }

        // Otherwise, use the value of og_image to define its filename path.
        $path = 'source/assets/og-images/' . $page->og_image . '.png';

        // If the file does not exist, create it.
        if (!file_exists($path)) {
            storeImage($page->title, $page->description, $path);
        }

        // Finally, return its absolute, public URL.
        return $page->baseUrl . str_replace('source', '', $path);
    },
];
If you want to recreate the image (for example, after changing the title or description of the page), you can either remove the image file from source/assets/og-images or change the value of og_image in the markdown's front matter.
Now, let's see it in action! Serve the site with vendor/bin/jigsaw serve and open your browser on an article, like /posts/my-first-blog-post. In the head of the document, the og:image meta tag should be:
<meta property="og:image" content="http://localhost:8000/assets/og-images/my-first-blog-post.png" />

You will find that image (and all the other generated images) in the og-images folder.
Step 4: Building For Production
You can build your Jigsaw website for production with vendor/bin/jigsaw build production.
If you previewed the site with vendor/bin/jigsaw serve, the OG images will already be stored in the assets/og-images folder and copied to build_production/assets/og-images on build.
But if you didn't, they will be missing. To ensure they are always copied, we can use Jigsaw's event listeners. Open bootstrap.php and add the following:
use TightenCo\Jigsaw\Jigsaw;
use Illuminate\Filesystem\Filesystem;

$events->afterBuild(function (Jigsaw $jigsaw) {
    $filesystem = new Filesystem();
    $source = $jigsaw->getSourcePath() . '/assets/og-images';
    $destination = $jigsaw->getDestinationPath() . '/assets/og-images';

    // Make sure the destination directory exists
    $filesystem->ensureDirectoryExists($destination, 0755, true);

    // Copy the OG image files to their final destination
    foreach ($filesystem->allFiles($source) as $file) {
        $filesystem->copy(
            $file->getPathname(),
            $destination . '/' . $file->getFilename()
        );
    }
});
We are done! You can now build the site and upload the build_production folder to your host.
Final Tips
To quickly preview the OG attributes in your browser, you can use an extension:
You can also use a website like MetaTags.io to see how the preview card will look on different social media platforms, such as Facebook or LinkedIn.
Of course, you can also share the link on social media to see how it looks. However, keep in mind that most websites cache the OG image the first time the link is shared. If you change the OG image afterward, you'll need to manually submit a request to clear the cache. You can do this on X (Twitter), Facebook, and LinkedIn.
Last but not least, make sure to check if the social network uses special tags apart from the Open Graph standard. For example, X (Twitter) uses twitter:card, twitter:url, etc. These are custom tags that can change at any moment, so check their documentation.
In closing
That's it! Today, we learned about the importance of OG images and how they enhance your content's visibility on social media. We explored how to use The OG package and extend Jigsaw with custom properties, helper functions and event listeners to generate dynamic OG images for your pages.
Now, you can share all your articles, products, or lessons, knowing that the previews will look fantastic and attract more visitors.
You can find all the code in this public GitHub repository. Interested in more articles about Jigsaw? Let us know!
Until next time!
in your inbox:
let’s talk.
Thank you!
We appreciate your interest.
We will get right back to you.