Use HTMX to Create Laravel Single-Page Apps Without Writing JavaScript


Sometimes, the landscape of front-end development can seem overwhelming. Should I use React? Svelte? Livewire? Vue? And TypeScript? And a state manager, and maybe a meta-framework? Transpilers, bundlers, minifiers, and... hey, what is Bun?
Don't get me wrong; all these tools are fantastic and let us build highly interactive applications. But they come with a cost. The browser has to load the JavaScript, interpret it, take the data we send in JSON format, run the rendering functions, update the DOM, and sometimes even hold a virtual DOM in memory to keep track of future changes.
What if we could render templates on the server and return the HTML? Well, that is what we used to do. Back in the day, before the rise of frontend frameworks, it wasn't uncommon to make an AJAX request to the server, receive a HTML in the response, and just insert it somewhere on the page.
HTMX brings back that philosophy, with a twist: it allows us to trigger AJAX requests from any HTML element just by adding custom attributes to it. Thanks to this approach, we can create single-page applications without writing a single line of JavaScript. Sounds intriguing? Let's dive in!
HTMX crash course
Picture this: a "Subscribe" button must send a POST request to /subscribe when clicked. If the response is successful, the button must be replaced with the message returned by the server.
Normally, you would need to handle the click, perform the request, and replace the element using JavaScript:
<button id="subscribe">Subscribe</button>

<script>
document.getElementById('subscribe').addEventListener('click', function() {
    fetch('/subscribe', { method: 'POST' })
    .then(response => response.text())
    .then(message => {
        document.getElementById('subscribe').outerHTML = message;
    });
});
</script>
Using HTMX, you can achieve the same result without writing JavaScript:
<button
    id="subscribe"
    hx-trigger="click"
    hx-post="/subscribe"
    hx-target="this"
    hx-swap="outerHTML">
    Subscribe
</button>
Wait, is that all? Yes, that's it. Let's delve into these hx attributes we just added:
- hx-trigger indicates the event we are listening for, such as
clickormouseover. By default, inputs, textareas, and selects are triggered by thechangeevent. Forms are triggered by thesubmitevent, while everything else is triggered by theclickevent. - hx-post allows us to specify the request endpoint. HTMX provides alternatives for making GET, PUT, and DELETE requests with hx-get, hx-put, and hx-delete.
- hx-target indicates where to place the HTML of the response. We can use this attribute to target other elements in the DOM using a CSS selector like
.resultsor#list. In this case, we use the default valuethis, a special key indicating that the target is the element itself. - hx-swap indicates how to place the HTML of the response in relation to the target element. If we don't specify a swap strategy, the default is
innerHTML, meaning that the HTML of the response will replace the contents of the target. Here, we don't want to embed the message inside the button; instead, we want it to replace the button entirely, so we useouterHTML.
Since the default value for hx-target is this and the default hx-trigger for a button is click respectively, we can condense our code a bit more:
<button id="subscribe" hx-post="/subscribe" hx-swap="outerHTML">
    Subscribe
</button>
Interpreting these attributes might seem daunting at first, but they become quite intuitive with practice. For example, let's take a look at this code:
<button
    hx-get="/contacts"
    hx-target="#contact-list"
    hx-swap="outerHTML">
    Reload Contacts
</button>
<ul id="contact-list">
    <li>John Doe</li>
    <li>Jane Smith</li>
</ul>
What is this doing? If you answered, "Clicking that button fires a GET request to /contacts and replaces the entire #contact-list with the HTML of the response," then you are already an HTMX ninja.
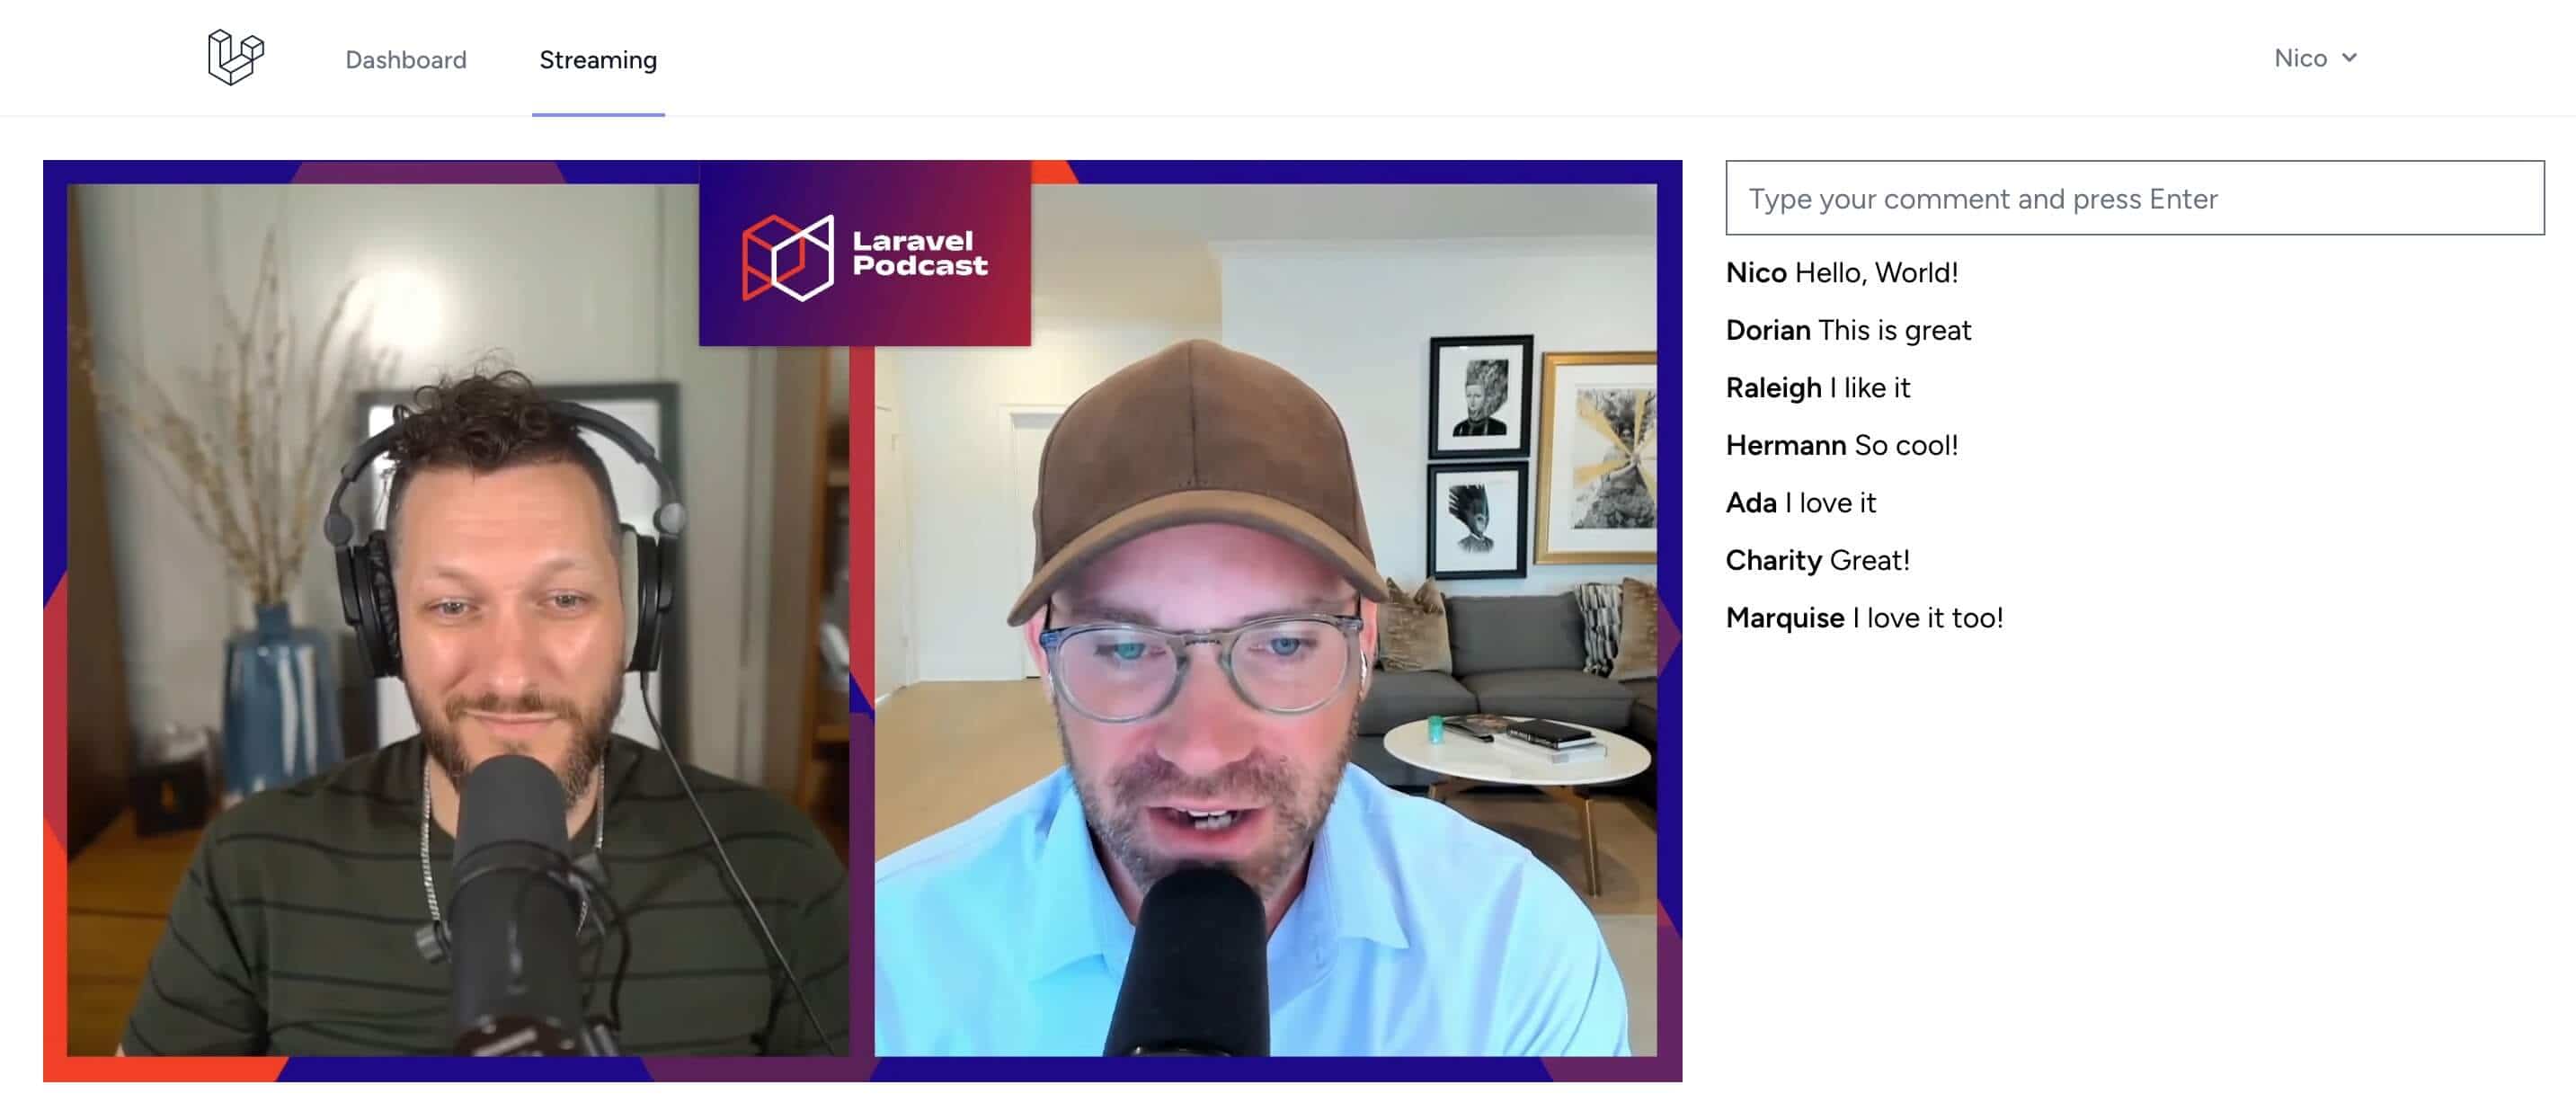
HTMX in action: Streaming site with live comments
To learn more about HTMX and how we can utilize it to enhance our applications, let's create a demo. How about a website where users can log in and watch a video stream? The challenge is to enable users to post comments and see comments from other users in real-time without interrupting the video playback.
Sounds like a good idea? Let's do it! Here's the roadmap:
- In the first three steps, we will create the classic, full-page reload website.
- In the last three steps, we will leverage HTMX to transform it into a single-page application (SPA).
This is the final result:
The code is available in this public GitHub repo.
1. Install Laravel and Laravel Breeze
Let's start by installing Laravel and Laravel Breeze, a starter kit that takes care of creating authentication routes, controllers, and templates so our users can register and log in to our application. Run the following commands:
# Install Laravel
composer create-project laravel/laravel demo-htmx-laravel
cd demo-htmx-laravel

# Install Laravel Breeze
composer require laravel/breeze --dev

# Scaffold using Blade views
php artisan breeze:install blade
Now you can start the application by running php artisan serve, and remember to start Vite with npm run dev as well.
2. Add support for comments
We want to provide a form for users to create comments. Let's add the route to routes/web.php using a resource controller.
Route::middleware('auth')->group(function () {
    Route::resource('comments', CommentController::class)->only(['store']);
});
For now, the only method is store. Later on, we'll add index to retrieve all comments. But for now, this will do. Let's create the controller:
<?php

namespace App\Http\Controllers;

use Illuminate\Http\Request;

class CommentController extends Controller
{
    public function store(Request $request)
    {
        $validated = $request->validate(['text' => 'string|required']);
        $request->user()->comments()->create($validated);

        return back();
    }
}
Here, we save the comment to the database via the authenticated user model. So, we should add a relationship to the User to indicate a user has many comments:
public function comments(): HasMany
{
    return $this->hasMany(Comment::class);
}
Finally, let's create that Comment model.
<?php

namespace App\Models;

use Illuminate\Database\Eloquent\Factories\HasFactory;
use Illuminate\Database\Eloquent\Model;
use Illuminate\Database\Eloquent\Relations\BelongsTo;

class Comment extends Model
{
    use HasFactory;

    protected $fillable = ['text'];

    public function user(): BelongsTo
    {
        return $this->belongsTo(User::class);
    }
}
As you might expect, we also need to create the corresponding migration.
3. Create the stream page
The stream page is where the video player and comment section will live. Let's add the route:
Route::middleware('auth')->group(function () {
    Route::resource('comments', CommentController::class)->only(['store']);
    Route::get('stream', StreamPageController::class)->name('stream'); // [tl! highlight]
});
Here, StreamPageController is an invokable controller responsible for fetching comments and rendering the stream page. Additionally, it stores the ID of the last comment in the user session (hint: we'll use this later!).
<?php

namespace App\Http\Controllers;

use App\Models\Comment;
use Illuminate\Http\Request;

class StreamPageController extends Controller
{
    public function __invoke(Request $request)
    {
        $comments = Comment::with('user')->latest()->get();

        if ($comments->isNotEmpty()) {
            session(['last_comment_read' => $comments->first()->id]);
        }

        return view('stream', ['comments' => $comments]));
    }
}
Now, let's create the stream template. Essentially, it consists of a flex container with two columns:
<x-app-layout>
    <div class="bg-white flex flex-col gap-6 p-6 lg:flex-row">
        <div class="lg:w-2/3">
            <!-- First column -->
        </div>
        <div class="lg:w-1/3">
            <!-- Second column -->
        </div>
    </div>
</x-app-layout>
The first column will contain the player. For simplicity, instead of a live video feed, let's use the YouTube embed of an episode of the Laravel Podcast.
Subscribe, by the way!
<iframe class="w-full aspect-video" src="https://www.youtube.com/embed/gerh8ywmuyM?si=aGPlpJgk0HSm4IDJ" title="YouTube video player" frameborder="0" allow="accelerometer; autoplay; clipboard-write; encrypted-media; gyroscope; picture-in-picture; web-share" referrerpolicy="strict-origin-when-cross-origin" allowfullscreen></iframe>
The second column will include the form to post a comment and the list of comments below it.
<form
    method="post"
    action="{{ route('comments.store') }}">
    @csrf
    <input
        name="text"
        required
        autofocus
        class="w-full"
        placeholder="Type your comment and press Enter" />
</form>

<div id="comments" class="mt-2 flex flex-col gap-2">
    @foreach ($comments as $comment)
        <div>
            <strong>{{ $comment->user->name }}</strong>
            {{ $comment->text }}
        </div>
    @endforeach
</div>
Alright! The stream page is done. To complete the setup, let's link it in the top navigation bar.
Open resources/views/layouts/navigation.blade.php and insert a link to /stream immediately after the Dashboard link. Save the file, then open the application in the browser and click on the added link. You should now see the following:
We've made significant progress!
- Users can register (or log in if they already have an account).
- They can navigate to the stream page and start watching the video.
- And they can submit comments.
Now we need to focus on these issues:
- First, when a comment is submitted, the video stops playing. The form submission triggers a full-page refresh, disrupting the video playback.
- Second, new comments don't appear in real-time. To view new comments, users must manually refresh the page, which interrupts the video playback.
- Last but not least, we're currently fetching the entire list of comments from the database and rendering them all. This approach can significantly increase the payload size, especially if there are numerous comments.
Let's explore how we can use HTMX to address all these points and transform our application into a real-time experience without writing a single line of JavaScript.
4. Install HTMX and boost links and forms with hx-boost
Installing HTMX is super simple. We can add the script tag to the head of our layout:
<script src="https://unpkg.com/htmx.org@1.9.11"></script>
Then, let's start by adding hx-boost to the body:
<body hx-boost="true">
This feature "boosts" all links and forms, meaning:
- When a link is clicked, rather than navigating to the linked page, HTMX will perform a background
GETAJAX request. Upon receiving a successful response, it will replace the current page's body contents with the body contents of the HTML returned by the server and create a history entry. - Likewise, when a form is submitted, instead of reloading the page, HTMX will trigger an AJAX request with the form method and again replace the content of the body with the response's body. If the server returns a redirect, HTMX will follow it and obtain the HTML of the end destination.
This is great! You can navigate through the different sections of the application and even update your profile without a single full-page reload.
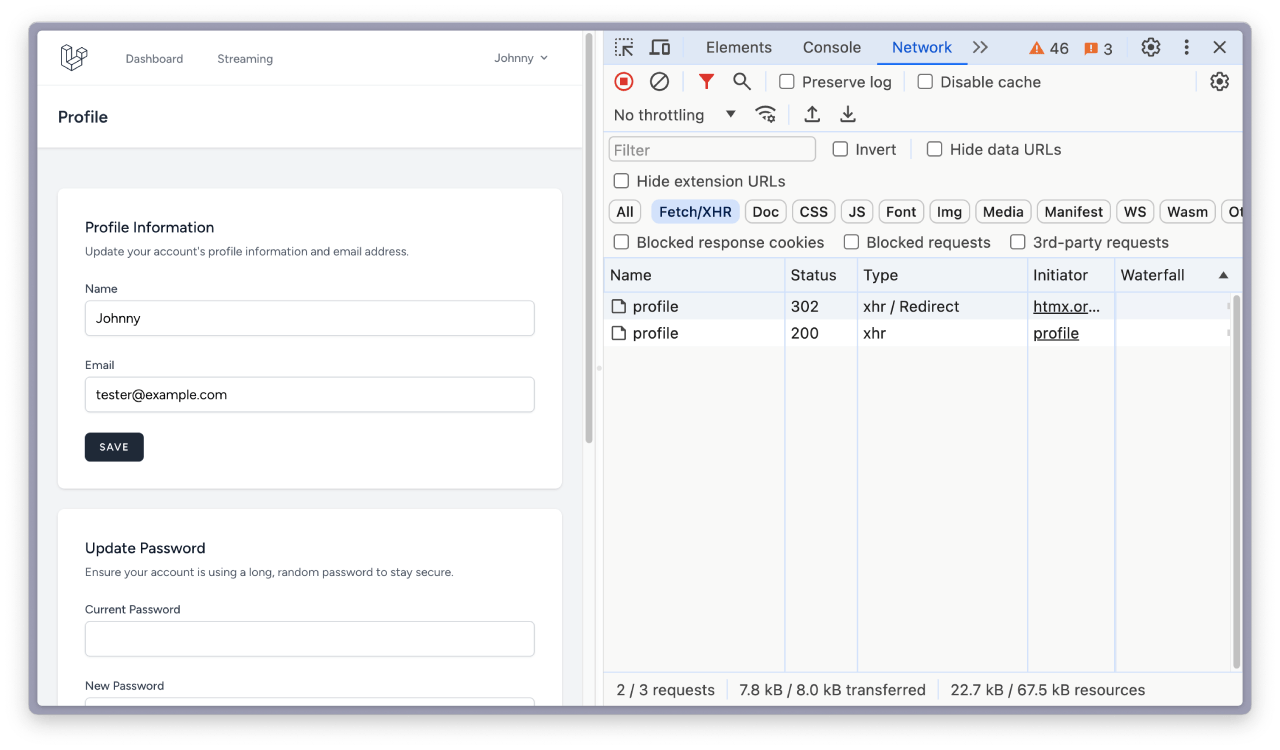
But we're not quite finished yet. Notice that on the stream page, the video still reloads when we submit a comment because we're swapping the entire body content, including the video player. Additionally, the backend still renders the whole page, including all the comments, every time we submit one.
It would be ideal if we could keep the video playing and re-render only the necessary content. Let's do that in the following steps.
5. Manage comment posting with hx-post
When using hx-boost, all forms in the page are submitted using AJAX, but we can't control the fine details, like the target and the swap strategy.
To do so, we can add the hx-post attribute to our form that submits comments. The value of the attribute should be the endpoint we want to hit, in this case, /comments. So the form should look like this:
<form
    method="post"
    action="{{ route('comments.store') }}"
    hx-post="{{ route('comments.store') }}">
    @csrf
    <input
        name="text"
        required
        autofocus
        class="w-full"
        placeholder="Type your comment and press Enter" />
</form>
No need to define hx-target or hx-swap, because the default target is the element itself and the default swap strategy is innerHTML. This means that, by default, HTMX will replace the inner content of the element that fired the event with whatever HTML is returned by the server. In this case, what needs to be returned is the form, with a new CSRF token and a clear text input:
<form
    method="post"
    action="http://demo-htmx-laravel.test/comments"
    hx-post="http://demo-htmx-laravel.test/comments">
    <input type="hidden" name="_token" value="..." autocomplete="off">
    <input
        name="text"
        type="text"
        required
        autofocus
        class="w-full"
        value=""
        placeholder="Type your comment and press Enter" />
</form>
Let's adapt the store method of our CommentController controller to return just that.
We can verify if the request was made via HTMX by checking for the presence of the hx-request header. If it exists, we return HTML; otherwise, we perform the classic redirect.
$validated = $request->validate(['text' => 'string|required']);
$request->user()->comments()->create($validator->validated());

if ($request->hasHeader('hx-request')) { // [tl! highlight:2]
    return view('stream');
}

return back();
But, wait... we don't want to return the entire stream view, just a fragment of it. Otherwise, we'd end up embedding the entire page within the form. Your first thought might be to extract the form into a partial:
if ($request->hasHeader('hx-request')) {
    return view('partials.comment-form'); // [tl! highlight]
}
And that totally works, but Laravel has a trick to make it even easier: fragments.
We can keep the form in the current stream.blade.php template and just wrap it between the @fragment and @endfragment directives, like this:
@fragment('comment-form') @
    <form
        method="post"
        action="{{ route('comments.store') }}"
        hx-post="{{ route('comments.store') }}">
        @csrf
        <input
            name="text"
            required
            autofocus
            class="w-full"
            placeholder="Type your comment and press Enter" />
    </form>
@endfragment @
As you can see, we've delimited a fragment and assigned it a name. Now, we can return the view and chain the fragment method, passing the fragment name as a parameter. This ensures that the response contains only that portion of HTML.
if ($request->hasHeader('hx-request')) {
    return view('stream')->fragment('comment-form'); // [tl! highlight]
}
When you render a fragment of a view, you still need to pass all the variables that the view needs, even those used outside the fragments you want to render. That's why we need to check if the $comments variable is set, because otherwise, we would get the error Undefined variable $comments.
@if (isset($comments)) @
    @foreach ($comments as $comment)
        <div>
            <strong>{{ $comment->user->name }}</strong>
            {{ $comment->text }}
        </div>
    @endforeach
@endif @
If we did everything right, when submitting the form and saving the comment, the form should be swapped by that bit of HTML. Effectively, we are clearing out the form, HTMX-style.
Now, this only swaps the form. The list of comments remains unaltered. That's the last piece of the puzzle: adding new comments to the list.
6. Show new comments
There are many ways to accomplish this step, but today we'll explore one of the simplest methods:
- We will tell HTMX to fire a request to the server every second.
- If there are new comments, the server will render them and return that piece of HTML (not the full list, but only those new comments).
- HTMX will insert that HTML to the top of the list.
This strategy is known as polling, and although it may not be ideal in many scenarios because it involves constantly sending requests to the server, it will help us learn more about HTMX. If you would like to see how you can replace it for websockets, stay tuned for the next (optional) step.
Let's start by telling HTMX to make the request every second. In the #comments container we should add the attribute hx-get with the value of the endpoint we want to hit. In this case, a new comments.index route that we'll soon create.
hx-get="{{ route('comments.index') }}"
Then, add the attribute hx-trigger, with the value every 1s. This is one of the special triggers HTMX offers, apart from the standard DOM events like click, change and submit. We can adjust the frequence to any number of seconds we consider appropiate for our app.
hx-trigger="every 1s"
Now let's use the hx-swap attribute to tell HTMX how we want to handle the incoming HTML. We've already seen a few common swap strategies, like innerHTML (to replace the content of an element) and outerHTML (to replace the whole element).
Here we'll use another one: afterbegin, which injects the HTML after the opening tag of the target element. In other words, we are instructing HTMX to place the new comments right at the top of the list.
hx-swap="afterbegin"
This means that the server should return only the new comments rows, like this:
<div><strong>Nico</strong> Hello world!</div>
<div><strong>John</strong> How are you?</div>
To do so, let's create a new fragment in our template, wrapping the loop of comments. To be original, let's call it comments. The final updated template code should look like this:
<div
    id="comments"
    hx-get="{{ route('comments.index') }}" @
    hx-trigger="every 1s"
    hx-swap="afterbegin"
    class="mt-2 flex flex-col gap-2">
    @fragment('comments') @
        @if (isset($comments))
            @foreach ($comments as $comment)
                <div>
                    <strong>{{ $comment->user->name }}</strong>
                    {{ $comment->text }}
                </div>
            @endforeach
        @endif
    @endfragment @
</div>
Now let's create the endpoint. We can add the index method to the resouce route:
Route::resource('comments', CommentController::class)->only(['store', 'index']);
... and define it in the controller:
public function index()
{
    $comments = Comment::with('user')
        ->where('id', '>', session('last_comment_read', 0))
        ->latest()
        ->get();

    if ($comments->isEmpty()) {
        return response()->noContent();
    }

    session(['last_comment_read' => $comments->first()->id]);
    return view('stream', ['comments' => $comments]))->fragment('comments');
}
Alright, let's break down this code snippet:
We start off by retrieving comments from the database. Remember that in a previous step, when we created the
StreamPageController, we saved the ID of the last retrieved comment in the session aslast_comment_read? Well, we've come full circle. We will now read that session key to retrieve all the messages with an ID greater than that value, because we're only interested in fetching comments that have been created after the last comment the user has seen.If the query result is empty, we respond with a
204 No Contentstatus code. This indicates HTMX that there's nothing new to display.If there are, we update the
last_comment_readsession variable to store the ID of the latest comment fetched.Finally, we return the
streamview, passing the retrieved comments to it and chaining thefragment()method to specify that only thecommentsfragment should be sent back in the response.
And we are done! Every second, new comments will be displayed in the list.
We accomplished all our goals:
- Video continues playing after posting a comment.
- The new comments appear on the list as they are created.
- The payload is small because the server returns only the new comments.
And given that when taking this approach everything still works without JavaScript, you get two great aditional benefits:
- SEO: The website content is readable by search engine bots.
- Testing: You can test your views without a JavaScript testing framework like Vitest.
You can access to the complete codebase on GitHub.
Optional: Replace polling with websockets
This is an optional, additional step. As we mentioned, polling is easy to implement, but for a more performant solution, we can use websockets. Spoiler alert, this implies writing JavaScript, but just a tiny bit (we promise!)
Let's create a simple CommentSent event:
<?php

namespace App\Events;

use Illuminate\Broadcasting\InteractsWithSockets;
use Illuminate\Broadcasting\PrivateChannel;
use Illuminate\Contracts\Broadcasting\ShouldBroadcastNow;
use Illuminate\Foundation\Events\Dispatchable;
use Illuminate\Queue\SerializesModels;

class CommentSent implements ShouldBroadcastNow
{
    use Dispatchable, InteractsWithSockets, SerializesModels;

    /**
     * Create a new event instance.
     */
    public function __construct()
    {
        //
    }

    /**
     * Get the channels the event should broadcast on.
     *
     * @return array<int, \Illuminate\Broadcasting\Channel>
     */
    public function broadcastOn(): array
    {
        return [
            new PrivateChannel('comments'),
        ];
    }
}
When a new comment is posted, we emit that event:
$request->user()->comments()->create($validator->validated());
event(new CommentSent); // [tl! highlight]
Assumming we have configured broadcasting and installed Laravel Echo in our frontend, we can listen for the event and define a callback:
window.Echo.private('comments').listen('CommentSent', () => {
    htmx.trigger('#comments', 'loadComments');
});
As you can see, we are using htmx in JavaScript. Although the philosophy of HTMX is to express behavior via HTML attributes, it provides this handy JavaScript object, which includes methods to fire events programmatically and more.
In this case, we use the htmx.trigger method to emit a custom event named loadComments, which the #comments can listen for. Now, we need to update it so that the request is made not every second but only when triggered by that custom event.
<div
    id="comments"
    hx-get="{{ route('comments.index') }}"
    hx-trigger="every 1s" @
    hx-trigger="loadComments" @
    hx-swap="afterbegin"
    class="mt-2 flex flex-col gap-2">
Done! Now, instead of polling every second, we'll only send the request to retrieve new comments when we receive the event from the websocket.
It's worth mentioning that HTMX offers an extension to support websockets, enabling the updating of the page with HTML fragments received through an open connection. That's a bit more advanced and beyond the scope of this article, but feel free to check it out.
Conclusion
Can you create rich, interactive experiences without relying on a big JavaScript framework like React, Vue, or Svelte? These days, more and more people are leaning towards "yes". Turbo Laravel and Laravel Livewire are fantastic tools to do so.
And HTMX is a magnificent addition to that list, with the bonus of working with any backend framework that can return HTML. Maybe that is why HTMX was the 2nd Front-end Framework rising star of the year in 2023, just behind React!
We invite you to check out the HTMX docs and their Hypermedia book to learn more.
And if you enjoy building HTMX applications in Laravel, explore the Laravel-HTMX package, which comes with many goodies for advanced usage.
Until next time!
in your inbox:
let’s talk.
Thank you!
We appreciate your interest.
We will get right back to you.