State management in Vue 3: Why you should try out Pinia


They say there are two difficult things in programming: naming things and cache invalidation. I would add one more to the list: state management in modern web applications!
Today, we'll delve into state management strategies in Vue and introduce Pinia, the intuitive store.
Vue state management: gotchas and limitations
Since the days of Vue 2, we have used the data option to define a method that returns an object containing all the reactive variables our component needs.
<template>
  <div>{{ user.name }}</div>
<template>

<script>
export default {
  data () {
    return { user: { name: 'John', age: 25 } }
  }
}
</script>
This component definition, known as the Options API, is still supported in Vue 3, which also introduced the Composition API. This new API offers methods such as reactive and ref to define reactive data. By leveraging the Composition API and script setup we can rewrite the script portion of our single-file component like this:
<script setup>
import { reactive } from 'vue'
const user = reactive({ name: 'John', age: 25 })
</script>
Now, what if we need to access the user data from multiple components? For example, displaying the user name in the navbar, their details on the profile page, their address during checkout, and so on.
Typically, a parent component can pass down this data to its children as props. However, when the child component requiring the data is nested three or four layers deep, you may find yourself adding that prop to every component in the hierarchy whether they directly use the data or not. This practice, known as prop drilling, is generally discouraged as it can compromise the maintainability of the code.
Things get even more complex when you have to update a shared piece of data from multiple places. A child component cannot directly modify a prop. Instead, it must emit a custom event to notify about the change. The parent component can then listen to that custom event and update its data, which in turn travels down the prop chain. Yeah, it could be better.
Fortunately, Vue 3 offers a straightforward solution to this challenge: thanks to the Composition API, we are no longer restricted to using Vue's reactivity methods within the confines of Vue components. Now, we can use ref and reactive in any script and export these reactive variables to use them throughout our application.
We can refer to these modules of reactive state as stores. For instance, we can create a store/user.js store:
import { reactive } from 'vue'
const user = reactive({ name: 'John', age: 25 })
export { user }
... and then import it into a Profile component:
<script setup>
import { user } from './stores/user.js'
</script>

<template>
  <h1>Hello, {{ user.name }}! Remember, you are {{ user.age }} years old.</h1>
</template>
... or a HappyBirthday component:
<script setup>
import { user } from './stores/user.js'
const blowCandles = () => user.age++
</script>

<template>
  <button @click="blowCandles">
    I am {{ user.name }} and it's my birthday!
  </button>
</template>
... or any other location where we need to reference the user.
Great, right? Now, we have a reactive single source of truth for our data, not limited to a specific component.
As you can see, any component can also alter that data and the changes will instantly reflect on all the components reading it. So, if John blows out the candles, his Profile will read, 'Hello, John! Remember, you are 26 years old.'
Having a globally mutable state that any component can update is handy but might make things tricky to maintain. To keep things organized and clear, it's a good idea to define state-mutating logic on the store itself:
import { reactive } from 'vue'
const user = reactive({ name: 'John', age: 25 })
const blowCandles = () => user.age++
export { user, blowCandles }
... and use it like this:
<script setup>
import { user, blowCandles } from './stores/user.js'
</script>

<template>
  <button @click="blowCandles">
    I am {{ user.name }} and it's my birthday!
  </button>
</template>
It functions just like before, but the code is now more organized.
You can have small stores (picture a store to manage a short list of user preferences) or more intricate ones, handling substantial amounts of data with various methods for reading and updating it (such as a store to manage products on an e-commerce site).
This simple state management pattern is convenient, but:
It doesn't work for Server-Side Rendered applications. The shared state exists in a JavaScript module root scope, so only one instance of the reactive object is created throughout the app's lifecycle. That's fine for Single Page Applications, where modules initialize fresh for each visit, but not for SSR, where modules initialize only once, when the server starts. This could potentially lead to data leaks and security issues. Imagine a user visiting your app... and getting the data of another user. While you can configure your SSR app to support these basic stores, the process can be cumbersome.
Even if your app doesn't use Server-Side Rendering, you might need a stronger solution as it grows. For instance, picture needing to add a method to all your stores, keep their state synced with Local Storage, or stream each change through Websockets. Creating a base store that all others extend from is possible, but it can get complex really fast.
To solve these issues and get a rich, developer-friendly experience, we can use Pinia, the official state management solution for Vue 3. Let's take a closer look!
Pinia, the store solution for modern Vue applications
Pinia not only provides out-of-the-box support for SSR but also comes with a range of other goodies, including Vue Devtools integration, Hot-module replacement, TypeScript support, and easy-to-install plugins that can handle the features we mentioned, like sync with LocalStorage.
Created by Eduardo, the developer behind Vue Router, it replaced Vuex as the official recommended state management solution for Vue 3.
Install and setup
To install Pinia in your project, you can run:
npm install pinia
Then create a Pinia instance and pass it to your Vue app:
import { createApp } from 'vue'
import { createPinia } from 'pinia'
import App from './App.vue'

const pinia = createPinia()
const app = createApp(App)

app.use(pinia)
app.mount('#app')
And it's done! You are now ready to create and use stores.
Creating stores
You can create a Pinia store with the defineStore method. The first argument is the store's name (must be unique), and the second is an options object. Let's rewrite our stores/user.js store in Pinia and, while we are at it, add a computed property to know whether the user has the right age to vote.
import { defineStore } from 'pinia'

export const useUserStore = defineStore('user', {
  state: () => ({ name: 'John', age: 25 }),
  getters: {
    canVote: (state) => state.age >= 18,
  },
  actions: {
    blowCandles () {
      this.age++
    }
  }
})
As you can see, a Pinia store has:
state, the reactive datagetters, computed properties based on that dataactions, methods to interact with that data
This initial glimpse at a Pinia store may bring to mind a Vue 2 component or a Vue 3 component using the Options API. This type of definition is called Option Stores.
If you prefer the Composition API, you'll be happy to know that Pinia offers the ability to define your store like a setup function. In Setup Stores, you can pass a function as the second argument and use ref, computed, and methods to define state, getters, and actions, respectively. The function must return an object with the variables you want to expose.
import { defineStore } from 'pinia'
import { ref, computed } from 'vue'

export const useUserStore = defineStore('user', () => {
  const name = ref('John')
  const age = ref(25)
  const canVote = computed(() => age.value >= 18)
  const blowCandles = () => age.value++

  return { name, age, canVote, blowCandles }
}
Using Setup Stores has some advantages, like the ability to define watchers in the store itself, use other composables and inject provided properties in our setup function.
Using stores
Now that we have defined our Pinia store, we can easily import it to our components or composables. Let's update our example:
<script setup>
import useUserStore from './stores/user.js'

const user = useUserStore()
</script>

<template>
  <button @click="user.blowCandles">
    I am {{ user.name }} and it's my birthday!
  </button>
</template>
Accessing the state and actions of the store through the user object is super handy. However, if you want to destructure it to tidy up your code, there's a trick to remember. When destructuring reactive properties (those created with ref, reactive, or computed) you'll need to use the storeToRefs helper to ensure they maintain their reactivity. For example:
<script setup>
import { storeToRefs } from 'pinia'
import useUserStore from './stores/user.js'

const user = useUserStore()

// You need storeToRefs when destructuring
// properties created with `ref` or `computed`
const { name, age, canVote } = storeToRefs(user)

// But you don't need it when destructuring methods
const { blowCandles } = user
</script>
A real-world example
Now, unless all your visitors are 25-year-old folks named John, you won't initialize your store with those default values. Let's address that and take the opportunity to showcase a store closer to what you might find in a real-world application:
// Let's use Ofetch to make AJAX requests
// (https://npmjs.com/package/ofetch)
import { ofetch } from 'ofetch'
import { defineStore } from 'pinia'

export const useUserStore = defineStore('user', () => {
  const data = ref()
  const token = ref()

  const isLoggedIn = computed(() => Boolean(token.value))

  async function login ({ email, password }) {
    const payload = await ofetch('https://example.com/login', {
      method: 'POST',
      body: { email, password }
    })

    data.value = payload.data
    token.value = payload.token
  }

  async function logout () {
    await ofetch('https://example.com/logout', {
      method: 'POST',
      headers: { Authorization: `Bearer ${token.value}` }
    })

    data.value = null
    token.value = null
  }

  return { data, token, isLoggedIn, login, logout }
})
As seen in this example, the store is an excellent place to encapsulate the logic of a segment of your application. Here, the login action makes a request to an API, saving the user data and token in the store state. The logout action interacts with the corresponding endpoint, clearing out the state. We return these two methods along with the state, data and token, and the isLoggedIn getter.
Then, we can use the store in a component as follows:
<script setup>
import useUserStore from './stores/user.js'
const user = useUserStore()

const form = reactive({ email: null, password: null })
const error = ref(null)

async function handleSubmit() {
  try {
    await user.login(form)
  } catch {
    error.value = true
  }
}
</script>

<template>
  <div v-if="user.isLoggedIn">
    Welcome back, {{ user.data.name }}!
    <button @click="user.logout">Logout</button>
  </div>

  <form v-else @submit.prevent="handleSubmit">
    <input type="email" v-model="form.email">
    <input type="password" v-model="form.password">
    <span v-if="error">Error, please try again</span>
    <button>Login</button>
  </form>
</template>
This looks great! However, it's still a simple example. We can use Pinia not only to manage the user session but also to track the data they need access to, such as notifications, to-dos, products, and so on. Once the data is requested from the API, retaining it in the store while the user navigates through the app leads to fewer subsequent requests to the server, resulting in much faster applications.
import { ofetch } from 'ofetch'
import { defineStore } from 'pinia'
import { ref } from 'vue'

export const usePostsStore = defineStore('posts', () => {
  let loaded = false
  const endpoint = 'https://jsonplaceholder.typicode.com/posts'
  const list = ref([])

  async function get (params = {}) {
    if (loaded && !params.forceReload) return
    list.value = await ofetch(endpoint)
    loaded = true
  }

  async function add (body) {
    list.value.push(await ofetch(endpoint, { method: 'POST', body }))
  }

  async function remove (id) {
    await ofetch(`${endpoint}/${id}`, { method: 'DELETE' })
    const index = list.value.findIndex(post => post.id === id)
    if (index >= 0) list.value.splice(index, 1)
  }

  return { list, get, add, remove }
})
Pinia works on Vue 2
We began this article by discussing Vue 2, and now we've come full circle: Pinia is fully compatible with Vue 2. So, if you have a Vue 2 application using Vuex for store management, migrating those stores to Pinia could be the initial step in your upgrade to Vue 3.
Upgrading from Vue 2 to Vue 3 is a complex task, though, so if you feel you need assistance, don't hesitate to get in touch with us 😉
One more thing: Pinia Vue Devtools plugin
If you have the Vue Devtools extension installed in your browser (which is highly recommended for Vue app development) and you're using Pinia, you'll notice a new tab where you can explore your stores:
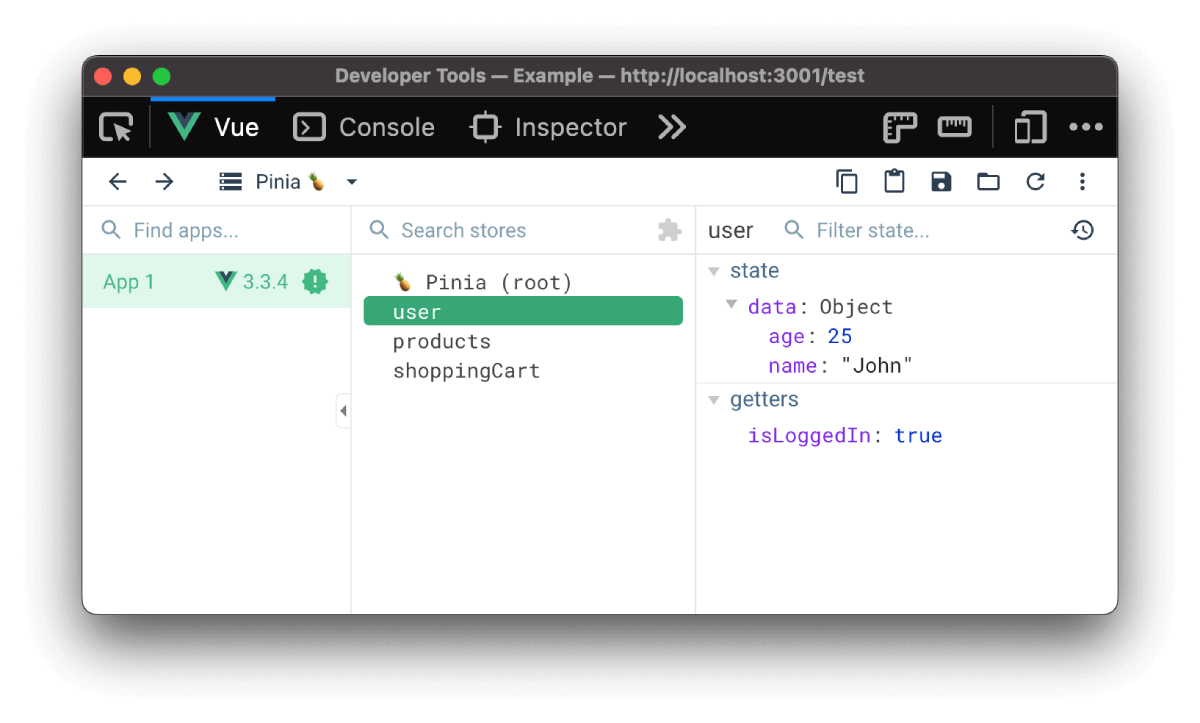
This plugin allows you to explore your stores, inspect the state and values of getters, serialize the state to save it as JSON or copy it to your clipboard... and even import state from a JSON file!
In closing
Developing an effective state management strategy in Vue applications might seem daunting at first, but it becomes much easier once you understand these core concepts.
Pinia offers an excellent solution to help keep your data well-organized and accessible from anywhere in your application. The developer experience is top-notch, and integrating it into your project is very straightforward. If you want to try it, head to the official website to discover more. Until next time!
in your inbox:
let’s talk.
Thank you!
We appreciate your interest.
We will get right back to you.